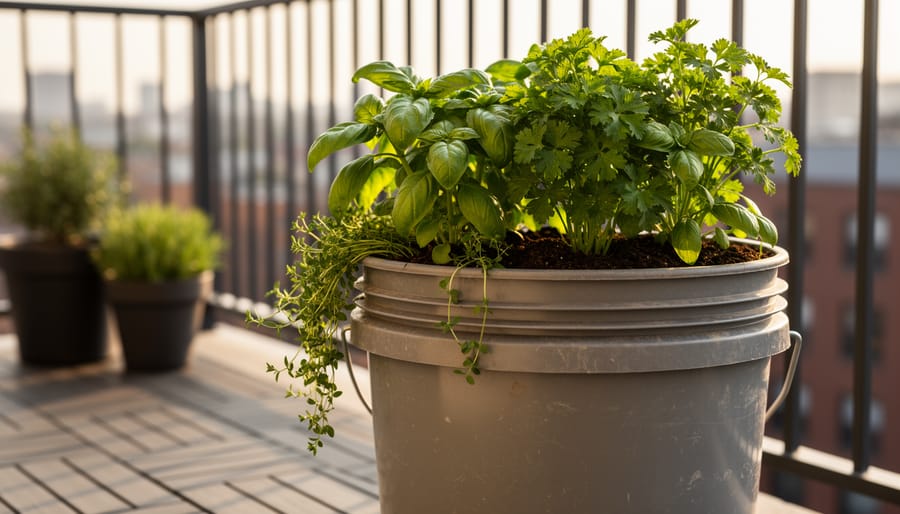
Growing fresh herbs in a 5-gallon bucket takes about 30 minutes to set up, costs less than $15 in materials, and delivers a thriving culinary garden that fits on a patio, balcony, or doorstep. This method works because the bucket’s depth accommodates most herb root systems while its portability lets you chase sunlight or move plants indoors during harsh weather. You’ll need just one bucket, potting mix, drainage materials, and herb seedlings to start harvesting basil, parsley, cilantro, and other kitchen essentials within weeks.
What makes bucket gardening particularly smart in 2026 is how it solves the space crunch facing so many home cooks who want garden-fresh flavor without dedicated garden beds. I spoke with Maria Chen, a container gardening specialist who’s taught hundreds of apartment dwellers to grow their own herbs, and she emphasized that buckets actually outperform some traditional containers. “The volume gives roots room to establish, and the handle makes repositioning effortless when you need to adjust for seasonal sun angles,” she explained during our conversation last spring.
The beauty of this approach is its flexibility. Plant a single large herb like rosemary, combine three compatible herbs in one bucket, or line up multiple buckets to create a full herb station. Beginners appreciate the contained environment that makes watering and care straightforward, while experienced gardeners value the control over soil quality and drainage. Whether you’re working with a sunny apartment balcony or a shaded backyard corner, bucket gardens adapt to your exact conditions and let you experiment without committing to permanent plantings.
Why Choose 5 Gallon Buckets for Your Culinary Herbs
Five gallon buckets solve nearly every common challenge gardeners face when growing herbs, making them surprisingly superior to traditional containers or ground planting in many situations. If you’ve struggled with expensive specialty planters, immovable in-ground beds, or herbs that outgrew their pots, buckets offer practical solutions you’ll appreciate from the first planting.
The humble bucket brings several distinct advantages to your culinary herb garden:
- Perfect 12-inch depth accommodates herb root systems without restricting growth or causing pot-bound conditions
- Built-in handles let you chase sunlight throughout the day or seasons, moving basil to morning sun and oregano to afternoon heat
- Total cost of $3-5 per bucket versus $15-40 for decorative containers of similar size
- Complete drainage control through custom hole placement eliminates the guessing game of pre-drilled pots
- Stackable design means you can store a dozen buckets in two square feet of garage space during winter
Beyond these basics, buckets excel at drainage management in ways standard pots can’t match. You control exactly where water exits by drilling your own hole pattern, and the straight sides prevent the water-trapping that happens in tapered planters. Herbs like rosemary and thyme, which despise wet feet, thrive because excess moisture escapes immediately.
Mobility matters more than most gardeners realize until they need it. When unexpected frost threatens your basil in September, you’ll grab those handles and bring buckets indoors for the night. Renters appreciate moving an entire herb garden in one afternoon without losing a season’s growth. Even homeowners benefit from repositioning buckets to follow seasonal sun shifts or make space for outdoor entertaining.
This approach fits seamlessly into sound culinary herb garden design by giving you modular building blocks. Start with three buckets of cooking essentials, then expand your collection as your confidence and recipe needs grow, creating a customizable garden that adapts rather than commits you to permanent beds.
Best Herbs for 5 Gallon Bucket Gardens
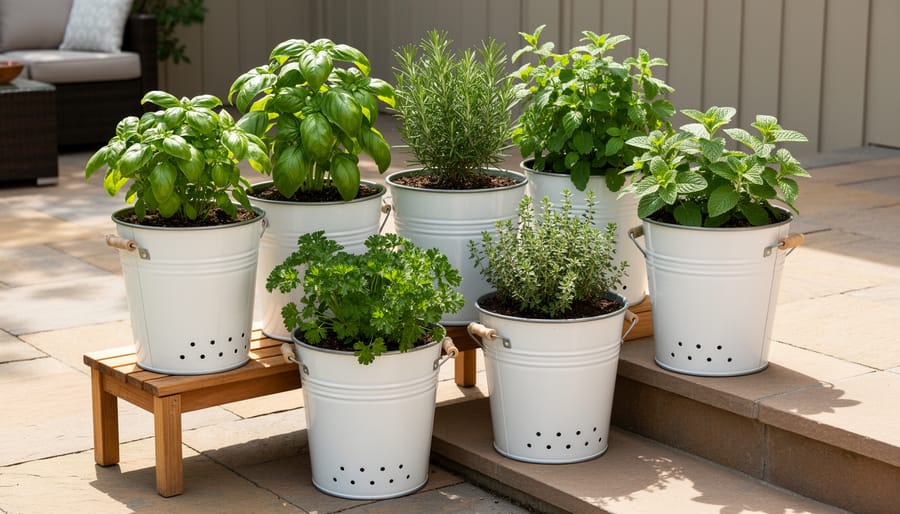
Not all herbs take equally well to bucket life, but culinary favorites thrive when you match them to the right container conditions. Most common cooking herbs adapt beautifully to 5 gallon buckets, giving you flexibility to design a productive kitchen garden in whatever space you have.
Large, Bushy Herbs (One Per Bucket)
Basil grows exceptionally well in buckets, reaching 18-24 inches tall with proper pinching. A single sweet basil plant fills a 5 gallon bucket and produces enough leaves for weekly pesto making throughout summer. Rosemary and sage also prefer solo planting since mature specimens develop extensive root systems and woody stems that need the full bucket volume. These Mediterranean herbs tolerate drier soil between waterings, making bucket culture ideal for controlling moisture levels.
Compact Herbs (Multiple Per Bucket)
Parsley, cilantro, thyme, and oregano work well when you plant two or three together in one bucket, creating herb combinations for specific cuisines. Try planting parsley with thyme for French cooking, or cilantro with oregano for Mexican dishes. These herbs stay relatively compact, with mature heights under 12 inches, so they won’t compete aggressively for root space. Chives fit this category too, forming tight clumps that leave room for a second herb.
Aggressive Spreaders (Containment Stars)
Mint deserves special mention as the herb that buckets tame best. In garden beds, mint spreads through underground runners and becomes invasive within a season. A 5 gallon bucket confines those wandering roots completely while still allowing robust growth for mojitos, teas, and cooking. Plant one mint variety per bucket and you’ll harvest abundantly without the takeover. Consider growing mint alongside herbs for a medicinal tea garden if you’re expanding beyond culinary uses.
Match your herb selections to how you actually cook, and you’ll harvest exactly what you need steps from your kitchen.
Tools and Materials You’ll Need
Gathering everything before you begin ensures a smooth building process and prevents mid-project trips to the store. Most materials are inexpensive and readily available at hardware stores, garden centers, or even repurposed from items you already own.
Essential Materials
- Five gallon buckets, food-grade plastic preferred to avoid chemical leaching; check restaurant bakeries or delis for free or cheap used buckets
- Electric drill with 1/4 to 1/2 inch drill bits, any standard drill works; a cordless model offers easier maneuverability
- Potting mix, purchase bags labeled for containers, not garden soil, which compacts and drains poorly; expect to use about 0.7 cubic feet per bucket
- Drainage material, pea gravel, river stones, broken terracotta pieces, or lava rock for the bottom layer; one small bag covers multiple buckets
- Herb plants or seeds, starter plants from nurseries give faster results; seeds cost less but require patience
Optional Upgrades
- Bucket saucers or trays, catch drainage water to protect surfaces, especially on decks or patios; inexpensive plastic plant saucers work well
- Plant labels or markers, helpful for tracking varieties, particularly if growing similar-looking herbs
- Outdoor paint or stain, non-toxic exterior paint transforms plain buckets into decorative planters that enhance your garden’s appearance
- Watering can with narrow spout, gives better control than a hose for container watering
Budget-conscious gardeners can start with just the essentials and add upgrades later. Many people already own a drill, and buckets from food service businesses often cost just a dollar or two. The entire project typically runs under thirty dollars when sourcing materials wisely, making it one of the most affordable entry points into growing your own culinary herbs.
Safety and Preparation Tips
Before you drill your first hole, take a moment to set yourself up safely. This quick preparation ensures your project stays fun rather than frustrating.
Restaurant pickle buckets or bakery frosting containers work perfectly and are often free for the asking. Thoroughly wash any bucket with hot soapy water and rinse it completely before use.
When drilling, wear safety glasses to protect against plastic shavings, and secure the bucket so it won’t spin or shift. Work on a stable surface and let the drill do the work without forcing it. If you’re new to power tools, practice on scrap plastic first to get the feel.
Filled buckets are deceptively heavy, five gallons of wet soil weighs 40 to 50 pounds. Lift with your legs, not your back, and consider placing buckets in their final location before filling them. Choose spots on level ground where they won’t tip if bumped, and keep them away from foot traffic, pets, or anywhere they might create a tripping hazard. A stable base now prevents spilled soil and damaged herbs later.
Step-by-Step: Building Your Bucket Herb Garden
Step 1: Prepare Your Buckets
Start with buckets that are completely clean and free of any previous contents. If you’re repurposing food-grade buckets, scrub them inside and out with hot soapy water, rinse thoroughly, and let them dry in the sun for a day. This removes residues and helps eliminate odors that could affect your herbs.
Once clean, flip each bucket upside down and mark your drainage hole pattern on the bottom. Use a permanent marker to make 6-8 evenly spaced dots across the entire base, think of it like a clock face with dots at 12, 3, 6, and 9 o’clock, plus a few between. Add 2-3 marks about an inch up from the bottom edge around the sides. This pattern prevents water from pooling anywhere in the container and gives roots access to oxygen throughout the bucket.
Step 2: Drill Drainage Holes
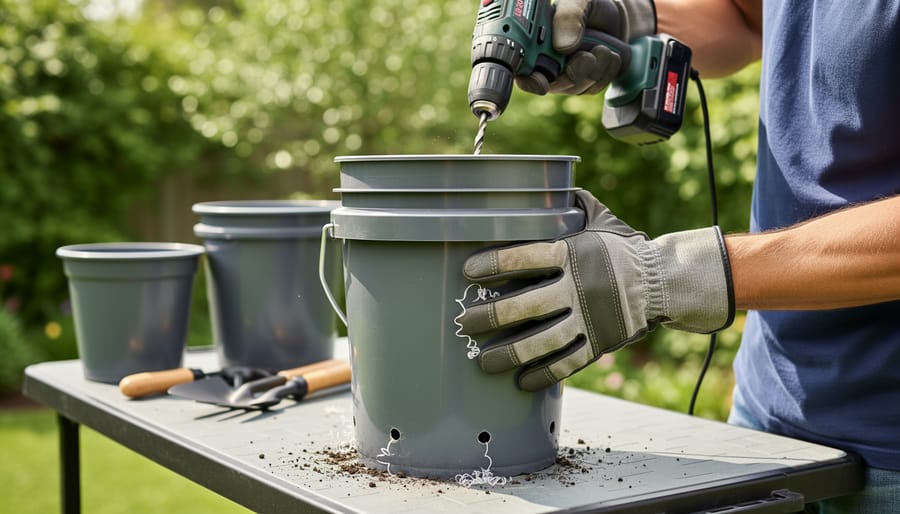
Flip your bucket upside down and use a 1/4-inch to 3/8-inch drill bit for the job. Drill 6-8 evenly spaced holes across the bottom, working slowly to prevent cracking. Space them about 2-3 inches apart in a circular pattern rather than clustering them in the center.
Add 3-4 smaller holes around the sides, about half an inch up from the bottom. These prevent water from pooling if the bottom holes get blocked by roots or soil.
Work on a stable surface and apply steady, gentle pressure. Let the drill do the work instead of forcing it. If the plastic starts to crack, you’re pushing too hard or your bit is dull. The holes should be clean and smooth edged when finished.
Step 3: Add Drainage Layer
With your drainage holes drilled, add a 1-2 inch layer of coarse material to the bucket’s bottom. Gravel, small stones, or broken pottery shards work perfectly. This layer prevents potting mix from settling and compacting over time, which can block your carefully drilled holes and trap water around roots.
Pour the material slowly to avoid cracking the bucket, then shake gently to level it. You’re not aiming for precision here, just enough coverage to keep soil from clogging the drainage system. If using broken pottery, flip pieces concave-side down so they don’t cradle water. Pea gravel or aquarium rocks are affordable options; raid your garden paths or gravel driveway if you need a free source. This simple foundation keeps roots healthy by ensuring excess water always has an escape route.
Step 4: Fill with Potting Mix
Fill each bucket with a high-quality potting mix formulated specifically for containers. Garden soil is too dense and compacts easily in buckets, suffocating roots and blocking drainage. Container potting mix stays light and fluffy, allowing air circulation and water movement that herbs need to thrive.
Pour potting mix over your drainage layer until the bucket is filled to about 2 inches below the rim. This gap prevents soil from washing over the edge when you water and gives you space to add mulch later. Gently firm the soil with your hands as you fill, but don’t pack it down hard. Pre-moisten the mix if it’s very dry by adding water and stirring before filling the buckets, which prevents it from repelling water initially and makes planting easier.
Step 5: Plant Your Herbs
Start with transplants if you’re new to gardening, they’re more forgiving than seeds and get you harvesting sooner. Gently remove each seedling from its nursery pot, teasing apart any circling roots, then dig a hole in your potting mix slightly larger than the root ball. Set the plant at the same depth it was growing before (stem-to-soil line should match) and firm the soil around it.
For bucket spacing, plant one large herb like rosemary or a sprawling basil per bucket. Smaller herbs like thyme or chives can share space, three to four plants work if you space them evenly around the perimeter, about four inches apart. This prevents crowding as they mature.
Sowing seeds directly? Follow packet depth instructions (most herb seeds need only quarter-inch coverage) and thin seedlings to proper spacing once they’ve developed two sets of true leaves. Press soil gently over seeds but don’t compact it, they need air pockets to germinate.
Step 6: Water Thoroughly
Pour water slowly and steadily over the soil surface until you see it drain from the bottom holes, this settles the potting mix around roots and eliminates air pockets. Wait a few minutes, then check beneath each bucket. Water should flow freely, not pool or drip sluggishly. If drainage seems slow, gently lift the bucket to feel its weight; soggy, heavy buckets signal compacted soil or clogged holes. Proper drainage means the top inch will dry between waterings while deeper soil stays moist. Let excess water drain completely before moving buckets to their final spot.
Step 7: Position for Success
Positioning your buckets correctly makes the difference between a struggling garden and a thriving one. Most culinary herbs need at least six hours of direct sunlight daily, so scout your space throughout the day to identify the sunniest spots. South-facing locations typically receive the most consistent light, though west-facing areas work well too.
Place your buckets where you’ll actually use them. A basil bucket tucked behind the garage might get perfect sun, but if you can’t reach it easily while cooking dinner, you won’t harvest it regularly. Keep frequently-used herbs like parsley and cilantro within a few steps of your kitchen door.
Arrange buckets with taller herbs like rosemary toward the back and shorter ones like thyme in front, creating visual depth. Group buckets in odd numbers (three or five) for a more natural look, and consider using buckets of varying heights or placing some on overturned crates. Ensure each bucket sits level to prevent tipping and water pooling, and leave enough space between them for air circulation, which helps prevent fungal issues.
How to Verify Your Garden is Thriving
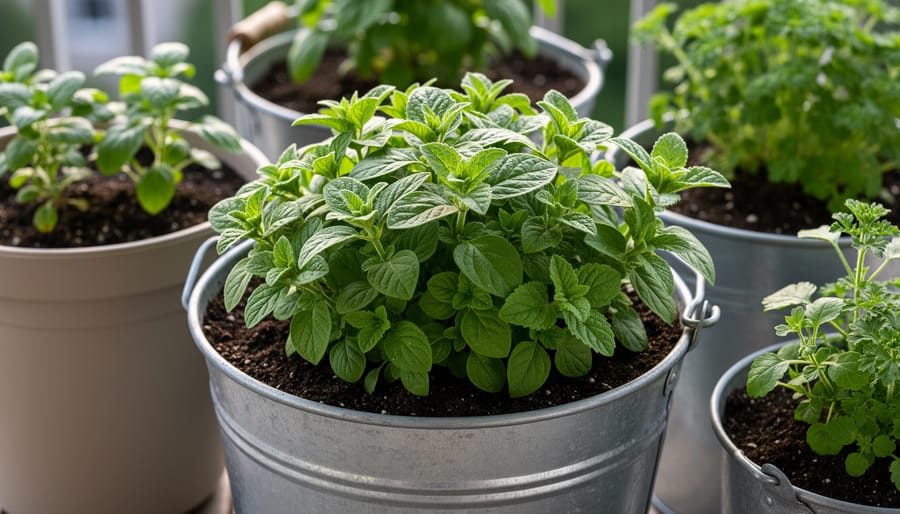
Within a week or two of setting up your bucket garden, you’ll start seeing clear signs of success. Proper drainage is your first checkpoint: water should flow freely from the bottom holes within minutes of watering, never pooling on the soil surface for more than a few seconds. If you plant your first herbs from transplants, you should notice new leaf growth or stem extensions within 10-14 days. From seed, expect visible sprouts in 7-21 days depending on the herb variety. Healthy herbs display vibrant green leaves (or silver-green for sage, blue-green for rosemary) without yellowing, browning edges, or drooping.
- Proper drainage: Water flows through in minutes, if puddling persists, add more drainage holes or check for clogged gravel layer
- New growth: Fresh leaves or shoots appear within two weeks, if stalled, check light exposure and soil moisture
- Healthy color: Leaves are vibrant and firm, yellowing suggests overwatering, pale leaves indicate insufficient light or nutrients
- No wilting: Plants stand upright between waterings, persistent drooping means either drought stress or waterlogged roots
Catching problems early makes all the difference. If leaves yellow and soil feels soggy three inches down, you’re overwatering; let the bucket dry out more between sessions. Wilting despite moist soil often signals root rot from poor drainage, requiring immediate repotting with fresh mix and more holes. Pale, leggy growth means your buckets need a sunnier spot, while crispy leaf edges in hot weather tell you to water more frequently or move buckets to afternoon shade.
Next Steps: Caring for Your Bucket Herb Garden
Watering and Feeding Schedule
Containers dry out significantly faster than garden beds, so check your buckets daily during warm weather. Push your finger two inches into the soil, if it feels dry at that depth, water thoroughly until you see drainage from the bottom holes. In hot summer conditions, you’ll likely water every day or every other day; in cooler weather, every two to three days may suffice.
Bucket-grown herbs deplete nutrients quickly since they can’t draw from surrounding soil. Start feeding three weeks after transplanting with a balanced liquid fertilizer diluted to half the recommended strength. Apply this every three to four weeks throughout the growing season. Water-soluble fish emulsion or seaweed-based fertilizers work especially well for culinary herbs, encouraging flavorful leaf growth without excessive fertilizer salts that can build up in containers and damage roots over time.
Harvesting for Maximum Yield
Start harvesting most herbs once they reach 6-8 inches tall, typically three to four weeks after planting transplants. Cut stems just above a leaf node using clean, sharp scissors, this triggers the plant to branch at that point, creating two new stems instead of one.
Take no more than one-third of the plant at any harvest. For basil, pinch off the top two to four inches of each stem every week during peak growing season. Leafy herbs like parsley and cilantro can handle having outer stems cut to the base, which encourages new growth from the center.
Harvest in the morning after dew dries but before the sun gets intense, that’s when essential oils are most concentrated. Remove flower buds as they appear on basil, oregano, and thyme to keep plants focused on leaf production rather than seed development.
Seasonal Adjustments
One huge advantage of bucket gardens is mobility, you can chase sunlight as seasons shift. In spring and fall, slide buckets to sunnier spots when shadows lengthen. Before your area’s first frost date, bring heat-loving herbs like basil indoors near a south-facing window. Cold-hardy herbs such as thyme, oregano, and parsley can stay outside with mulch protecting their roots, though moving them against a sheltered wall prevents harsh wind damage. If you overwinter tender herbs indoors, reduce watering frequency since indoor growth slows considerably.
Expert Insights: Making Bucket Gardens Beautiful and Productive
I reached out to Mel Bartholomew, Jr., a container gardening specialist and urban agriculture consultant, to get his take on elevating bucket herb gardens beyond mere function. “Most people line up their buckets in a straight row and call it done,” he told me. “But you can create something genuinely beautiful by playing with height and clustering.” He recommends placing buckets on overturned crates or concrete blocks to create tiers, mixing tall herbs like rosemary in back with trailing varieties like thyme cascading over front edges.
For maximizing yield in limited space, Bartholomew swears by successive planting. “Don’t wait until your basil dies back to plant the next round. Start new buckets every three weeks during the growing season so you always have harvestable leaves.” He also suggests pairing quick-growing annuals like cilantro with slower perennial herb gardens staples, plant sage or oregano as your anchor, then tuck fast-maturing herbs around them for immediate harvests while the perennials establish.
On aesthetics, he’s practical: “Paint won’t hurt food-grade buckets if you use exterior latex and let it cure completely. Grouping three or five buckets in odd numbers looks more intentional than pairs.” His final advice? Rotate buckets quarterly to ensure even sun exposure and prevent one-sided growth, keeping plants lush and productive from all angles.
Common Questions About 5 Gallon Bucket Herb Gardens
Can you reuse buckets year after year?
Yes, 5 gallon buckets last for many seasons if you clean them between plantings. Remove old soil, scrub with a diluted bleach solution (one part bleach to nine parts water), rinse thoroughly, and let dry before refilling with fresh potting mix.
Can you grow multiple herbs in one bucket?
You can plant two or three smaller herbs like thyme, oregano, or parsley together in one bucket, but avoid mixing aggressive spreaders like mint with other plants. Give larger herbs like rosemary or basil their own bucket for best results.
Do buckets need saucers underneath?
Saucers aren’t essential but help if you’re placing buckets on decks, patios, or balconies where drainage water might stain surfaces. Just remember to empty saucers after watering so roots don’t sit in standing water.
How do you winterize bucket herb gardens?
Move tender herbs like basil and cilantro indoors before the first frost, or treat them as annuals. Hardy perennials such as thyme, oregano, and sage can stay outside in many climates, though you might wrap buckets with burlap in extremely cold regions to insulate roots.
What’s the best way to paint or decorate buckets?
Use outdoor acrylic or spray paint designed for plastic, applying it to clean, dry buckets before drilling and planting. Light colors reflect heat and keep roots cooler in summer, and decorated buckets turn functional containers into attractive elements that support biodiversity by drawing pollinators to your herbs.
How long do bucket herb gardens typically last?
Annual herbs complete their cycle in one season, but perennial herbs like rosemary, thyme, and sage can thrive in the same bucket for two to three years before needing fresh soil and possibly a larger container. Replace potting mix annually for annuals to maintain soil fertility.
Most gardeners find that bucket gardens become easier with each season as you learn which herbs perform best in your specific conditions. The buckets themselves can serve you for a decade or more with proper care, making this an investment that pays dividends in fresh herbs year after year. Don’t hesitate to experiment with placement and herb combinations until you find what works for your space and cooking habits.
You now have everything you need to transform a few inexpensive buckets into a thriving source of fresh culinary herbs. This project takes just an afternoon to complete, yet it delivers harvests for months to come. Whether you have a sprawling backyard or just a small balcony, bucket gardens adapt to your space and grow with your confidence.
The real reward comes when you step outside to snip fresh basil for pasta, gather cilantro for tacos, or crush rosemary leaves between your fingers before adding them to roasted vegetables. That connection between your garden and your kitchen creates flavors store-bought herbs simply can’t match.
Start with two or three buckets and your favorite cooking herbs. You’ll make mistakes along the way, we all do, but containers are forgiving, and you can adjust as you learn what works in your specific conditions.
Your bucket herb garden awaits. Grab those buckets, drill those holes, and get planting. In a few weeks, you’ll be harvesting herbs you grew yourself, and there’s genuine satisfaction in that achievement. We’d love to hear how your bucket garden turns out, so share your progress and any creative twists you discover along the way.