Transform your rooftop and gutters into a powerful self-sustaining garden system by building your own rainwater harvesting setup. Calculate your potential water collection by multiplying your roof’s square footage by your area’s average monthly rainfall – each square foot can collect about 0.6 gallons per inch of rain. Start with a food-grade 55-gallon barrel, install mesh filters to keep debris out, and connect your downspouts using standard PVC fittings. Position your storage container on a raised platform (at least 12 inches high) to enable gravity-fed irrigation and prevent stagnation.
Building a DIY rainwater harvesting system not only cuts your water bills but also provides chlorine-free water that plants thrive on. Whether you’re aiming to water a small garden or sustain larger agricultural needs, this sustainable solution pays for itself within the first year through reduced utility costs and healthier plant growth. With basic tools and about $200 in materials, you can capture thousands of gallons of free, natural water annually.

Essential Components for Your Rainwater System
Collection Materials
Your rainwater harvesting system starts with quality collection materials that work together seamlessly. The most important component is your roof, which serves as the primary catchment surface. Asphalt shingles, metal roofing, and tile all work well, though metal roofs tend to be the most efficient and cleanest option.
Gutters are your system’s first line of collection, and you’ll want to ensure they’re properly sized and sloped. Aluminum gutters are popular for their durability and reasonable cost, while vinyl offers a budget-friendly alternative. Standard 5-inch K-style gutters work well for most homes, but in areas with heavy rainfall, consider 6-inch gutters.
For downspouts, choose materials that match your gutters and can handle your expected water flow. The standard 2×3-inch rectangular or 3-inch round downspouts are suitable for most systems. Install downspout filters or leaf guards to keep debris out of your collection system.
Don’t forget about gutter guards! These helpful additions prevent leaves and other debris from clogging your system, reducing maintenance needs and improving water quality. Mesh screens or solid covers both work well, depending on your local environment and budget.
Storage Solutions
When it comes to storing your harvested rainwater, you’ve got several fantastic options to choose from. The most popular choice among DIY enthusiasts is food-grade plastic barrels, which typically hold 55-65 gallons and are perfect for smaller setups. These are readily available, affordable, and easy to modify for your system.
For larger capacity needs, consider IBC totes (Intermediate Bulk Containers), which can store around 275-330 gallons. These are excellent value for money and come with built-in metal cages for added stability. Just make sure to choose ones that previously contained food-grade materials.
Above-ground polyethylene tanks are another great option, available in sizes ranging from 100 to 5000 gallons. They’re UV-resistant and specifically designed for water storage, though they tend to be pricier than repurposed containers.
For a more aesthetically pleasing solution, consider decorative rain barrels that look like terracotta pots or wooden barrels. While they typically hold less water (30-50 gallons), they blend beautifully with your garden décor.
Whatever container you choose, ensure it’s opaque to prevent algae growth and has a secure lid to keep out debris and insects. Always position your storage container on a sturdy, level base that can support its weight when full.
Planning Your System
Calculating Your Collection Potential
Before you start building your rainwater harvesting system, it’s essential to calculate how much water you can potentially collect. The good news is that this calculation is simpler than you might think!
Start by measuring your roof’s footprint – the area of ground your roof covers. For a rectangular roof, multiply the length by the width. For more complex roof shapes, break them into rectangular sections and add them together. Don’t forget to account for overhanging eaves in your measurements.
Here’s a handy rule of thumb: for every inch of rainfall, you can collect approximately 0.6 gallons of water per square foot of roof area. So, if your roof area is 1,000 square feet and you get one inch of rain, you could potentially collect 600 gallons of water!
To estimate your yearly collection potential, multiply your roof’s collection capacity by your area’s average annual rainfall. For example, if you live in an area that receives 30 inches of rain annually and have a 1,000-square-foot roof, your yearly collection potential would be: 1,000 × 0.6 × 30 = 18,000 gallons!
Keep in mind that you won’t capture 100% of the rainfall due to factors like evaporation and splashing. A good rule is to estimate about 85% efficiency in your calculations. Remember to consider your storage capacity when planning – you’ll want enough storage to make the most of heavy rainfall periods.
Choosing the Perfect Location
The success of your rainwater harvesting system largely depends on its location. Start by examining your property’s natural slope and drainage patterns. Your tank should be positioned downhill from your collection surface (typically your roof) to take advantage of gravity flow. This reduces the need for pumps and makes the system more energy-efficient.
Consider placing your tank on a stable, level surface – ideally a concrete pad or compacted gravel base. The ground should be able to support the tank’s weight when full (water weighs approximately 8.3 pounds per gallon). Leave enough space around the tank for maintenance and ensure it’s easily accessible during all seasons.
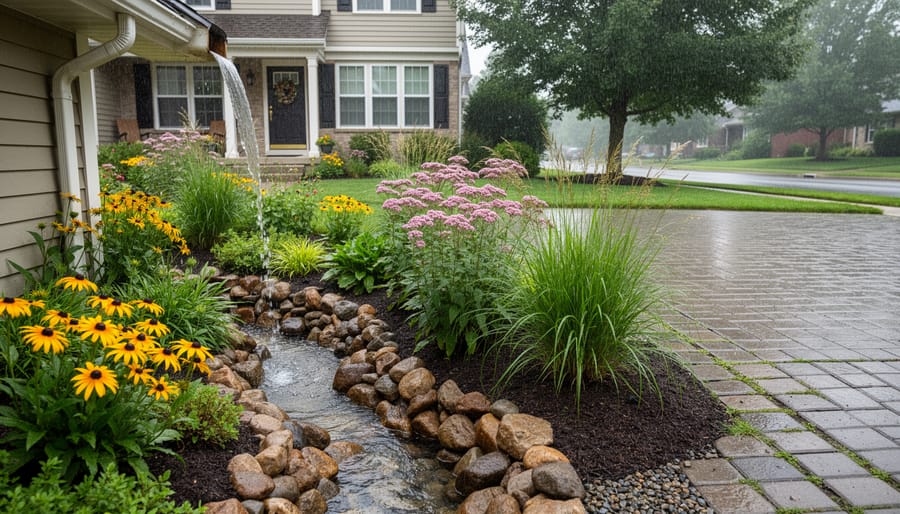
When planning your system’s layout, think about how you’ll use the collected water. If you’re creating a rain garden design, position your tank nearby to minimize piping. For garden irrigation, consider multiple smaller tanks strategically placed near different planting areas rather than one large central tank.
Keep your tank away from tree roots, which can damage the foundation, and position it where overflow won’t affect your home’s foundation or your neighbors’ properties. If possible, place the tank in a shaded area to minimize algae growth and extend the tank’s lifespan. Remember to check local building codes and setback requirements before finalizing your location.
Building Your System
Setting Up the Collection System
Setting up your gutter system is one of the most crucial steps in creating an effective rainwater harvesting system. Start by inspecting your existing gutters – they should have a slight slope (about 1/4 inch per 10 feet) towards the downspout to ensure proper water flow. If you need to install new gutters, aluminum or vinyl are excellent DIY-friendly options that won’t break the bank.
When positioning your downspouts, place them strategically near where your collection tanks will be located. You’ll want to minimize the distance water needs to travel, which helps maintain good flow and reduces the chance of leaks. Most homes will benefit from multiple downspouts to handle heavy rainfall effectively.
Here’s a quick installation checklist:
– Measure and mark your gutter slopes
– Install gutter hangers every 2-3 feet
– Seal all joints with gutter sealant
– Add gutter guards to prevent debris collection
– Install downspout elbows and extensions
Pro tip: Consider adding a first-flush diverter to your downspout. This clever device redirects the initial rainwater (which often contains more debris and contaminants) away from your collection system, ensuring cleaner water reaches your storage tanks.
Remember to check local building codes before making any significant changes to your home’s gutter system. Some areas have specific requirements about rainwater collection and drainage that you’ll need to follow.
Installing Your Storage Tank
Selecting the perfect spot for your storage tank is crucial for a successful rainwater harvesting system. Choose a level, stable surface that can support the tank’s weight when full – water is heavy, weighing about 8.3 pounds per gallon! I recommend placing your tank on a concrete pad or compacted gravel base that extends slightly beyond the tank’s footprint.
Position the tank close to your downspout to minimize pipe runs, but ensure it’s accessible for maintenance. Keep it away from tree roots and areas prone to flooding. If possible, elevate the tank slightly (about 6 inches) to create better water pressure and make accessing the outlet easier.
Before placing your tank, prepare the foundation by removing any rocks or debris. Use a level to ensure the surface is perfectly flat – even a slight tilt can affect your tank’s stability. For larger tanks, you might want to consider professional help with the base preparation.
When connecting your tank, install an overflow pipe near the top that directs excess water away from your home’s foundation. Don’t forget to add a tight-fitting lid to keep out debris, insects, and sunlight (which can promote algae growth). If you’re using multiple tanks, connect them with linking pipes at the same height to ensure even filling.
Remember to position any outlets or taps at a height that allows you to easily connect a hose or fill watering cans.

Adding Filters and Overflow Protection
Keeping your harvested rainwater clean and your system working safely is crucial for success. Let’s start with filters – you’ll want to install them at three key points. First, add a gutter guard or mesh screen to keep leaves and large debris from entering your system. Next, install a first-flush diverter, which automatically discards the initial rainfall that washes away roof contaminants. Finally, add a fine mesh filter just before the water enters your storage tank to catch any remaining particles.
For overflow protection, you’ll need to plan for those heavy rainfall events. Install an overflow pipe near the top of your tank that’s at least as large as your input pipe. Direct this overflow away from your home’s foundation, either to a rain garden or storm drain. It’s also smart to add a floating outlet that draws water from just below the surface, where it’s cleanest.
Here’s a helpful tip: mark your overflow pipe’s location with bright paint or tape, and check it regularly for blockages. During my years of rainwater harvesting, I’ve found that adding a small wire mesh screen over the overflow pipe prevents curious critters from trying to make it their new home.
Remember to position your overflow pipe so it’s visible during rain events – this helps you monitor your system’s performance and catch any potential issues early on.
Maintenance and Usage Tips
Seasonal Maintenance Schedule
To keep your rainwater harvesting system working efficiently, follow this simple seasonal maintenance schedule. In spring, start by cleaning gutters and downspouts of winter debris, checking for any cracks or damage that may have occurred during freezing temperatures. Inspect all seals and connections, and clean your first-flush diverter if you have one installed.
Summer maintenance focuses on mosquito prevention. Check and clean your mesh screens monthly, and ensure your overflow valve is working correctly. Keep an eye on algae growth, which can be more common during warm months, and trim any overhanging branches that might drop leaves into your system.
Fall requires the most attention as leaves begin to drop. Clean gutters more frequently, typically every 2-3 weeks, and check your filters regularly. If you live in a cold climate, late fall is the time to prepare your system for winter by draining pipes that might freeze.
During winter, regularly check for ice damage and clear snow from your collection areas. If you’ve winterized your system, perform monthly visual inspections to ensure everything remains secure until spring.

Getting the Most from Your Harvested Water
Now that you’ve collected your rainwater, making the most of this precious resource is essential for your garden’s success. Start by implementing efficient garden watering techniques like mulching around plants to reduce evaporation and watering deeply but less frequently to encourage strong root growth.
Early morning is the ideal time to water your garden with harvested rainwater, as this minimizes water loss through evaporation and gives plants time to absorb moisture before the heat of the day. Consider using drip irrigation or soaker hoses to deliver water directly to plant roots, maximizing the benefits of your collected rainwater.
For the best results, combine your rainwater usage with water-wise gardening practices such as grouping plants with similar water needs together and choosing drought-resistant varieties when possible. Remember to check the moisture level of your soil before watering – simply insert your finger about an inch into the soil. If it feels dry at that depth, it’s time to water.
Keep your harvested water clean by regularly cleaning your collection system and using it within a reasonable timeframe to prevent algae growth.
Building your own rainwater harvesting system is an exciting and rewarding project that brings multiple benefits to your garden and the environment. As we’ve explored throughout this guide, you don’t need to be a master craftsperson to create an effective system – just some basic tools, the right materials, and a willingness to learn.
Remember that starting small is perfectly fine. You can begin with a simple barrel setup and gradually expand your system as you become more comfortable with the process. The key is to ensure proper installation of your gutters, secure foundation for your storage containers, and regular maintenance of your filters and overflow mechanisms.
The investment in time and materials will quickly pay off through reduced water bills, healthier plants, and the satisfaction of knowing you’re contributing to water conservation. Your garden will thank you with lusher growth, and you’ll have peace of mind knowing you have a reliable water source during dry spells.
Don’t let initial hesitation hold you back – thousands of gardeners have successfully built their own systems, and you can too. Take the knowledge you’ve gained from this guide, gather your materials, and start your rainwater harvesting journey this weekend. Your future self (and your garden) will thank you for taking this sustainable step forward.
Let’s get building and make every raindrop count!