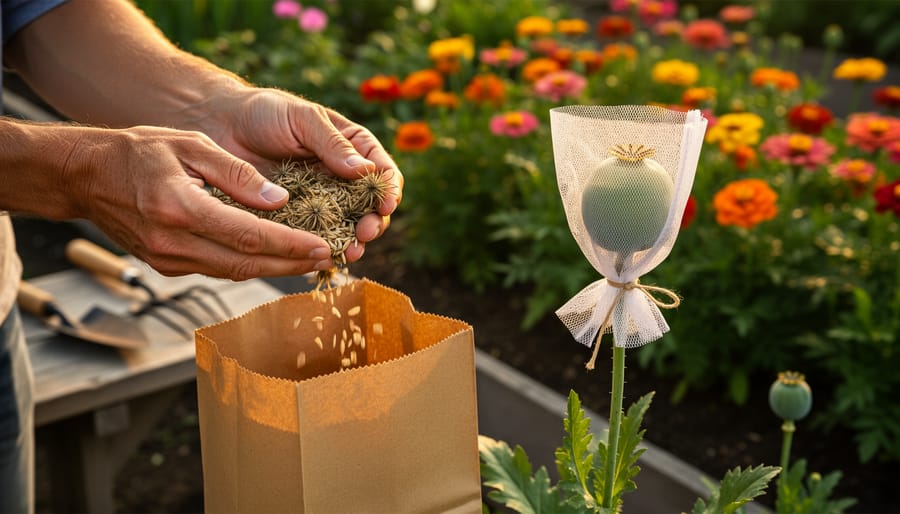
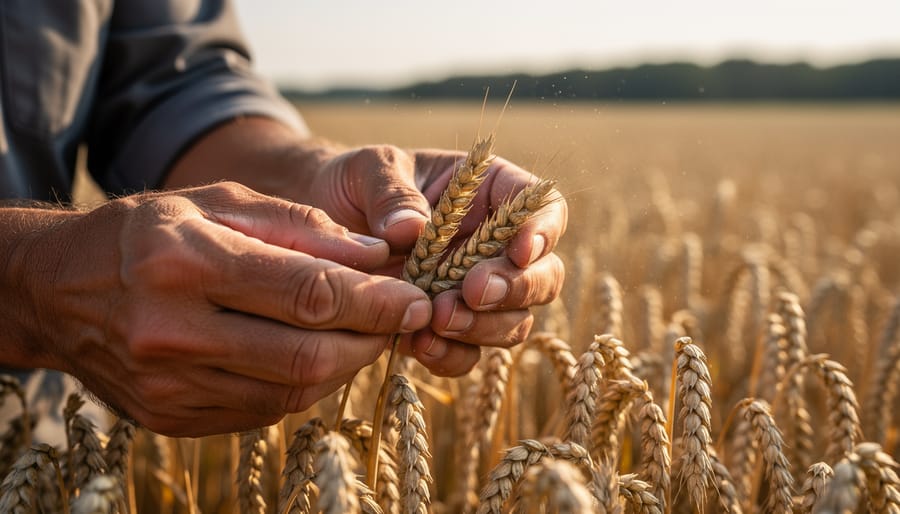
Harvest flower seeds by gently shaking dried seedheads into paper bags, allowing you to capture hundreds of seeds in seconds while keeping varieties separate and clearly labeled. For delicate blooms like poppies and columbines, slip breathable mesh bags over fading flowers before seeds drop, securing them with twist ties so nature does the work while you prevent loss to wind and wildlife. Strip seed-laden stems of zinnias, cosmos, and marigolds by running your fingers downward into a bucket, releasing mature seeds quickly while leaving immature ones to develop further.
The right flower seed harvester transforms seed saving from a tedious chore into an efficient, satisfying ritual that connects you directly to your garden’s future. Whether you’re working with a small cutting garden or acres of blooms, specialized tools and simple techniques help you collect seeds at peak ripeness without damaging plants or losing precious varieties. Commercial harvesters range from handheld combs that strip seeds from stems to rolling machines that process entire beds, while many gardeners achieve excellent results with everyday items already in their sheds.
Understanding when and how to harvest different flower types makes all the difference between a jar of viable seeds and disappointing germination rates next spring. This guide walks you through selecting the perfect tools for your needs, mastering harvest timing for popular flowers, and processing your collection for long-term storage success.
Why Flower Seed Harvesting Matters for Your Garden
There’s something deeply rewarding about completing the circle in your garden, and harvesting flower seeds is where that magic happens. When you save seeds from your favorite blooms, you’re not just collecting tiny packages of potential—you’re investing in your garden’s future in ways that truly matter.
Let’s talk about your wallet first. Purchasing flower seeds season after season adds up quickly, especially if you’re filling large beds or trying new varieties. By harvesting and saving your own seeds, you can grow hundreds of plants for essentially nothing. Imagine transforming a single packet purchase into years of beautiful blooms!
Beyond the financial benefits, seed harvesting gives you the incredible opportunity of preserving heirloom varieties that might otherwise disappear. Many gardeners have told me about treasured flowers passed down through generations—a grandmother’s favorite zinnia or a neighbor’s special sunflower. These living heirlooms carry stories and memories that simply can’t be replicated by commercial seeds.
Here’s something fascinating: when you save seeds from plants that thrive in your specific garden, you’re actually creating flowers that become increasingly adapted to your local conditions. Year after year, you’re naturally selecting for plants that handle your soil, weather patterns, and growing season. They become your unique, perfectly suited varieties.
Perhaps most importantly, seed harvesting connects you to centuries of garden tradition and gives you genuine independence. You’re no longer dependent on seed companies or wondering if your favorite variety will be discontinued. You become a steward, part of an ancient practice of saving, sharing, and celebrating the endless cycle of growth. That sense of self-sufficiency and connection to the natural world? That’s garden gold.
What Exactly Is a Flower Seed Harvester?
Manual vs. Mechanical Options
Choosing the right harvester depends on your garden’s scale and your physical comfort. Handheld seed strippers are perfect for small gardens or patio containers. These lightweight tools look like combs with teeth that strip seeds as you pull them through flower heads. They’re wonderfully portable and cost-effective, ideal for harvesting selective varieties without disturbing neighboring plants. I love mine for gathering zinnias and cosmos while strolling through my borders.
Rolling harvesters step things up for medium-sized gardens. These wheeled devices collect seeds as you push them along flower beds, catching seeds in an attached bag or bin. They save your back and knees, making them excellent for anyone managing several raised beds or longer borders.
For larger properties or small-scale flower farming, mechanical harvesters offer serious efficiency. These powered options quickly process significant quantities, though they require storage space and higher investment. Master gardener Linda Chen, who grows flowers for local florists, told me her mechanical harvester cut her seed collection time by two-thirds.
Consider your garden size, budget, and how many varieties you’re harvesting when deciding. Most home gardeners find handheld strippers meet their needs beautifully, while rolling harvesters shine for those growing extensive cutting gardens.
When to Use a Harvester vs. Hand Collection
Choosing between a harvester and hand collection really depends on the flowers you’re growing and the characteristics of their seeds. I’ve found that harvesters truly shine when you’re working with grasses and small-seeded flowers like black-eyed Susans, coneflowers, or calendula. These plants produce abundant tiny seeds that would take hours to collect individually. Running a harvester through them is not only faster but also gentler on your back!
However, some situations call for the traditional hand-collection approach. Larger seeds from sunflowers, zinnias, or cosmos are actually easier to pluck by hand, and you’ll have better control over selecting the best seed heads. Delicate varieties with fragile seed pods, like sweet peas or snapdragons, also benefit from the careful touch of hand collection to avoid damaging the seeds or breaking apart the pods prematurely.
Here’s my practical rule: if you can easily see and grab individual seeds or seed heads, go with hand collection. If you’re squinting at hundreds of tiny seeds clinging to stems, a harvester will save you considerable time and effort. Many gardeners, myself included, use both methods depending on what’s ready for harvest that day.

Choosing the Right Flower Seed Harvester for Your Needs
Best Harvesters for Small Home Gardens
For those of us tending cozy home gardens, simple handheld tools work beautifully for seed harvesting without breaking the bank. The classic seed stripper remains my personal favorite—these inexpensive tools feature notched openings that strip seeds cleanly as you pull stems through them. You can find basic models for under ten dollars, and they’re perfect for coneflowers, black-eyed Susans, and other sturdy-stemmed flowers.
Another wonderful option is the handheld seed comb, which gently removes seeds from delicate flower heads like cosmos and zinnias. These lightweight tools slip easily into your garden apron and let you harvest while strolling through your beds.
Don’t overlook the trusty paper bag method either! Simply place a bag over mature seed heads, secure with a rubber band, and shake. This works remarkably well for plants like calendula and bachelor’s buttons.
I spoke with master gardener Linda Chen, who swears by investing in a small battery-powered seed vacuum for her cottage garden. “It’s gentle enough for tiny seeds but saves my back from all that bending,” she shared. These compact vacuums typically cost around thirty to fifty dollars and include collection chambers that make sorting seeds much easier.
Options for Larger Cut Flower Operations
If you’re running a cut flower operations or growing flowers for market, you’ll likely need something more efficient than hand-held tools. Mechanical harvesters designed for small-scale commercial use can process significantly larger quantities while maintaining seed quality.
Walk-behind seed strippers are a popular choice for growers working with rows of flowers. These machines feature adjustable combing mechanisms that strip seeds directly into collection bags as you walk through your beds. They’re particularly effective for flowers like zinnias, cosmos, and sunflowers that produce seeds at relatively uniform heights.
For those with even larger operations, tractor-mounted harvesters offer the highest efficiency. While these represent a bigger investment, they can harvest acres rather than rows, making them cost-effective for serious flower farmers. These systems typically include adjustable headers to accommodate different flower heights and seed types.
When considering mechanical options, factor in maintenance requirements and the learning curve involved. Many growers I’ve spoken with recommend starting with a mid-range walk-behind model to test whether mechanical harvesting suits your workflow before investing in larger equipment. Remember, these tools work best when flowers are planted in organized rows with consistent spacing.
How to Use Your Flower Seed Harvester Effectively
Timing Your Seed Harvest Perfectly
Timing is everything when it comes to harvesting flower seeds! The trick is catching them at that sweet spot when they’re fully mature but haven’t scattered to the wind yet. You’ll know your seeds are ready when the seed heads or pods turn brown and feel dry and papery to the touch. Give them a gentle shake—if you hear a rattling sound, that’s nature’s way of telling you they’re good to go!
I like to check my flowers every few days as the season winds down, since different varieties mature at different rates. For plants like zinnias and marigolds, wait until the petals have completely dried and the seed heads look slightly shriveled. With seed pods like those from sweet peas or larkspur, they should feel crisp and may even start to split open.
Weather plays a crucial role too. Choose a dry, sunny morning after the dew has evaporated for your harvest. Avoid collecting seeds when they’re damp, as moisture can lead to mold during storage. If rain is forecast and your seeds look nearly ready, go ahead and harvest them—better slightly early than lost to storms!
Step-by-Step Harvesting Technique
Using a flower seed harvester effectively takes a bit of practice, but once you get the hang of it, you’ll wonder how you ever managed without one. Let me walk you through the process so you can start collecting seeds like a pro.
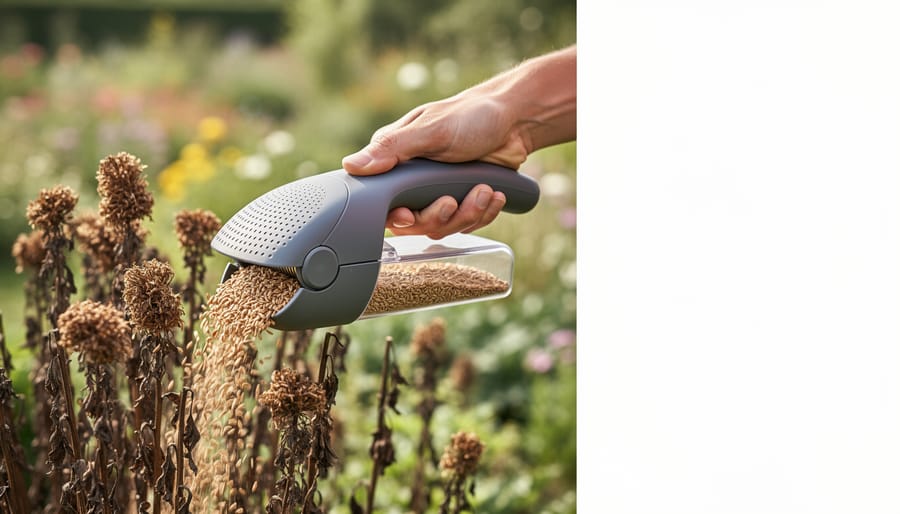
First, hold your harvester at about a 45-degree angle beneath the seed heads. This positioning allows the seeds to fall naturally into the collection basket without bouncing out. Think of it like catching raindrops in a cup rather than trying to scoop them up.
Next, apply gentle pressure as you slide the harvester upward along the stem. The key word here is gentle – you’re coaxing the seeds free, not forcing them. Too much pressure can damage unripe seeds or crush delicate varieties. With practice, you’ll develop a feel for just the right amount of firmness needed.
For larger flower heads like coneflowers or sunflowers, work in sections around the seed head, rotating as you go. Smaller blooms like cosmos or zinnias respond well to a simple upward sweep. Some gardeners I’ve spoken with recommend tapping stubborn seed heads lightly with your free hand while the harvester is positioned underneath to dislodge reluctant seeds.
As you work, periodically check your collection basket. Empty it into a labeled container before it gets too full – overflowing baskets mean lost seeds. Working through your garden systematically, flower type by flower type, helps you stay organized and ensures you don’t accidentally mix varieties that need different storage conditions.
After the Harvest: Processing and Cleaning Your Seeds
Simple Cleaning Methods That Work
Once you’ve collected your flower seeds, the real fun begins—cleaning them! Don’t worry, you won’t need fancy equipment for this step. Let me share some tried-and-true methods that work beautifully with things you probably already have at home.
The screen method is my personal favorite for larger seeds like sunflowers and zinnias. Simply place your seed heads on a fine mesh screen or old window screen and gently rub the material across the surface. The seeds fall through while the chaff stays on top. You can use different screen sizes for various seed types—kitchen strainers work wonderfully for this!
For lighter debris, the winnowing technique is remarkably effective. Pour your seeds slowly between two containers outdoors on a breezy day, or use a household fan on low speed. The chaff blows away while the heavier seeds drop straight down. I learned this method from an experienced gardener who’s been saving seeds for forty years, and it’s become my go-to technique.
Water separation works perfectly for seeds like marigolds. Add your seed-and-chaff mixture to a bowl of water—viable seeds sink while most debris floats. Skim off the floating material, drain the good seeds, and spread them on paper towels to dry completely.
For delicate seeds, the gentle shake method in a paper bag works wonders. Just give the bag a good shake and carefully pour out the seeds, leaving larger plant bits behind. Sometimes the simplest approaches are the best!
Storing Your Harvested Flower Seeds for Success
Once you’ve harvested and cleaned your flower seeds, proper storage becomes your secret weapon for future gardening success. I learned this the hard way when I lost an entire collection of heirloom cosmos seeds to moisture—a mistake I’ll never repeat!
Start by ensuring your seeds are completely dry before storage. Spread them on paper towels or screens in a warm, well-ventilated area away from direct sunlight for at least a week. When seeds feel crisp and snap rather than bend, they’re ready. Any residual moisture invites mold and ruins viability.
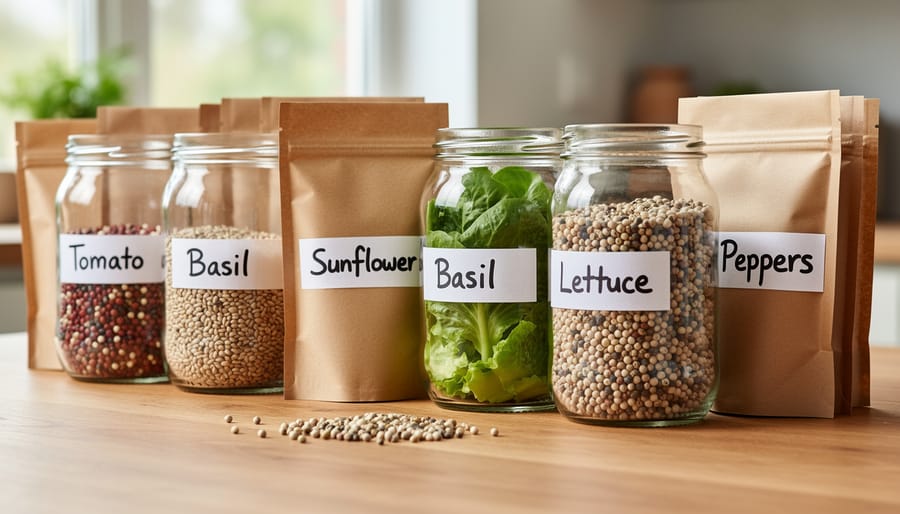
Choose your containers wisely. Paper envelopes work wonderfully for most flower seeds, allowing them to breathe while protecting from light. For long-term storage, small glass jars with tight-sealing lids are excellent, though you’ll want to add a small silica gel packet to absorb any lingering moisture. Avoid plastic bags unless you’re certain seeds are bone-dry.
Now comes the part many gardeners skip but shouldn’t: thorough labeling. Include the flower variety, harvest date, color notes, and even the parent plant’s location if you’re selecting for specific traits. Trust me, those mystery seeds you think you’ll remember? You won’t. I keep a gardening journal that corresponds with my seed labels—it’s become an invaluable reference.
Store your labeled containers in a cool, dark, dry location. A basement closet or refrigerator works perfectly. Ideal conditions hover around 40 degrees Fahrenheit with low humidity. Most flower seeds remain viable for two to five years under proper conditions, though some species last longer.
Consider this your investment in future gardens. With careful storage and good documentation, you’re not just saving seeds—you’re preserving garden memories and building a personal seed library that grows more valuable each season.
Common Mistakes to Avoid When Harvesting Flower Seeds
Even experienced gardeners can stumble when it comes to seed harvesting, but knowing these common pitfalls will set you up for success from the start.
The biggest mistake I see beginners make is harvesting too early. I remember eagerly collecting what I thought were ripe seeds from my cosmos, only to discover they were still green inside and completely unviable. Seeds need to be fully mature before collection, which usually means waiting until seed heads turn brown and feel papery to the touch. It’s tempting to harvest early, especially when weather threatens, but patience truly pays off here.
Another frequent error is being too rough during collection. Crushing or damaging seeds while removing them from pods or flower heads can significantly reduce germination rates. Use gentle techniques and let the seeds fall naturally when possible rather than forcing them out.
Improper cleaning is also surprisingly common. Leaving too much plant material mixed with seeds invites mold and moisture problems. Take time to thoroughly separate chaff from seeds, even if it feels tedious. Your future garden will thank you.
Finally, poor storage destroys countless perfectly good seeds. I’ve learned this lesson the hard way after losing an entire year’s collection to humidity. Seeds need cool, dry, dark conditions with proper labeling. Storing them in paper envelopes inside airtight containers with silica gel packets works wonderfully. Avoid plastic bags directly touching seeds, as they can trap moisture and encourage mold growth.
DIY Flower Seed Harvester: Make Your Own
You don’t need to spend a fortune on specialized equipment to harvest your flower seeds effectively. With a few common household items and a little creativity, you can create your own seed harvester that works beautifully for most garden flowers.
For a simple handheld harvester, start with a clean plastic container like a margarine tub or yogurt cup. Using a sharp tool, carefully punch small holes in the bottom—about the size of a pencil tip works well. These holes should be large enough to let loose seeds fall through but small enough to catch seed heads and petals. Cut a handle from sturdy cardboard or use an old wooden spoon handle, securing it to the container with strong tape or hot glue. Voila! You’ve created a shake-and-sift harvester perfect for coneflowers, black-eyed Susans, and similar flowers.
Another effective option involves repurposing a wire mesh strainer or small colander. Simply hold it beneath mature seed heads and gently tap or shake the stems. The seeds fall through while larger plant debris stays caught in the mesh. For flowers with tiny seeds like poppies or snapdragons, try using an old pillowcase or thin mesh bag. Slip it over the entire seed head, secure it with a twist tie, and snip the stem. As the seeds dry, they’ll naturally fall into the bag.
My neighbor Sarah created a brilliant harvester using an empty parmesan cheese shaker—the kind with holes in the lid. She simply removes the lid completely, slides dried flower heads inside, replaces the lid, and shakes vigorously over a clean sheet. The seeds pour out while the chaff stays contained.
Remember, regardless of which design you choose, cleanliness matters. Wash your homemade harvester between uses and practice proper tool maintenance to prevent mold or disease transfer. Store it in a dry location when not in use, and it’ll serve you reliably for many seasons of seed saving adventures.
You’ve now discovered how flower seed harvesters can transform your seed-saving experience from tedious to truly enjoyable. Whether you choose a handheld scoop, a specialized vacuum tool, or a simple DIY solution, you’re joining a rewarding tradition that connects you more deeply with your garden’s natural cycles.
Starting your seed-saving journey doesn’t require perfection. Begin with just one or two favorite flowers this season. As you gain confidence, you’ll find yourself looking forward to harvest time, watching for those perfect moments when seed heads are ready. The satisfaction of growing from saved seeds next spring is truly unmatched—there’s something magical about completing the full circle from flower to seed to flower again.
Remember, every seed you save represents not just future blooms, but also a small act of stewardship. You’re preserving varieties you love, reducing waste, and creating a more sustainable garden. Plus, you’ll have plenty of seeds to share with fellow gardeners, spreading beauty throughout your community.
So grab your harvester, head out to your garden, and embrace this fulfilling practice. Your future self will thank you when those saved seeds burst into glorious blooms.