
Transform those dim corners under mature trees into lush tapestries by layering hostas, ferns, and astilbes at different heights—the varying textures create visual interest even without bright blooms. Amend your soil with compost and leaf mold before planting since tree roots often deplete nutrients, giving shade plants the rich foundation they need to thrive despite competing for resources. Map your garden’s light patterns by observing which areas receive morning sun versus dappled afternoon light, then match plants accordingly—what you think is full shade might actually support partial shade lovers like hellebores and coral bells.
Stop viewing your shaded areas as limitations. Those challenging garden spaces beneath towering oaks or along north-facing walls actually offer distinct advantages: less watering, fewer weeds, and an opportunity to grow woodland treasures that would scorch in full sun. The secret lies in understanding that shade gardening isn’t about making do with less—it’s about embracing a completely different palette of plants that have evolved to flourish in low-light conditions.
Whether you’re dealing with dense shade under evergreens or the bright, filtered light of deciduous trees, you can create stunning garden rooms filled with elegant foliage, delicate blooms, and year-round structure. This guide will walk you through selecting the right plants for your specific conditions, preparing your soil for success, and designing cohesive spaces that prove shade gardens can be just as vibrant and rewarding as their sun-drenched counterparts.
Understanding Your Shade: The First Step to Success
The Difference Between Deep Shade and Dappled Light
Understanding what kind of shade you’re working with makes all the difference in choosing the right plants and creating a thriving garden. Not all shade is created equal, and once you can identify your specific conditions, you’ll feel much more confident in your plant selections.
Deep shade, sometimes called full shade, is where the sun rarely visits. Think of areas under dense evergreen trees, along north-facing walls, or spaces completely blocked by structures. These spots receive less than two hours of direct sunlight daily and often have a noticeably cooler feel. You might find that moss grows naturally here, which is actually a helpful indicator.
Dappled light, on the other hand, is that lovely filtered sunlight that dances through tree canopies with high branches or open foliage. Picture the shifting patterns of light and shadow under a mature oak or birch tree. This condition typically provides brighter overall light levels with occasional sun rays breaking through, creating an ever-changing environment throughout the day.
Here’s a simple way to determine what you have: On a sunny day, observe your space at three different times—morning, midday, and late afternoon. Take notes about where direct sunlight falls and for how long. If patches of bright light move across the area, you’ve got dappled conditions. If it stays consistently dim, you’re working with deep shade.
I also recommend placing white paper in different spots for an hour during peak sun time. The brighter the paper appears, the more light that area receives. This quick test helps you map out microclimates within your shady space.
Why Most Plants Struggle in Low Light
Think of plants like tiny solar panels that need energy to grow, bloom, and thrive. Through photosynthesis, plants convert sunlight into the fuel they need to build leaves, develop roots, and produce those gorgeous flowers we love. When light is limited, most plants simply can’t manufacture enough energy to support their growth.
Here’s the challenge: plants evolved in different environments around the world. Those sun-loving tomatoes and roses? Their ancestors grew in open meadows and sunny hillsides where they developed a high-energy lifestyle. They’re like marathon runners who need substantial fuel to perform. Place them in shade, and they’ll stretch desperately toward any available light, growing leggy and weak, rarely flowering, and becoming vulnerable to pests and diseases.
But here’s the encouraging news I want you to remember: not all plants are energy hogs. Some species evolved on forest floors, in woodland edges, or beneath tree canopies. These shade-adapted plants developed a different strategy. They’re incredibly efficient at capturing and using whatever light filters through, much like having built-in solar panels designed for cloudy days. Their leaves are often larger or darker green to maximize light absorption, and they’ve learned to thrive on less.
Understanding this difference is your secret weapon for shade gardening success. Instead of fighting against your garden’s natural conditions, you’ll be selecting plants that are genuinely happy in low light, setting yourself up for a lush, thriving garden.
Shade-Loving Plants That Actually Thrive in Deep Shadow
Foliage Favorites That Bring Color and Texture
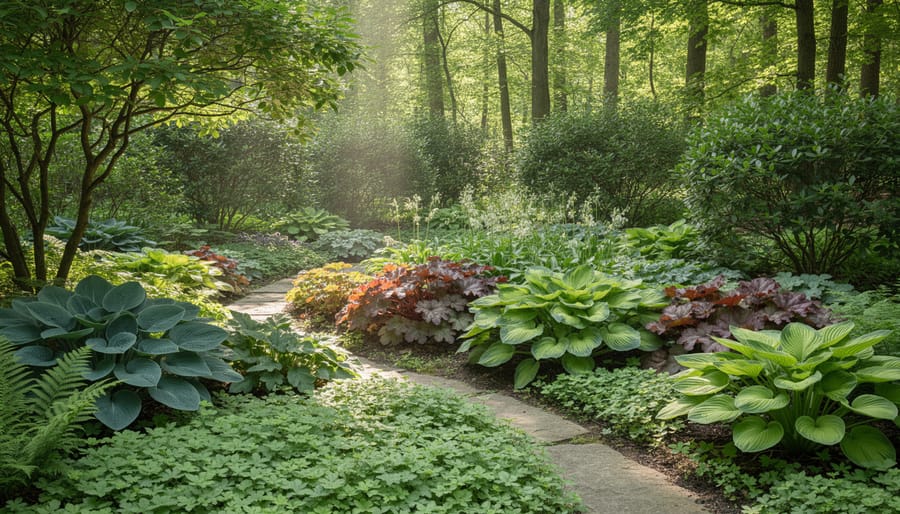
When shade limits your flower options, foliage plants become the true stars of your garden. I’ve learned that leaves can offer just as much visual interest as blooms, and they provide color from spring through frost without the fleeting nature of flowers.
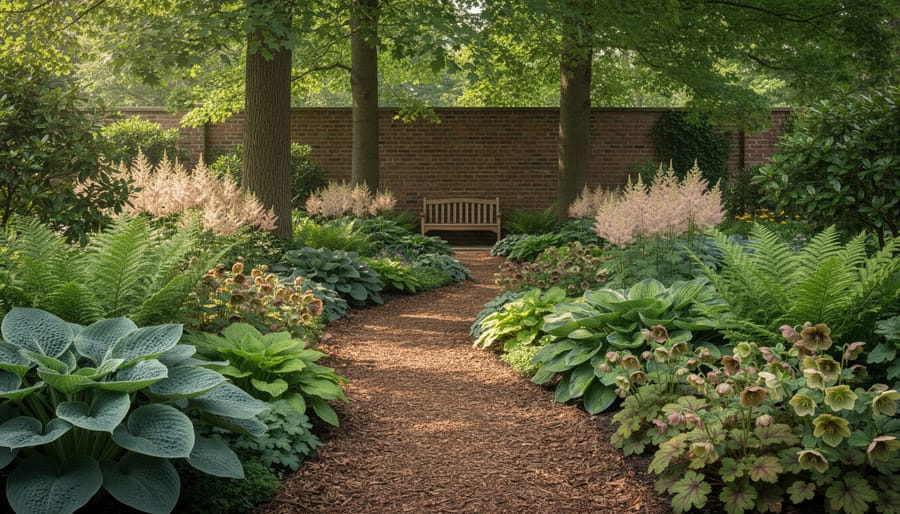
Hostas are the workhorses of shade gardens, and for good reason. They range from miniatures like ‘Blue Mouse Ears’ (perfect for containers) to giants like ‘Empress Wu’ that can reach four feet across. My personal favorite is ‘June’ hosta, with its blue-green edges and chartreuse centers that practically glow in low light. For something truly dramatic, try ‘Patriot’ with its crisp white margins.
Ferns bring an irreplaceable texture that softens any shaded spot. The Japanese painted fern stands out with silvery fronds touched with burgundy, while the native lady fern tolerates a wide range of conditions. I’ve had autumn ferns thriving in the same spot for seven years now, their copper-toned spring growth transforming to deep green as summer progresses.
Heucheras, commonly called coral bells, offer year-round interest with foliage in shades of purple, amber, lime, and even near-black. ‘Obsidian’ provides striking dark contrast, while ‘Caramel’ adds warm peachy tones. These tough plants handle neglect better than most and look fantastic edging a path or massed in groups.
Don’t overlook coleus, which has evolved far beyond the gaudy varieties of the past. Modern cultivars like ‘ColorBlaze Lime Time’ and ‘Under the Sea’ series thrive in shade with sophisticated color combinations. Hakone grass adds graceful movement with its cascading golden or variegated blades, creating a waterfall effect that catches every bit of available light.

Blooms for the Shadows
Let me be honest with you from the start: flowering in deep shade isn’t going to give you the explosion of color you’d see in a sunny border. But here’s the beautiful truth—shade bloomers offer something even better. They provide delicate, sophisticated beauty that doesn’t shout for attention but rewards those who look closely.
Astilbe is your go-to workhorse for shady spots. These feathery plumes come in shades of pink, red, white, and even peachy coral, blooming reliably from late spring through summer depending on the variety. The key is keeping the soil consistently moist—think woodland stream rather than desert. When happy, astilbe produces those gorgeous plumes that seem to float above the ferny foliage. I’ve seen them perform beautifully even under dense maple canopies where little else blooms.
Bleeding heart offers that cottage garden charm with its distinctive heart-shaped flowers dangling from arching stems. The classic pink-and-white variety blooms in spring, while the fringed bleeding heart continues flowering sporadically through summer if you keep it watered. The bonus? That lovely blue-green foliage stays attractive long after blooming finishes.
Hellebores are absolute champions, blooming when almost nothing else dares—late winter to early spring. Often called Lenten roses, these tough perennials produce nodding flowers in white, pink, burgundy, and even green. Once established, they’re remarkably drought-tolerant and self-seed gently to create natural drifts.
Here’s the realistic expectation part: your shade bloomers will produce fewer flowers than their sun-loving cousins, and blooms may be smaller. But what they lack in quantity, they make up for in grace, longevity, and the simple fact that they’re blooming where most plants wouldn’t even try.
Ground Covers That Solve Problem Areas
You know those frustrating bare patches under your mature trees where grass refuses to grow? Or that narrow strip along your north-facing foundation that stays perpetually dim? These problem areas are actually perfect opportunities for ground covers that thrive where other plants struggle.
I’ve found that ajuga, also called bugleweed, is one of the toughest ground covers for deep shade. Its bronze or variegated foliage spreads quickly to form a dense carpet, and in spring, you’ll get beautiful spikes of blue flowers. I interviewed master gardener Ellen Rodriguez last year, who told me she’s never met a shady spot ajuga couldn’t handle, even under dense evergreens.
Lamium, or spotted deadnettle, offers silvery foliage that brightens dark corners beautifully. It’s particularly effective along foundations where you need something that looks intentional rather than accidental. The pink or white flowers are a lovely bonus in late spring.
For a more naturalistic approach, consider woodland natives like wild ginger or sweet woodruff. Wild ginger creates a lush, tropical-looking carpet with heart-shaped leaves, while sweet woodruff releases a delightful hay-like fragrance when you brush against it. These natives also support local pollinators and wildlife.
The secret to success with any ground cover is patience during establishment. Plant them closer together than you think necessary, about six to eight inches apart, and keep them consistently moist for the first season. Within two years, you’ll have transformed that problem spot into a textured, low-maintenance feature that actually enhances your shade garden.
Designing a Shade Garden That Feels Intentional
Layering Plants for Depth and Interest
Think of your shade garden as a natural woodland, where plants exist in distinct layers that work together to create a cohesive, three-dimensional landscape. This layering technique is what makes shade gardens feel lush and inviting rather than sparse or flat.
Start with the canopy layer, which might already exist in the form of mature trees casting the shade. Beneath this, add understory trees or tall shrubs like Japanese maples, rhododendrons, or witch hazel. These mid-height plants create visual interest at eye level and provide a transition between the overhead canopy and the ground.
The middle layer is where you’ll place perennials and medium-sized shrubs, typically 18 to 36 inches tall. Hostas, astilbes, and bleeding hearts work beautifully here, creating waves of texture and seasonal color. This is often the most dramatic layer in a shade garden, so don’t be shy about grouping plants in drifts of three or five for greater impact.
Finally, the ground layer consists of low-growing plants and groundcovers like sweet woodruff, wild ginger, or ajuga. These carpet the soil, suppress weeds, and provide a finished look that ties everything together.
The magic happens when these layers overlap slightly, with taller plants at the back (or center, if your garden is viewed from all sides) graduating down to shorter plants at the front. This creates natural sight lines that draw your eye through the space and make even small gardens feel expansive and thoughtfully designed.
Using Light-Colored Plants to Brighten Dark Corners
Here’s a secret I learned from a master gardener in Oregon: shady corners don’t have to feel dark and dreary. By strategically placing light-colored plants throughout your shade garden, you can create surprising pockets of brightness that make the entire space feel open and inviting.
Variegated foliage is your best friend in dim areas. Plants with white, cream, or silvery markings on their leaves act like natural mirrors, reflecting whatever light filters through. Hostas with white edges, such as ‘Patriot’ or ‘Francee,’ practically glow in dappled shade. Japanese forest grass with its creamy striped leaves adds a graceful, luminous quality that draws the eye. Lungwort, with its spotted silver foliage, creates wonderful ground-level interest while brightening up the lowest layer of your garden.
White flowers have an almost magical ability to stand out in shade. They catch moonlight for evening enjoyment and seem to float above darker foliage during the day. Consider white-flowering astilbes, which create feathery plumes of brightness, or foamflower with its delicate white spikes. White bleeding heart offers an elegant, old-fashioned charm that absolutely sings in shadowy spots.
Don’t overlook plants with silvery or chartreuse leaves. Lamium with silver markings, heucheras in lighter shades like ‘Lime Rickey,’ and even ferns with silvery undertones can transform a gloomy corner into a jewel box. Position these lighter plants near paths or seating areas where you’ll appreciate their illuminating effect most.
Adding Structure with Hardscaping and Garden Art
Shady spots are perfect for showcasing hardscaping elements that might get lost in sunnier, plant-packed spaces. Consider adding a meandering gravel path that draws visitors deeper into your shade garden, creating both structure and mystery. The lighter color of crushed stone or decomposed granite reflects available light beautifully.
Garden art becomes even more impactful under trees. I’ve found that a simple birdbath or weathered urn serves as an anchor when hostas or ferns haven’t quite filled in yet. Look for pieces with interesting textures that catch dappled light. A strategically placed bench not only provides a resting spot but also signals where visitors should pause to appreciate a view.
Stone borders, stacked rocks, or even a small dry creek bed add year-round interest that plants alone can’t provide. These features help define different garden rooms and guide the eye through spaces that might otherwise feel flat. Remember, hardscaping works hardest in winter when many shade perennials have died back, keeping your garden visually engaging through every season.
Soil Preparation: The Secret to Shade Garden Success

Working with Tree Roots Without Harming Your Trees
Working around tree roots doesn’t have to mean choosing between healthy trees and a beautiful garden. I’ve learned this through trial and error, and I’m excited to share what works.
First, let’s talk about what not to do. Never remove large roots or pile more than two to three inches of soil over existing roots. Trees need to breathe, and smothering roots can stress or even kill them. I once watched a neighbor add eight inches of soil around an old oak, and within two years, the tree began declining rapidly.
Here’s your step-by-step approach for root-zone gardening:
Start by gently clearing away surface debris without disturbing roots. Think of it as archaeological work, brushing away rather than digging. Next, add a thin layer of compost, no more than two inches, directly over the existing soil. This feeds both the tree and your future plants without suffocating the roots.
For planting, look for natural pockets between roots rather than fighting them. When you encounter a root while digging, stop and move your plant a few inches over. Use smaller transplants with flexible root systems that can weave around obstacles. Perennials in four-inch pots work beautifully for this purpose.
If you’re determined to plant in a particularly root-dense area, consider creating raised beds that sit on top of the ground rather than cutting into it. Build simple frames four to six inches high, line them with landscape fabric to prevent roots from growing up into your new soil, and fill with quality planting mix.
Remember, patience pays off. Your shade garden will establish itself gradually, working in harmony with those magnificent trees above.
Building Up Instead of Digging Down
Here’s something I learned from master gardener Patricia Chen during a recent garden visit: when dealing with established shade gardens, you don’t need to disturb existing root systems to improve your soil. Instead, think upward! Raised beds are your best friend in shady spots, especially under mature trees where digging would damage precious roots.
Building a simple raised bed just 8-12 inches high gives you complete control over your growing medium without disturbing what’s below. Fill it with a rich mixture of compost, peat moss, and topsoil, and suddenly you’ve created the perfect environment for shade-loving hostas, ferns, and astilbes.
If raised beds aren’t your style, try the lasagna method. Simply layer cardboard or newspaper directly on the ground, then pile on alternating layers of organic matter—think shredded leaves, compost, grass clippings, and aged mulch. This builds up over time, creating nutrient-rich soil that worms and microorganisms will love. I’ve used this technique around my oak tree, and within one season, the area transformed into a lush shade garden. Your tree’s roots will thank you, and your plants will thrive in their new elevated home.
Watering and Maintenance Tips for Low-Light Gardens
When Shade Doesn’t Mean Moisture
Not all shade comes with the moisture you might expect. Dry shade is one of the trickiest garden challenges, typically found under house eaves where rain never reaches, beneath dense evergreen canopies, or in areas where mature trees drink up every drop of available water. I learned this the hard way when my lovely hostas under the maple tree simply refused to thrive, no matter how much shade they supposedly loved.
The key to success in dry shade is choosing plants adapted to these conditions. Epimediums, lamium, and hardy geraniums are champions here, along with drought-tolerant ferns like autumn fern. But plant selection is only half the battle. Before planting, work generous amounts of compost into the soil to improve water retention. Consider creating a shallow basin around each plant to catch and hold water where it’s needed most.
Implementing smart watering strategies makes all the difference in dry shade. Deep, infrequent watering encourages roots to grow downward rather than staying near the surface. A thick layer of mulch, about three inches deep, helps retain precious moisture while keeping roots cool. Remember, you’re competing with tree roots, so consistency matters more than occasional drenching.
Seasonal Care That Keeps Your Shade Garden Looking Fresh
Maintaining a shade garden doesn’t require endless hours of work, but a few seasonal tasks will keep your plantings looking their absolute best. In early spring, refresh your mulch layer to about 2-3 inches deep. This simple step suppresses weeds, retains moisture, and keeps those shallow shade-loving roots protected. I’ve found that shredded hardwood mulch works beautifully and breaks down to enrich your soil over time.
Late spring and early fall are perfect for dividing overgrown perennials like hostas and ferns. When you notice the center of a clump looking sparse or less vigorous, it’s time to dig, divide, and replant. Don’t worry if you’re new to this—most shade perennials are incredibly forgiving and actually benefit from being split every 3-4 years.
Fall cleanup deserves special mention for shade gardens. While you’ll want to remove seriously diseased foliage, consider leaving some leaf litter in place. Those fallen leaves provide natural mulch and shelter for beneficial insects. I like to tidy paths and visible areas while letting the back layers enjoy nature’s own blanket through winter. Come spring, simply rake away any matted leaves and watch your shade garden emerge refreshed and ready to grow.
Creative Shade Garden Projects to Try This Season
Creating a Woodland Container Garden for Your Patio
Woodland container gardens bring that magical forest floor feeling right to your patio! I’ve found this approach particularly rewarding because you can create these beautiful combinations even if your entire yard is sunny—just place them in those shaded corners under eaves or covered porches.
Start by choosing containers at least 12 inches deep with drainage holes. Terracotta or glazed ceramic pots work beautifully and echo that natural woodland aesthetic. Mix your own potting blend using equal parts quality potting soil, peat moss or coconut coir, and compost to mimic that rich forest floor texture.
For a stunning combination that thrives in shade, try pairing a Japanese painted fern as your centerpiece with coral bells for color variation and trailing creeping Jenny to spill over the edges. This trio offers contrasting textures and foliage colors that remain interesting from spring through fall. Many basic container gardening techniques apply here, but remember that shade containers dry out more slowly than their sunny counterparts.
Water when the top inch of soil feels dry—usually once or twice weekly depending on your climate. Feed monthly with diluted liquid fertilizer during the growing season. I learned this the hard way: avoid overwatering, as shade-loving plants are more susceptible to root rot.
Add small decorative elements like moss-covered stones or miniature ferns to enhance that woodland vibe. Group several containers together for maximum impact, varying heights and sizes to create natural-looking clusters that invite exploration.
Building a Simple Moss Garden
If you’re working with the darkest corners of your garden where even most shade-loving plants struggle, moss might be your perfect solution. I discovered this myself when dealing with the north side of my house where grass refused to grow—now it’s a tranquil green carpet that looks beautiful year-round.
Moss gardens are surprisingly simple to establish once you understand that moss doesn’t have roots like traditional plants. Instead, it attaches directly to surfaces and absorbs moisture through its leaves. This makes it ideal for those tricky spots under dense tree canopies or between stepping stones where nothing else thrives.
Start by selecting your site—look for areas that stay consistently moist and receive minimal direct sunlight. Remove any existing vegetation and debris, then roughen the soil surface slightly with a rake. If you’re working with compacted soil, don’t worry too much; moss actually prefers firm surfaces.
You can purchase moss sheets from nurseries or sustainably harvest small amounts from your own property. Press the moss firmly onto your prepared surface, ensuring good contact. Some gardeners swear by the “moss milkshake” method—blending moss with buttermilk or yogurt and painting it onto rocks or soil—though transplanting established patches typically yields faster results.
Water your new moss garden daily for the first three weeks using a gentle spray to keep it moist but not soggy. Once established, moss requires virtually no maintenance—no mowing, fertilizing, or weeding. It simply thrives in those challenging shady spots where other plants fail.
Common Mistakes and How to Avoid Them
When I first started shade gardening, I made plenty of blunders that taught me valuable lessons. The good news? Most mistakes are easily fixable, and sharing them can save you time and frustration.
One of the biggest pitfalls is choosing sun-loving plants and hoping they’ll adapt. I once planted colorful petunias under my oak tree, convinced they’d somehow make it work. They didn’t. Instead of fighting against your conditions, embrace shade-appropriate plants from the start. Hostas, ferns, and astilbes actually prefer less light and will reward you with lush growth.
Another common error is neglecting soil preparation. I learned this the hard way when my early plantings struggled despite adequate water. Shady areas, especially under trees, often have depleted, compacted soil. Tree roots compete aggressively for nutrients and moisture. Take time to amend your soil with compost and organic matter before planting. Your plants will establish faster and thrive longer.
Overwatering is surprisingly common in shade gardens. Because the soil doesn’t dry out as quickly, many gardeners water on the same schedule as their sunny beds. Check soil moisture with your finger before watering, and adjust accordingly.
Planting too densely is tempting when you’re eager to fill space quickly. Give plants room to reach their mature size. Overcrowding leads to poor air circulation, increased disease risk, and competition for resources.
Finally, many gardeners give up too soon. Shade gardens take time to establish and fill in. What looks sparse in year one often becomes a lush retreat by year three. Avoiding these common garden mistakes will help you create the beautiful space you envision.
If you’ve made it this far, you’ve already discovered something wonderful: shade isn’t the gardening challenge you might have thought it was. Those shadowy corners, those dappled patches beneath mature trees, that north-facing border—they’re not limitations. They’re invitations to create something truly special.
Here’s the truth that seasoned gardeners know: shade gardens often become the most beloved spaces in any landscape. They’re cooler on hot summer days, they require less watering, and they showcase a sophisticated palette of textures and foliage that sun gardens simply can’t match. Plus, many shade-loving plants are incredibly forgiving, making shade gardening easier than you think.
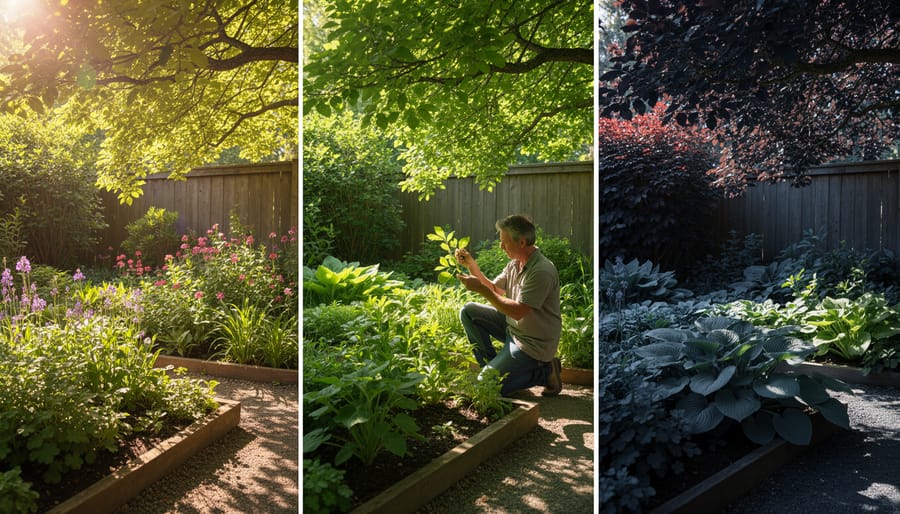
The key is to start small. You don’t need to transform your entire shaded area overnight. Choose one corner, select three to five plants that excite you, and see what happens. Pay attention to what thrives and what struggles. Observe how the light changes through the seasons. Move things around if they’re not happy—that’s not failure, that’s gardening.
Remember, even experienced gardeners experiment constantly. That hostas collection? It probably started with a single plant. That stunning fern gully? Likely grew from a modest beginning. Every magnificent shade garden you’ve ever admired began with someone willing to try.
So grab a trowel, pick up a few plants that caught your eye at the nursery, and get your hands dirty. Your shade is waiting to surprise you with its potential. Trust the process, be patient with yourself, and don’t be afraid to learn as you go. The beauty of gardening is that there’s always next season to try again or try something new. Your shady spot might just become your favorite place to garden—and the envy of your sun-loving neighbors.

