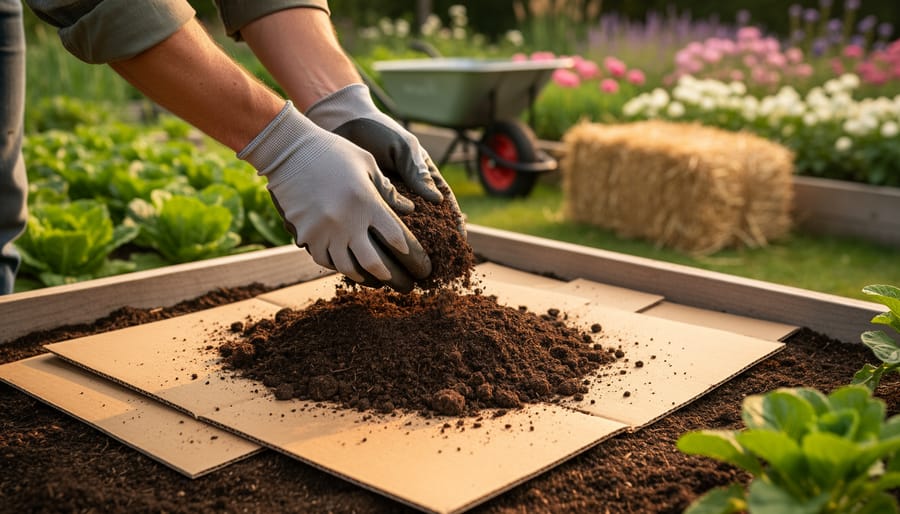
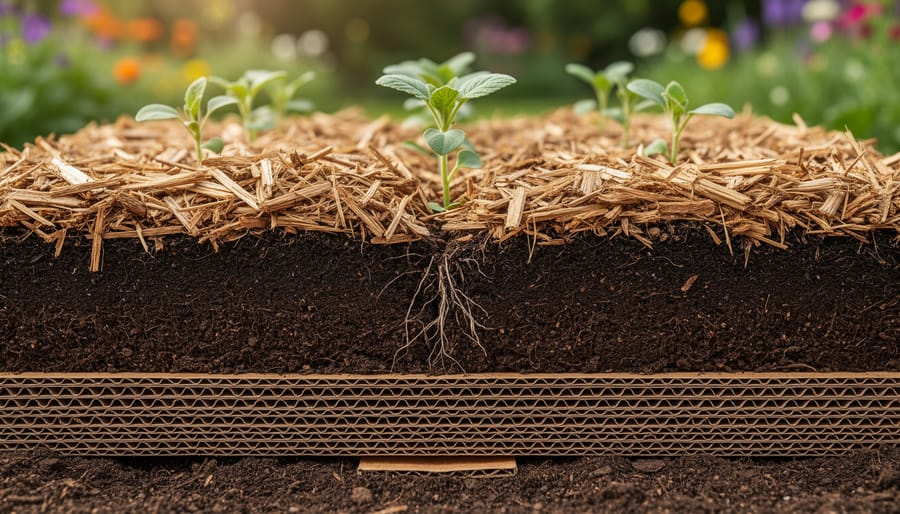
Spread cardboard or thick newspaper layers directly over weedy grass or bare soil, then cover with 4-6 inches of compost to create an instant no-dig garden bed that suppresses weeds while feeding beneficial soil life below. This simple technique, which works beautifully for traditional in-ground gardens and raised bed gardening, eliminates back-breaking tilling and preserves the intricate network of microorganisms that healthy soil depends on.
Layer organic materials in a lasagna-style approach by alternating carbon-rich browns like shredded leaves or straw with nitrogen-rich greens such as grass clippings or kitchen scraps, building up 12-18 inches that will decompose into rich growing medium over several months. Top with finished compost for immediate planting, and you’ll discover how nature does the heavy lifting while you simply add annual mulch layers to maintain soil structure and fertility.
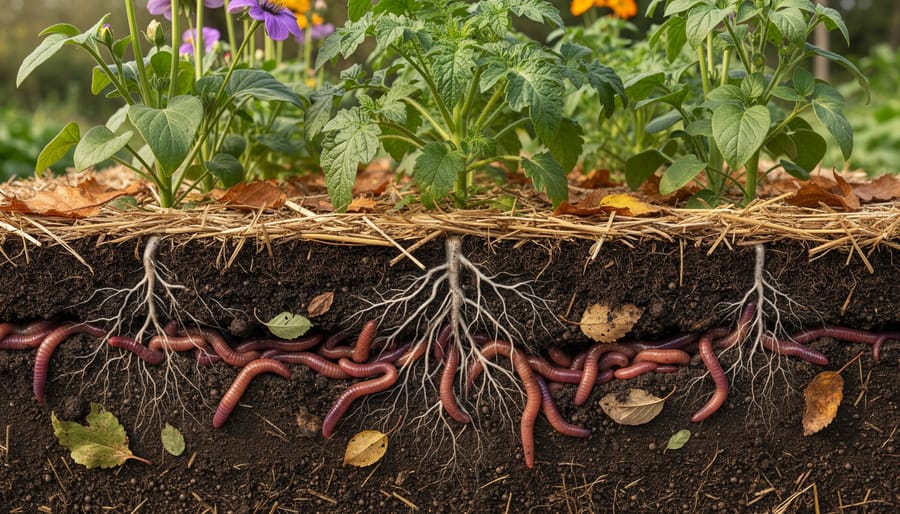
Transform hard-packed soil into friable, productive earth without ever picking up a spade by allowing roots to die in place, earthworms to tunnel freely, and beneficial fungi to establish undisturbed networks that transport nutrients directly to plant roots. The no-dig philosophy respects soil as a living ecosystem rather than inert matter to be turned and disrupted.
Whether you’re dealing with persistent weeds, compacted clay, or simply want healthier vegetables with less effort, no-dig methods deliver remarkable results that improve year after year as your soil biology flourishes.
What Exactly Is No-Dig Gardening?
Imagine building your garden beds from the ground up, literally, without ever having to turn your soil or wrestle with a heavy spade. That’s the beauty of no-dig gardening. Instead of disrupting what’s happening below the surface, you’re working with nature by adding layers of organic material on top of your existing soil, whether it’s grass, weeds, or tired garden beds.
Think of it as creating a lasagna of goodness for your plants. You lay down cardboard or newspaper, then pile on compost, aged manure, straw, and other organic materials. Over time, these layers break down, creating rich, fertile soil that earthworms and beneficial microbes absolutely love. The cardboard smothers unwanted weeds while eventually decomposing, and those hardworking creatures below do the tilling for you.
The philosophy here is refreshingly simple: soil is alive, and when you dig it up, you’re disrupting an entire underground community. Every time you turn soil, you’re disturbing fungal networks, exposing dormant weed seeds to light, and breaking apart the natural structure that plants rely on. No-dig gardening respects this hidden world, allowing beneficial organisms to thrive undisturbed.
I spoke with Charles Dowding, a pioneer in no-dig methods, who shared that his beds have been untouched for over 40 years and still produce abundant harvests. “The soil life does the work,” he told me. “We just need to feed it from above.”
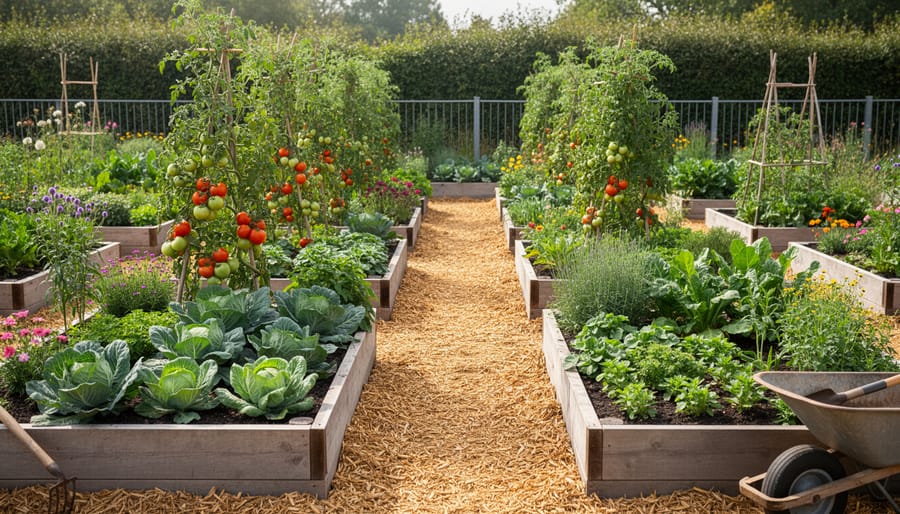
This approach aligns beautifully with sustainable gardening practices, reducing labor while improving soil health season after season. You’re not fighting against nature’s systems, you’re enhancing them. The result? Healthier plants, fewer weeds, better water retention, and noticeably less backache. Whether you’re starting fresh or transitioning from traditional methods, no-dig gardening offers a gentler, more effective way forward.
The Surprising Benefits You’ll Notice Right Away
One of the most delightful aspects of switching to no dig gardening is how quickly you’ll notice positive changes. I remember chatting with veteran gardener Margaret Chen last spring, and she told me the biggest surprise wasn’t just what improved, but how fast it happened. Let me walk you through what you can expect.
First and foremost, your back will thank you. Within your very first session, you’ll realize you’re no longer wrestling with a spade or fork, straining to turn over heavy, compacted soil. Instead, you’re simply layering materials on top, which feels more like making a lasagna than doing heavy labor. For those of us who aren’t getting any younger, this difference is genuinely life-changing.
The time savings become apparent almost immediately too. Traditional digging can take hours for even a modest plot. With no dig, you’re spending that time on more enjoyable tasks like planning what to grow or actually planting. Many gardeners report cutting their preparation time in half or more.
Here’s where it gets really exciting: the weed situation improves dramatically. By covering the soil with layers of compost and mulch, you’re essentially smothering existing weeds and preventing new seeds from germinating. While you’ll still get the occasional persistent weed poking through, you’ll spend far less time on your hands and knees pulling them. And when weeds do appear, they slide out easily from that lovely, loose surface layer.
Within weeks, you’ll notice your soil structure transforming. The earthworms and microorganisms start working overtime, creating natural channels that improve drainage and aeration. Your plants develop stronger, healthier root systems because they’re not dealing with disrupted soil layers or compacted ground.
Water retention improves noticeably too. That organic matter on top acts like a sponge, holding moisture where your plants need it most. During hot spells, you’ll water less frequently than your neighbors still using traditional methods, yet your plants stay hydrated and happy.
The payoff for all these benefits? Healthier, more productive plants leading to bountiful harvests. When your soil ecosystem thrives undisturbed, your vegetables, flowers, and herbs simply perform better. It’s nature’s way of rewarding you for working with it rather than against it.
How to Start Your First No-Dig Garden Bed
Gathering Your Materials
The beauty of no-dig gardening is that you probably already have many materials lying around your property! Let’s start with the foundation: cardboard. Those delivery boxes accumulating in your garage are perfect. Remove any tape and labels, and you’re good to go. Corrugated cardboard works best as it breaks down gradually while suppressing weeds.
Next, you’ll need compost, which is the star player in this method. Homemade compost from your kitchen scraps and yard waste is ideal, but don’t worry if you haven’t started composting yet. Many municipalities offer free or low-cost compost to residents, and local farms sometimes sell it affordably. You’ll want enough to create a layer about 4-6 inches deep.
For mulch, consider wood chips, straw, or shredded leaves. Call local tree service companies—they often deliver wood chips for free since it saves them disposal fees. Autumn leaves from your own yard work wonderfully too.
Optional additions include well-rotted manure from local farms and grass clippings. Just remember to avoid grass treated with herbicides. The good news? Once you source these materials initially, you’ll need much less in subsequent years, making this an incredibly economical gardening approach.
The Layering Technique That Works Every Time
Think of lasagna layering like making a delicious garden sandwich. Just as you’d carefully stack ingredients for the perfect lasagna, you’ll build your no-dig bed from the ground up, and I promise it’s much simpler than it sounds.
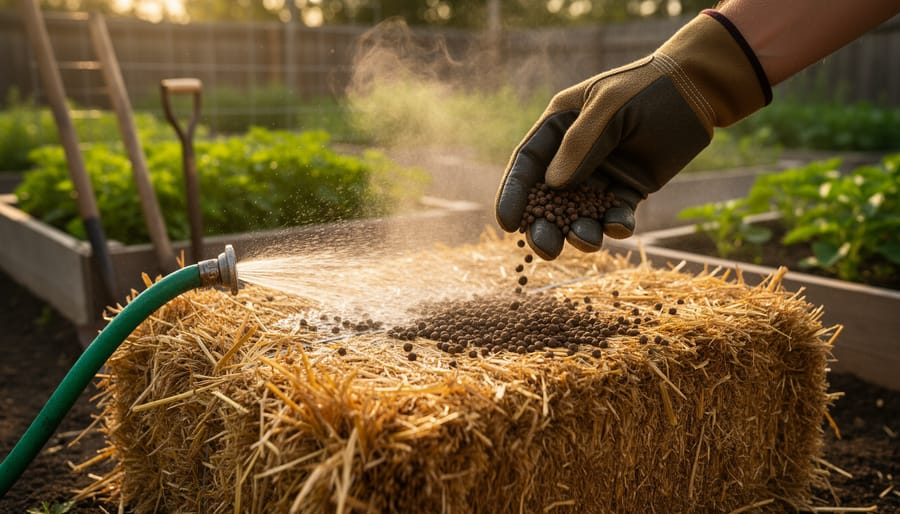
Start by laying cardboard or several sheets of newspaper directly on your grass or weeds. This bottom layer acts as a weed barrier and will eventually break down. Overlap the edges by at least six inches to prevent sneaky weeds from finding gaps. Wet it thoroughly—soggy is good here.
Next comes the brown layer, about 4-6 inches thick. This includes dried leaves, straw, or shredded paper. Think carbon-rich materials that look, well, brownish. These materials provide structure and feed beneficial organisms over time.
Now add your green layer, roughly 2-4 inches deep. Fresh grass clippings, kitchen scraps, or compost work beautifully here. These nitrogen-rich materials heat things up and speed decomposition. I learned the hard way not to make this layer too thick—a friend once added eight inches of grass clippings, and let’s just say her garden smelled like a swamp for weeks.
Repeat this brown-green pattern two or three times, like you’re building actual lasagna layers. Finish with a generous 3-4 inch topping of quality compost or well-rotted manure. This is your planting surface.
The magic ratio to remember is roughly 2:1 brown to green materials. Too much green creates a slimy, smelly mess. Too much brown means slower decomposition.
Water each layer as you build—moisture is essential for breaking down materials. Your finished bed should be about 18-24 inches tall initially, settling to roughly half that height over time.

When to Build and When to Plant
The beauty of no-dig gardening is that you can start almost any time of year, though some seasons definitely work in your favor more than others. Here’s what works best in my experience.
Fall is hands-down the ideal time to build a no-dig bed. Why? You can pile on those layers of cardboard, compost, and mulch, then let winter do the work for you. By spring, everything will have settled and broken down beautifully, giving you a perfect planting bed when you’re most eager to get growing. The earthworms and microorganisms stay active longer in autumn’s mild conditions, speeding up decomposition before winter slows things down.
Spring is your second-best option. You can absolutely create beds and plant immediately into them, provided you use quality, well-rotted compost as your top layer. I’ve had great success planting seedlings straight into fresh beds, though seeds sometimes struggle without fully settled soil. If you’re building in spring, consider starting with transplants rather than direct sowing.
Winter building works too, especially in milder climates. The bed will be ready for early spring planting, and you’ll appreciate having this task completed during the quieter gardening months.
Summer is trickier only because materials can dry out quickly and need frequent watering. However, if you’re preparing beds for fall crops, summer building works perfectly fine.
The real magic? Once established, your no-dig beds improve year after year, becoming more fertile and easier to work with each season.
Different No-Dig Methods for Different Situations
The Classic Compost Method
This is the method that’s made Charles Dowding a household name in gardening circles, and it’s beautifully simple. Each year, typically in late winter or early spring, you spread a generous layer of compost across your beds—about 1-2 inches thick. That’s it. No turning, no incorporating, just a yearly top-up that feeds your soil and suppresses weeds.
What makes this approach so effective is its consistency. By adding compost annually, you’re continuously improving soil structure, encouraging beneficial microbes, and creating that perfect, crumbly texture plants adore. I particularly love how forgiving this method is—if you’re a bit late with your application one year, your garden won’t suffer dramatically.
This works best for established gardens where beds are already created and soil quality is reasonable. If you’re dealing with compacted lawn or poor soil, you might want to start with a thicker initial layer (around 4-6 inches) before settling into the annual rhythm.
The beauty? Once you’re up and running, it takes minimal time and effort while delivering impressive results year after year.
Sheet Mulching for Converting Lawn to Garden
Sheet mulching is your ticket to transforming a tired lawn into productive garden beds without the backbreaking work of removing turf. I discovered this method when I needed to expand my vegetable garden, and it’s become my go-to approach for converting grass areas.
The process is wonderfully straightforward. Start by mowing your lawn as short as possible, leaving the clippings in place. Next, lay down overlapping sheets of cardboard or several layers of newspaper directly over the grass, ensuring no light can penetrate through. Water this layer thoroughly until it’s completely saturated. This barrier will smother the grass while feeding soil organisms as it breaks down.
Now comes the fun part: pile on organic matter. Add 4-6 inches of compost, finished manure, or a mixture of both on top of the cardboard. This rich layer creates an immediate planting bed while the grass beneath quietly decomposes. For extra weed suppression, top everything with 2-3 inches of wood chips or straw mulch.
This technique works beautifully for small space gardening projects or larger landscape transformations. You can plant right away by creating pockets through the cardboard for transplants, or wait 2-3 months for even easier planting as everything settles.
Raised Bed No-Dig Approach
Combining raised beds with no-dig methods creates an incredibly accessible gardening system that works beautifully for everyone, especially if you have mobility concerns or challenging soil conditions. The raised bed approach elevates your garden to a comfortable working height while the no-dig principle keeps your soil ecosystem thriving.
Start by building or purchasing raised beds at least 12 inches deep, though 18-24 inches is ideal for deeper-rooted crops. Place them directly on your existing ground without removing the grass or weeds underneath. Lay down cardboard as your weed barrier, overlapping pieces by several inches to prevent gaps. Then fill your beds with alternating layers of brown and green materials, just as you would in a traditional no-dig garden.
The beauty of this system is that you can garden immediately while enjoying better drainage, warmer soil in spring, and less bending. Your raised beds will need topping up annually with fresh compost, but you’ll never need to dig or turn the soil. I’ve found this method particularly rewarding for older gardeners and those with back problems who thought their gardening days were behind them. The contained space also makes crop rotation simpler and pest management more straightforward.
Maintaining Your No-Dig Garden Through the Seasons
Here’s the wonderful news about no-dig gardens: they actually get easier to maintain as time goes on. Once you’ve established your beds, the seasonal care becomes remarkably straightforward, almost second nature.
The cornerstone of no-dig maintenance is your annual mulch top-up. Each year, typically in late autumn or early spring, add a fresh layer of compost or well-rotted organic matter, around 2-3 inches thick. Think of this as feeding your garden’s breakfast, lunch, and dinner all at once. This yearly ritual replenishes nutrients, suppresses weeds, and maintains that beautiful crumbly soil structure you’ve been cultivating. I spoke with veteran gardener Martha Henderson, who’s maintained no-dig beds for fifteen years, and she swears by her autumn mulching routine. “It’s like tucking the garden in for winter,” she says. “Come spring, the soil is ready and waiting.”
Persistent weeds will occasionally test your patience, particularly deep-rooted troublemakers like bindweed or dock. Rather than turning the soil and disturbing all that beneficial life below, simply keep layering mulch over problem areas and remove any shoots that appear. Cardboard can be your secret weapon here—lay it over stubborn patches before mulching. Most weeds eventually surrender when deprived of light.
Crop rotation works beautifully in no-dig beds. Simply plant different crop families in different areas each season, just as you would in traditional beds. The undisturbed soil actually makes tracking beneficial because you’re not mixing everything up each year.
As seasons shift, resist the urge to dig or turn your beds, even when they look bare. Instead, plant cover crops like clover or winter rye during dormant periods, or simply add extra mulch. This protects soil life and prevents erosion.
Winter care is minimal—just add that mulch layer and let nature do its work. Spring arrives with soil that’s alive, structured, and ready for planting without any backbreaking preparation.
The beauty of no-dig becomes clear after your second or third year. Your soil improves dramatically, weeds diminish significantly, and your maintenance time shrinks while your harvests grow. It’s gardening that works with you, not against you.
Common Questions (And Honest Answers)
I know what you’re thinking – this sounds too good to be true, right? Let me tackle some of the questions I hear most often, and I promise to give you the real story.
Does no-dig really work in all climates?
Here’s the honest truth: yes, but with some adjustments. I’ve seen thriving no-dig gardens everywhere from chilly Scotland to sun-baked California. The key is adapting your mulch thickness. In hot, dry areas, you’ll want to pile on extra compost to retain moisture. In wet climates, you might use slightly less to avoid waterlogging. Cold climate gardeners often start their beds in fall, giving everything time to settle before spring planting.
What about slugs and pests hiding in all that lovely mulch?
I won’t lie – slugs do love moisture-rich environments. However, no-dig gardens also attract more beneficial predators like ground beetles and birds that feast on slugs. Many gardeners find the pest balance actually improves over time. If slugs are troublesome in your area, try using coarser materials like wood chips on pathways and save the fine compost for planting areas. A barrier of crushed eggshells around vulnerable seedlings works wonders too.
Can I convert my existing dug garden to no-dig?
Absolutely! This is one of my favorite things about this method – you can start right now, mid-season if you like. Simply stop digging and begin adding layers of compost on top. Your existing plants won’t mind a bit. Within one growing season, you’ll notice improvements in soil structure. There’s no need to wait or prepare anything special.
Won’t I need loads of compost every year?
Initially, yes, you’ll need a good amount to build your beds. But here’s the good news: after the first year, you only need about an inch or two annually to maintain fertility. Many gardeners make their own compost or find local sources like municipal composting programs, making it surprisingly affordable.
So there you have it—no-dig gardening really is as straightforward as it sounds. You’re essentially working with nature instead of against it, and honestly, that’s what makes this approach so beautifully effective. Your soil stays healthy and structured, beneficial organisms thrive undisturbed, and you get to spend less time struggling with a spade and more time actually enjoying your garden.
If you’re feeling inspired but a bit overwhelmed, here’s my advice: start small. Choose one bed, maybe just a few square feet, and give it a try. Layer on some cardboard and compost, plant something forgiving like lettuce or beans, and see what happens. You don’t need to transform your entire garden overnight. Many gardeners I’ve spoken with began with a single experimental patch and never looked back.
Your back will genuinely thank you for making the switch—no more aching shoulders after an afternoon of digging. But more importantly, your soil will thank you too. It’ll become richer, more alive, and more productive with each passing season.
I’d love to hear how your no-dig journey unfolds. Whether you’re trying this for the first time or you’ve been layering compost for years, your experiences matter. Share your successes, your questions, even your setbacks in the comments below. The no-dig community is welcoming and always growing, and we’re all learning together. Happy gardening!