Build a simple PVC pipe framework covered with shade cloth to cut your garden’s sun exposure by 30-70% within a weekend. This straightforward structure costs around $50-150 for a 10×10 foot area and requires just basic tools like a PVC cutter, drill, and measuring tape. The shade cloth itself comes in different percentages—30% for vegetables that need moderate sun, 50% for protecting delicate seedlings, and 70% for keeping patio areas cool.
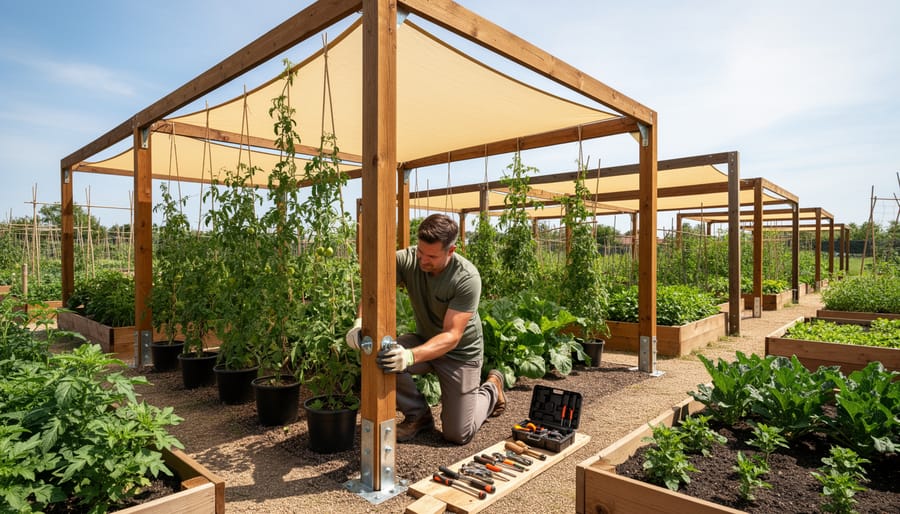
Construct permanent wooden pergolas using 4×4 posts and 2×6 rafters when you need year-round protection for specific garden zones. These sturdy structures support climbing plants like grapes or wisteria, creating natural shade that evolves with the seasons while adding property value. They require more investment in time and materials but last 15-20 years with proper weatherproofing.
Install temporary solutions like shade sails or repurposed materials during heat waves to save struggling plants immediately. Stretch UV-resistant fabric between fence posts, tree branches, or wall-mounted anchors at angles that block afternoon sun. Many gardeners use old bedsheets, bamboo screens, or even lattice panels as emergency shade that costs nearly nothing.
Position your shade structure to protect plants during peak sun hours between 10 AM and 4 PM while maintaining morning light for photosynthesis. Southern exposures need the most coverage in summer, while east-west orientations work best for extending the growing season of cool-weather crops. The right placement makes the difference between thriving plants and wasted effort, turning your outdoor space into a productive, comfortable haven.
Why Your Garden Needs More Than Just Shade
I’ll let you in on something I learned the hard way after years of gardening: shade alone isn’t enough to keep your plants thriving through challenging conditions. While we often focus on protecting our gardens from scorching sun, the real game-changer is creating structures that serve double duty as both shade providers and windbreaks.
Think of your shade structure as creating a protective bubble for your plants. Yes, it blocks those harsh afternoon rays that can turn tender leaves crispy brown, but it’s also working overtime in ways you might not realize. A well-designed structure dramatically reduces water evaporation from soil, which means you’re not constantly running back and forth with the hose. Combined with an efficient watering system, you’ll save time and conserve precious water.
Wind protection is where things get really interesting. Strong winds don’t just knock over your tomato cages; they actually steal moisture from plant leaves faster than roots can replace it, causing stress even when soil is adequately watered. Structures that break wind flow create stable microclimates where temperatures stay more moderate, humidity levels remain higher, and plants can focus their energy on growing rather than survival.
Certain plants absolutely sing with this kind of protection. Lettuce and other leafy greens bolt quickly in intense sun but thrive under filtered light. Tomatoes produce more consistently when shielded from temperature extremes. Peppers develop better flavor without constant wind stress battering their branches. Even herbs like basil and cilantro, which typically bolt fast in summer heat, extend their productive season significantly.
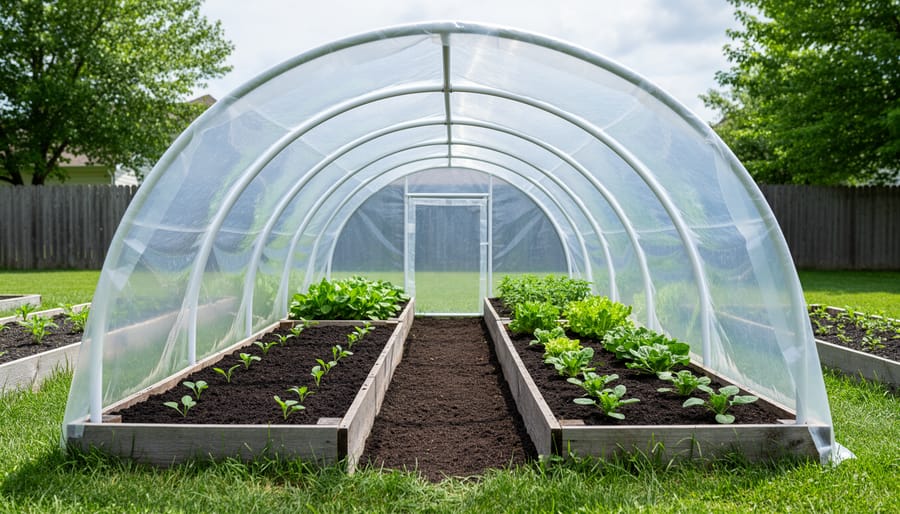
The combination of hoop house protection or simpler shade structures with strategic windbreak placement transforms challenging growing conditions into productive garden spaces. You’re not just putting up a roof; you’re engineering a better environment where your plants can genuinely flourish.
Choosing the Right Structure for Your Space
Simple Shade Sails and Canopies
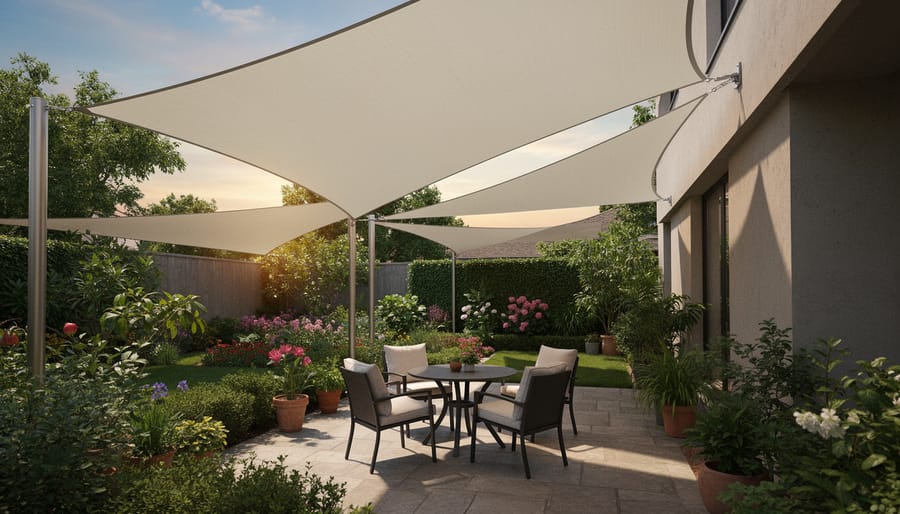
Shade sails are my go-to recommendation for gardeners who need quick, flexible coverage without the commitment of a permanent structure. These triangular or rectangular fabric panels attach to existing posts, trees, or walls using tension hardware, and you can typically have one up and providing relief within an afternoon.
What makes them particularly appealing is their affordability and versatility. You’re looking at anywhere from 50 to 200 square feet of coverage depending on the size you choose, perfect for protecting a vegetable bed, patio seating area, or tender perennials. I’ve found they work best when angled slightly to allow rainwater runoff and air circulation beneath.
The advantages are clear: they’re portable, adjustable with the seasons, and easy to remove before winter storms. You can also layer multiple sails to create dynamic, overlapping coverage. However, they do have limitations. Strong winds can stress the anchor points, so you’ll want solid attachment spots. They also offer less protection than solid structures during heavy rain or hail.
Shade sails shine in situations where you need temporary or seasonal protection, making them ideal starter projects for anyone new to garden shade solutions.
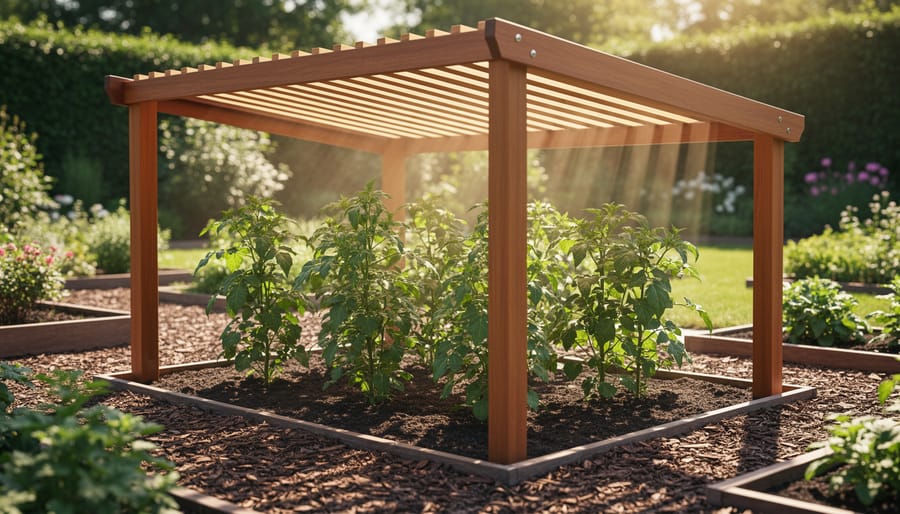
Pergolas and Arbors for Permanent Solutions
When you’re ready to commit to a more permanent shade solution, pergolas and arbors offer both functionality and beauty that can transform your garden space. These structures work wonderfully when you need consistent shade in a specific area, like over a seating zone or along a walkway, and they’re perfect additions when building permanent garden features.
The real magic happens when you pair these structures with climbing plants. Imagine grape vines, wisteria, or climbing roses gradually weaving through the beams, creating living shade that actually gets better each year. I’ve watched my own wisteria-covered pergola evolve from a simple wooden frame into a lush, fragrant canopy that drops the temperature underneath by several degrees.
Beyond their practical benefits, pergolas and arbors add architectural interest and create defined spaces in your garden. They give climbing plants the support they need while providing immediate partial shade, which increases as your plants mature. Consider investing in these structures if you plan to stay in your home long-term and want to create a lasting garden feature that combines structure with nature’s beauty.
Living Windbreaks and Green Walls
Nature offers some of the most beautiful shade solutions, though patience is required. Fast-growing bamboo can create an effective windbreak in just one to two seasons, while hedges like privet or arborvitae typically take three to five years to reach useful heights. I’ve found that mixing quick growers with slower, more permanent plants gives you protection while you wait.
For immediate impact, consider planting a row of tall ornamental grasses like miscanthus alongside slower-developing evergreens. The grasses provide first-year screening while your permanent windbreak matures. Space plants according to their mature width, typically 3-5 feet apart for dense coverage.
Maintenance is straightforward but essential. Annual pruning keeps hedges thick and encourages bushy growth at ground level where wind protection matters most. Water deeply during establishment, and apply mulch to retain moisture. Remember that living windbreaks need at least 6-8 hours of sunlight, so position them where they won’t shade your garden beds. The wait is worthwhile—these natural walls filter wind rather than blocking it abruptly, protecting plants more effectively than solid barriers.
Quick Fixes: Temporary Screens and Panels
Not ready to commit to a permanent structure? Temporary shade solutions work beautifully for renters, seasonal needs, or testing different garden layouts. Bamboo screens are my favorite quick fix—they’re lightweight, naturally weather-resistant, and instantly add visual interest. Simply lean them against fences or secure them with zip ties to existing posts. Lattice panels offer another versatile option, perfect for supporting climbing plants while providing dappled shade. You can find affordable options at any garden center and move them as your needs change.
For truly portable protection, consider pop-up shade cloth frames or tension-mounted panels that require no hardware installation. These work wonderfully for balcony gardens or rental properties where permanent DIY garden structures aren’t allowed. Roll-up reed fencing attached to adjustable poles gives you seasonal flexibility—simply store them away during cooler months. These temporary solutions prove that effective shade doesn’t require major construction skills or long-term commitment.
Materials That Won’t Let You Down
Framework Materials: Wood, Metal, or PVC?
Choosing the right frame material sets the foundation for your shade structure’s success, and each option brings distinct advantages to your garden project.
Wood remains a favorite among DIY gardeners for good reason. Cedar and redwood naturally resist rot and insects, lasting 15-20 years with proper care, while pressure-treated pine offers a budget-friendly alternative at 10-15 years. You’ll spend roughly $100-300 for posts and beams for a 10×10 structure. Wood feels approachable to work with—if you can measure, cut, and drill, you’re already equipped. The warm, natural look blends beautifully into garden settings. The downside? Wood requires regular sealing or staining every 2-3 years to maintain its integrity.
Metal, particularly galvanized steel or aluminum, delivers impressive longevity at 20-30+ years with minimal maintenance. Steel pipes and conduit create strong, sleek frames that stand up to wind and weather. Expect to invest $150-400 for materials. The learning curve is steeper here—you’ll need cutting tools like a hacksaw or grinder, and you might tackle basic welding or use specialized connectors. I’ve found metal particularly valuable in exposed locations where wind loads matter.
PVC pipe offers the gentlest entry point for beginners. At $50-150 for a basic structure, it’s wonderfully forgiving and requires only a PVC cutter and primer cement. The trade-off? A shorter lifespan of 5-10 years, as UV exposure gradually weakens the material. PVC works brilliantly for seasonal structures or when you’re testing placement before committing to something permanent.
Shade Cloth vs. Natural Materials
Choosing the right shade material can make all the difference for your plants! Shade cloth comes in different densities, typically 30%, 50%, and 70%, which refers to how much sunlight they block. I’ve found 30% shade cloth works beautifully for sun-loving vegetables like tomatoes and peppers that just need a break during scorching afternoons. The 50% option is your go-to for most garden situations, offering balanced protection for herbs, lettuce, and flowering plants. Save the 70% cloth for delicate shade-lovers like ferns or seedlings that need serious sun protection.
When shopping for shade cloth, look for UV-stabilized material that won’t deteriorate quickly in harsh sunlight. Quality shade cloth typically lasts 5-10 years outdoors.
Natural alternatives bring their own charm to the garden! Bamboo rolls create lovely dappled shade and work especially well for vertical structures. Reed fencing offers similar benefits with a rustic aesthetic. Canvas or outdoor fabric provides a more finished look but may require weatherproofing treatments. These natural materials generally block 40-60% of sunlight and add wonderful texture to your garden space, though they typically need replacement every 2-4 years depending on your climate.
Hardware and Fasteners That Matter
Here’s the thing about shade structures: they’re only as good as their hardware. I learned this the hard way when my first garden canopy took flight during a summer storm! Invest in galvanized or stainless steel fasteners from the start. Regular hardware rusts quickly outdoors, weakening your structure within months.
Your anchoring system matters enormously. Ground screws work beautifully in most garden beds, while concrete footings provide maximum stability for permanent structures. For temporary setups, heavy-duty stakes paired with guy wires create surprising wind resistance.
Don’t skimp on connector quality either. Use appropriately sized bolts rather than nails, and consider adding washers to distribute pressure. Hurricane ties and corner brackets aren’t just for houses—they’ll keep your shade structure standing through gusty afternoons when your tomatoes need protection most. Quality hardware costs a bit more upfront but saves you from rebuilding after every weather event.
Step-by-Step: Building a Basic Shade Structure
Planning and Measuring Your Space
Before you grab your tools, spend time observing your space throughout the day. Watch where shadows fall during peak afternoon heat, typically between 2-4 PM when your plants need protection most. Notice prevailing wind patterns too, especially if you’re protecting delicate seedlings or creating a comfortable sitting area.
Walk around your garden during these observations and identify what needs shading. Are your tomatoes wilting by mid-afternoon? Is your patio furniture too hot to touch? This helps determine both size and placement.
For measuring, start simple. Use garden stakes and string to mark your structure’s corners, then stand back and visualize. I like to place tall bamboo poles at each corner to really see the height in context. Leave your markers up for a few days, checking morning and evening sun angles. You might discover that shifting your structure a few feet makes all the difference.
Consider access paths around your shade structure and keep it at least two feet from fences or walls for air circulation. Take photos from different angles with your markers in place to help finalize your design before committing to construction.
Setting Posts That Stay Put
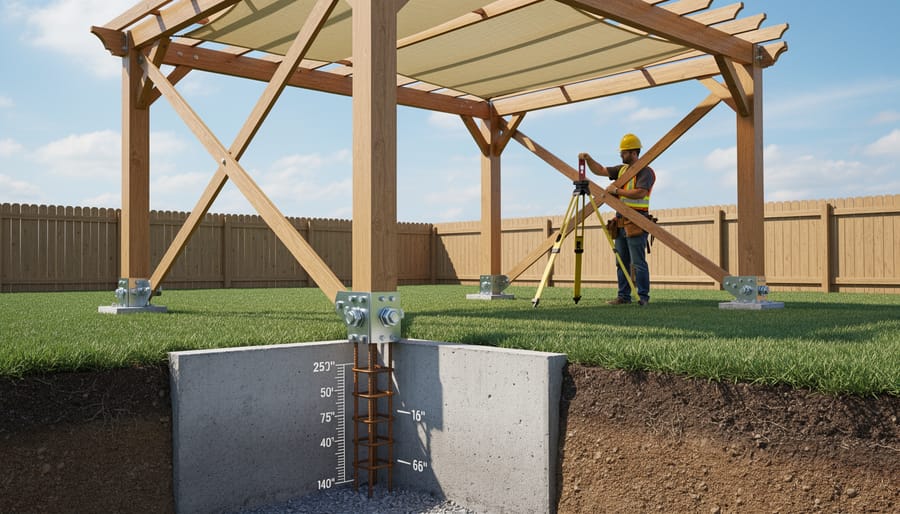
The foundation of your shade structure is everything—literally! You’ll want to dig holes at least 2 feet deep, though I always recommend going to 30 inches if your soil allows it. This gives your posts the stability they need to withstand wind and the weight of your shade material. A post hole digger makes this job much easier than a regular shovel, trust me on this one.
Now comes the big decision: concrete or gravel? For permanent structures, concrete provides unbeatable stability and is your best bet if you’re investing in a larger pergola or solid-roofed structure. Mix it according to package directions and allow 48 hours to cure fully. However, if you want flexibility to move things around later or you’re building something temporary, gravel drainage works beautifully. Pack 4-6 inches of gravel at the base, set your post, then backfill with more gravel, tamping firmly every few inches.
Before the concrete sets or you finish backfilling, check that your posts are perfectly level using a carpenter’s level on two adjacent sides. For multiple posts, use string lines to ensure they’re square to each other. This attention to detail now prevents frustrating adjustments later when nothing quite lines up!
Attaching Your Frame and Shade Material
Now comes the exciting part—bringing your frame to life with shade material! Start by attaching your horizontal supports, spacing them about 2-3 feet apart depending on your material’s weight. I learned the hard way that skipping this step leads to sagging pockets where water collects after rain, which isn’t fun for you or your plants.
When securing shade cloth, begin at one corner and work your way across systematically. Think of it like wrapping a present—you want smooth, even tension throughout. Use zip ties, grommets with rope, or specialized shade cloth clips spaced every 12-18 inches along the edges. A pro tip from master gardener Ellen Rodriguez: leave about an inch of slack initially, then go back and tighten everything once all sides are attached. This prevents the common mistake of over-tensioning one side while the opposite remains loose.
For proper tensioning, gently pull the material taut as you secure each point, but don’t stretch it drum-tight. Shade cloth needs some give to withstand wind without tearing. If you can press down an inch or two in the center without resistance, you’ve got it right.
Between horizontal supports, use bungee cords or additional tie-downs every few feet to prevent billowing. This is especially important in windy areas where unsecured material can flap and eventually tear. Remember, you’re creating gentle protection, not building a sail, so aim for secure but forgiving attachment points.
Finishing Touches for Storm Resistance
Think of your shade structure like a tree—it needs to bend without breaking. Adding diagonal cross-bracing between your vertical posts transforms a wobbly rectangle into a rigid triangle, nature’s strongest shape. I learned this the hard way when my first pergola twisted during a windstorm! Use galvanized metal corner brackets or screwed wooden braces at 45-degree angles.
Before you call it done, walk around your structure and give each connection a firm wiggle test. Tighten any loose bolts now rather than after the next storm. Here’s a tip from master gardener Elena Rodriguez: leave a tiny bit of flex in fabric panels by not stretching them drum-tight. This allows wind to dissipate through gentle movement instead of creating dangerous sail-like tension. Consider removing lightweight shade cloth during severe weather warnings—it only takes a few minutes and could save your entire structure. A little preparation means years of reliable garden protection.
Making It Last: Maintenance and Seasonal Adjustments
Your shade structure has served you well all season, but proper maintenance will ensure it continues protecting your plants for years to come. Think of it as a small investment of time that pays big dividends in longevity.
Start with regular inspections every few weeks during the growing season. Walk around your structure looking for loose connections, fraying fabric edges, or stressed joints. I learned this lesson after a small tear in my shade cloth expanded into a gaping hole during a windstorm. Catching issues early means simple fixes instead of costly replacements.
Cleaning your shade cloth once or twice a season keeps it effective. Remove loose debris with a soft brush, then hose it down gently. For stubborn dirt, use mild soap and water. Never use harsh chemicals or pressure washers, which can break down the UV-protective coating and fabric fibers. Let everything dry completely before rolling or storing to prevent mildew.
Seasonal takedown is essential in areas with harsh winters. Snow and ice loads can collapse even well-built structures. Remove shade cloth and store it in a dry, rodent-free location. Loosely roll rather than fold to prevent permanent creases. If your frame is permanent, inspect wooden posts for rot and metal components for rust. Apply appropriate treatments before winter sets in.
When deciding between repairs and replacement, consider the 50 percent rule. If repairs exceed half the cost of replacement, new components are usually wiser. However, a $5 replacement bolt beats buying a whole new frame section. Keep spare fasteners, extra shade cloth fabric, and basic tools handy for quick fixes.
With consistent care, your DIY shade structure will protect countless harvests and create a comfortable garden retreat season after season.
Common Mistakes That Cost Time and Money
I’ve learned some hard lessons over the years, and I’d love to save you from the same headaches. Let me share what catches many DIYers off guard.
The biggest mistake I see? Underestimating wind. I once built a beautiful shade structure using lightweight fabric and minimal anchoring. Three weeks later, after a summer storm, I found it tangled in my neighbor’s rosebushes. Always anchor deeper than you think necessary—at least 18 inches for posts, and use quality hardware. Those extra few dollars on ground anchors or concrete footings are worth every penny compared to rebuilding.
Choosing the wrong shade percentage is another common stumble. A gardener I interviewed installed 90% shade cloth over her tomatoes, thinking more protection meant better results. Her plants became leggy and produced poorly because they weren’t getting enough light. Most vegetables thrive under 30-50% shade, while delicate seedlings need 60-70%. Research your specific plants before purchasing materials.
Poor placement also costs people time and frustration. I’ve seen shade structures built in spots that look perfect in morning light but leave plants exposed during the brutal afternoon sun. Spend a full day observing how sunlight moves across your garden before committing to a location.
Finally, resist the temptation to skimp on materials. That bargain fabric might save you twenty dollars today, but if it deteriorates after one season, you’ll spend more replacing it—plus lose valuable growing time. Quality UV-resistant materials typically last 5-10 years, making them the smarter investment. Think of your shade structure as infrastructure for your garden’s long-term success, not just a quick fix.
Building your own shade structure is more achievable than you might think, and your plants will thank you immediately. Remember, even a simple framework with basic shade cloth beats letting your tomatoes wilt in scorching afternoon sun. Start with something straightforward like a single hoop house or a basic frame, then expand as your confidence grows. I’ve seen gardeners transform their struggling gardens with nothing more than some PVC pipes and a weekend afternoon.
The beauty of DIY garden projects like these is that they’re forgiving. If your first attempt isn’t perfect, you can adjust it. Plants don’t judge wobbly posts or slightly crooked frames; they simply appreciate the relief from harsh conditions. The skills you build here will serve you in countless other garden endeavors too.
I’d love to hear about your shade structure adventures! What design worked best for your space? Did you discover any clever tricks or materials that made the job easier? Share your photos and questions in the comments below. Your experience might be exactly what another gardener needs to get started on protecting their own precious plants.