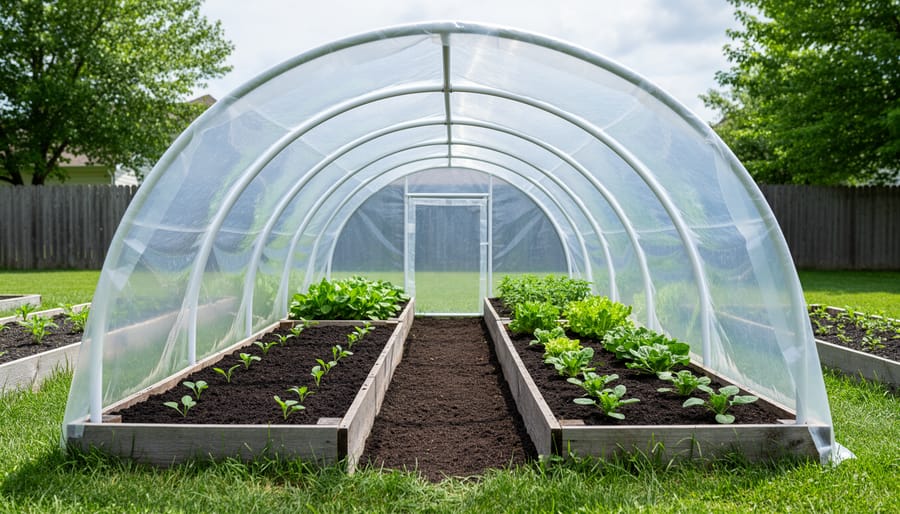
Picture yourself harvesting fresh lettuce in March or growing tomatoes until November—that’s the magic a DIY hoop house brings to your garden. This simple, curved structure extends your growing season by 4-6 weeks on each end, protects plants from harsh weather, and costs a fraction of what you’d spend on a traditional greenhouse.
Building your own hoop house is surprisingly straightforward, even if you’ve never tackled construction projects before. You’ll need basic materials like PVC pipes or metal hoops, greenhouse plastic, and ground anchors—most costing between $100-$300 depending on size. The beauty of hoop houses lies in their flexibility: start with a modest 4×8-foot structure to test the waters, or go bigger if you’re ready to dramatically expand your harvest.
Think of a hoop house as one of those easy garden upgrades that delivers outsized rewards. Unlike permanent greenhouses requiring foundations and permits, hoop houses are temporary structures you can assemble in a weekend. They’re perfect for hardening off seedlings, protecting cold-hardy crops through winter, and giving heat-loving plants the extra warmth they crave.
Whether you’re dreaming of year-round salad greens or hoping to get a jumpstart on spring planting, this guide walks you through every decision and construction step. You’ll learn exactly what materials to buy, how to assemble them without professional help, and how to maintain your hoop house season after season.
Why Choose a Hoop House Over a Traditional Greenhouse?
When I first started exploring season extension options, I faced the same dilemma many gardeners encounter: should I invest in a traditional greenhouse or build a hoop house? After talking with experienced grower Maria Chen, who’s been gardening for over twenty years, I discovered that hoop houses offer some compelling advantages that make them perfect for many situations.
The most obvious difference is cost. A traditional greenhouse with glass or polycarbonate panels, foundation, and proper ventilation systems can easily run several thousand dollars. In contrast, you can build a functional hoop house for a few hundred dollars using PVC pipe or metal hoops and polyethylene sheeting. This makes hoop houses incredibly accessible for gardeners just starting out or those working with limited budgets.
Construction difficulty is another major consideration. Greenhouses typically require concrete footings, precise framing, and sometimes professional installation. Hoop houses, however, are wonderfully straightforward. Most people can complete a basic structure in a weekend using common tools you probably already own. There’s something empowering about building your own growing space without needing carpentry expertise.
Portability gives hoop houses another edge. If you rotate your garden beds or move to a new property, you can dismantle and relocate a hoop house relatively easily. Traditional greenhouses are essentially permanent structures.
That said, greenhouses do have their place. They offer better insulation, year-round growing potential in harsh climates, and greater durability against extreme weather. But for extending your growing season, protecting plants from frost, and getting earlier harvests without breaking the bank, a hoop house delivers remarkable results. It’s the practical choice that lets you start growing sooner rather than saving for years.
Planning Your Hoop House: Size, Location, and Design
Choosing the Right Size for Your Garden
Before you start gathering materials, let’s talk about sizing your hoop house to fit your specific needs. I’ve found that thinking through this carefully now saves headaches later!
Start by measuring your available garden space and considering what you’ll grow. A compact 4×8-foot hoop house works beautifully for salad greens and herbs, making it perfect for beginners testing the waters. Most gardeners find that 6×12 feet or 8×16 feet offers that sweet spot between manageable construction and productive growing space. These sizes accommodate several raised beds or multiple rows of vegetables.
Think about your ambitions too. Planning to grow tall tomatoes or peppers? You’ll want at least 5 to 6 feet of headroom at the center. Remember, you need comfortable access for watering, harvesting, and plant care, so factor in walkway space of at least 2 feet.
Here’s my advice: if you’re uncertain, go slightly bigger than you think you need. Gardens have a way of expanding, and you’ll thank yourself when you want to add just one more row of strawberries! That said, start with dimensions you can realistically build and maintain. Success with a smaller hoop house often leads to building a second one down the road.
Finding the Perfect Spot
Finding the right location for your hoop house can make the difference between a thriving garden and a frustrating struggle. Start by observing your yard throughout the day to identify spots that receive at least six hours of direct sunlight, ideally with southern exposure for maximum warmth during cooler months.
Check your drainage by examining where water pools after heavy rain. You’ll want level ground or a gentle slope that naturally diverts excess water away from your hoop house. Poor drainage leads to soggy soil and unhappy plants, so avoid low-lying areas where water accumulates.
Wind protection is another crucial factor. Position your hoop house near existing structures, fences, or hedgerows that can serve as windbreaks, but leave enough space for proper air circulation. Strong winds can damage your structure and stress your plants.
Finally, consider proximity to your water source. You’ll be watering regularly, so having access to a hose or DIY watering system will save you countless trips with heavy watering cans. Walk the distance from your spigot to potential sites while imagining yourself making that journey multiple times per week.
Permanent vs. Portable Designs
When planning your hoop house, you’ll need to choose between permanent and portable designs, and each has distinct advantages depending on your gardening goals.
Permanent hoop houses are anchored securely into the ground, typically with posts sunk into concrete or deep soil. They’re incredibly sturdy and can withstand harsh weather conditions much better than their portable counterparts. I’ve found they’re ideal if you have dedicated growing space and want a structure that’ll last for years. The downside? Once it’s up, it stays put, which means you can’t practice crop rotation by moving the structure to fresh soil.
Portable designs, on the other hand, offer wonderful flexibility. These lighter structures can be relocated seasonally, allowing you to rotate crops and prevent soil depletion. They’re perfect for renters or gardeners who like experimenting with different layouts. Many gardeners I’ve spoken with love being able to move their hoop house to follow the sun or protect different garden beds throughout the year.
The trade-off is stability. Portable designs need extra anchoring in windy conditions and may not hold up as well during storms. Consider your climate, property ownership status, and whether you value permanence or flexibility more in your gardening practice.
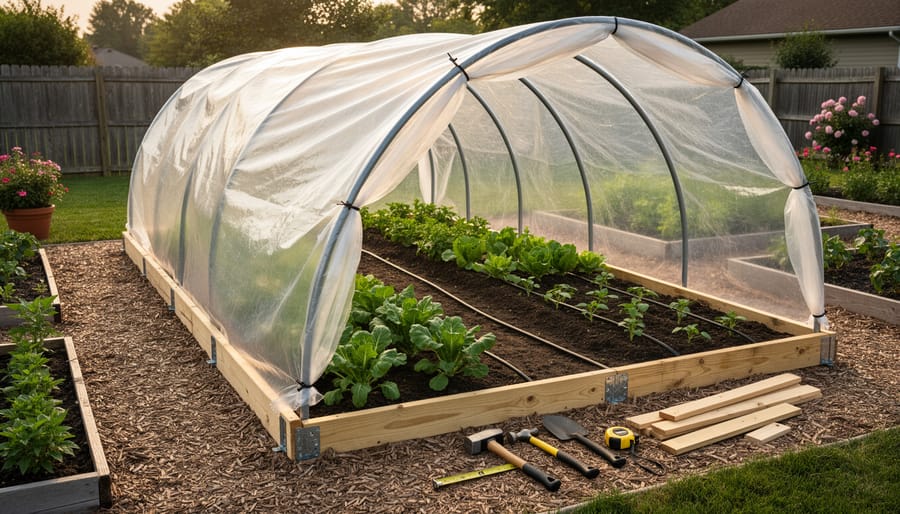
Materials and Tools You’ll Need
Building your own hoop house is one of those satisfying budget-friendly garden projects that delivers incredible value for the investment. Let’s walk through everything you’ll need to bring this project to life.
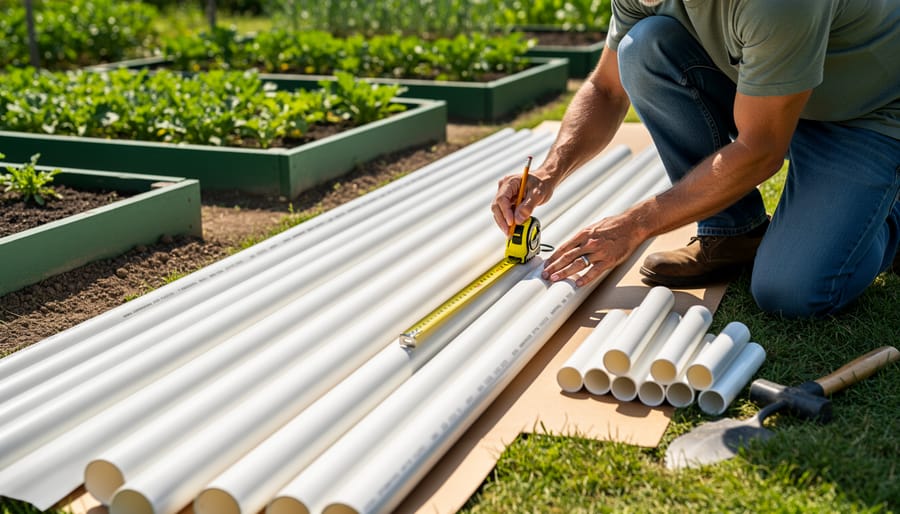
For the frame, you’ll need PVC pipes or metal conduit hoops. PVC is lighter, easier to work with, and more forgiving for beginners. I recommend 10-foot lengths of half-inch PVC pipe, which you can find at any hardware store for about three to five dollars each. The number depends on your desired length, but spacing them four feet apart works beautifully. Metal conduit costs slightly more but offers better wind resistance in exposed locations.
Your base structure requires rebar stakes or ground anchors to secure those hoops. Four-foot pieces of half-inch rebar, driven 18 inches into the ground, create rock-solid anchor points. You’ll need two stakes per hoop, so calculate accordingly.
The covering is where things get exciting. Greenhouse plastic, typically six-mil thickness, provides the perfect balance of durability and light transmission. A 20-foot by 25-foot roll runs about 50 to 70 dollars and covers most small hoop houses. Don’t use regular painter’s plastic, it degrades quickly under UV exposure. If you’re really watching pennies, ask local farmers if they have leftover greenhouse plastic from their operations.
For fastening, grab UV-resistant zip ties, wiggle wire and channel, or specialized hoop house clips. Wiggle wire creates the most professional finish and makes seasonal plastic replacement easier, but zip ties work perfectly fine and cost considerably less.
You’ll also need lumber for end walls. Two-by-fours create sturdy frames, though two-by-threes work for smaller structures. Plan for a simple door frame as well, nothing fancy, just functional access.
Tool-wise, keep it simple. A drill with various bits, a saw for cutting lumber, wire cutters or heavy scissors for the plastic, a tape measure, and a level cover the basics. A post hole digger or heavy mallet helps drive those rebar stakes, though I’ve managed with a regular hammer and patience.
Money-saving tip: Check building supply salvage yards for lumber and ask landscaping companies about unused or lightly used materials. Many gardeners have successfully sourced materials through community Buy Nothing groups or Craigslist. Remember, this doesn’t need to be perfect, it just needs to protect your plants and extend your growing season.
Step-by-Step: Building Your Hoop House
Preparing Your Base and Foundation
Before you start bending those hoops, you’ll need a solid foundation to keep your structure stable through wind, rain, and snow. Think of this step as setting the stage for success!
Start by choosing a level spot that receives at least six hours of sunlight daily. If your site has a slight slope, you’ll need to level it out. Use a rake to remove rocks, weeds, and debris, then check your work with a long board and a level. Even small variations can cause structural headaches later.
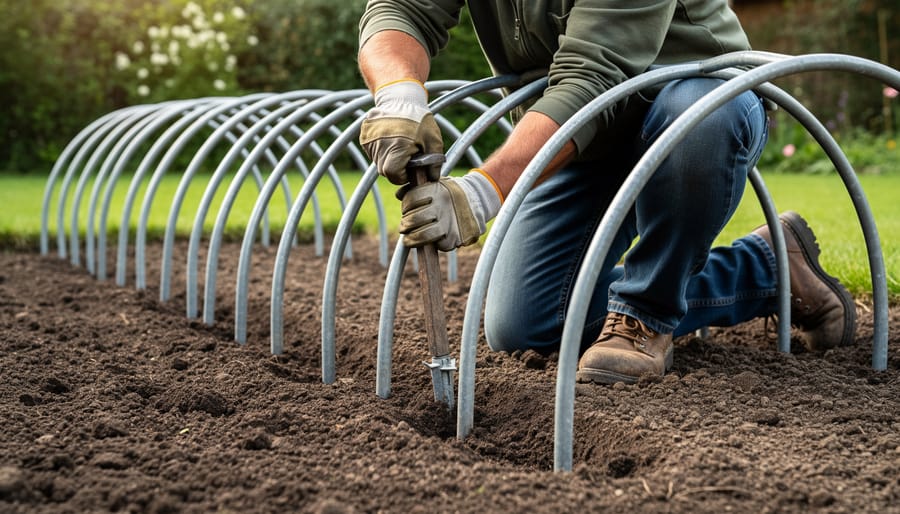
For anchoring, you have three reliable options. A wood base frame works beautifully for most gardeners. Build a rectangular frame using 2×6 or 2×8 treated lumber, sizing it to match your planned hoop house dimensions. Common sizes are 10×12 feet or 12×20 feet, though you can adjust based on your space. Secure the corners with deck screws and anchor the entire frame to the ground with 18-inch rebar stakes driven through pre-drilled holes every 3-4 feet.
If you prefer ground posts, sink 2-foot sections of rebar or metal conduit 12-18 inches deep at 4-foot intervals along both sides where your hoops will attach. This method works especially well in softer soils.
The simplest option involves driving rebar stakes directly into the ground at your planned hoop spacing, typically 4 feet apart. Just ensure they’re at least 12 inches deep for adequate stability. Whichever method you choose, double-check that everything is level and square before moving forward.
Installing the Hoops
Now comes the exciting part—transforming your frame into an actual hoop house! Start by marking your hoop spacing along both base boards. For standard 10-foot wide structures, place hoops every 4 feet for adequate support. If you live in a snowy area, I’d recommend spacing them closer at 3-foot intervals to handle the extra weight.
For PVC hoops, gently bend each pipe into an arch and insert both ends into your rebar stakes or ground posts. Don’t force them—let the natural curve do the work. You’ll want your hoops to reach about 6 to 7 feet at the center peak, which provides excellent headroom and allows heat to circulate properly. My first hoop house was only 5 feet tall, and I spent the whole season hunched over like a garden gnome!
Metal hoops require a bit more muscle but offer superior durability. Use a pipe bender if working with conduit, or purchase pre-bent hoops to save time and effort.
Once positioned, secure each hoop to your base frame using metal strapping, U-bolts, or heavy-duty zip ties. Double-check that all hoops are evenly spaced and standing vertically—this ensures your plastic covering will fit smoothly without creating stress points or gaps.
Adding Support and Stabilization
Now that your hoops are firmly in place, it’s time to add the structural elements that’ll keep your hoop house standing strong through wind, snow, and time. Think of this step as giving your structure a skeleton that prevents sagging and collapse.
Start by installing a ridge pole along the top center of your hoops. This horizontal piece, typically a length of PVC pipe or metal conduit, connects all your hoops together and prevents them from bowing sideways. Simply attach it using zip ties, hose clamps, or specialized PVC connectors at each hoop intersection.
Next, add cross bracing along the sides and ends. These diagonal supports create triangles, which are nature’s strongest shape. Run them from the base of one hoop to the top of the next, alternating directions to form an X pattern. You don’t need bracing on every hoop—every other one usually does the trick.
For larger structures over 12 feet wide, consider adding purlin poles running horizontally along each side, about halfway up. These distribute weight more evenly and provide extra anchor points for your covering material.
I learned this lesson the hard way during my first winter—without proper bracing, my hoop house looked like a sad accordion after a heavy snowfall! Don’t skip this step; it’s what transforms a temporary shelter into a reliable growing space.
Securing the Plastic Covering
This is where your hoop house really comes together! Start by choosing a calm, dry day for this task—wind can turn plastic sheeting into an uncooperative sail, believe me.
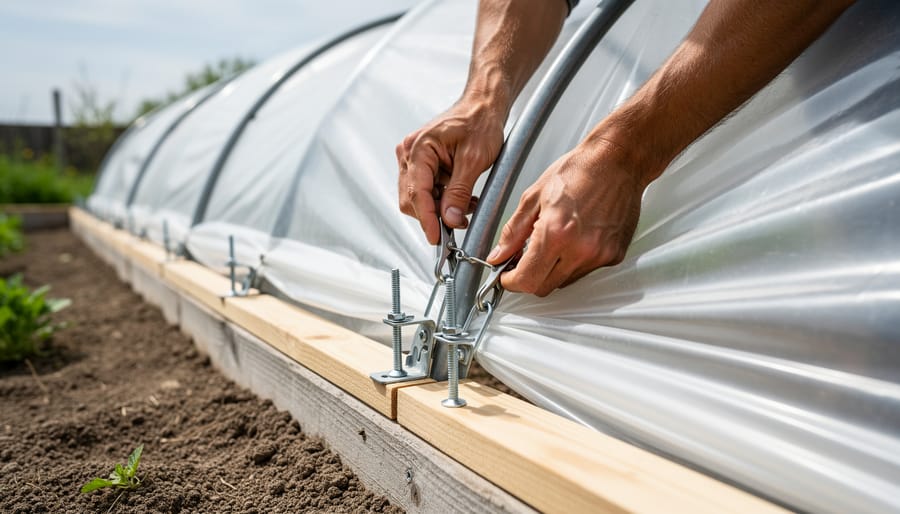
Begin at one end of your hoop house, draping the greenhouse plastic over the frame. You’ll want at least 2-3 feet of excess material touching the ground on all sides. This overlap is crucial for anchoring. Working with a friend makes this infinitely easier, as one person can hold tension while the other secures.
For attachment, wiggle wire channels screwed into your base boards work beautifully, letting you slide a spring wire through the channel to grip the plastic firmly. Alternatively, wooden lath strips nailed over the plastic create a secure hold. Space these attachment points every 12-18 inches for optimal tension.
Before fully securing everything, plan your door opening. Simply cut a vertical slit on one end, leaving extra material to fold back and secure with clips or ties. Some gardeners prefer installing a zipper door kit, which costs around $15-20 and provides cleaner access.
Pull the plastic taut as you secure it—wrinkles create pockets where water collects and wind catches. However, don’t stretch it drum-tight; leave just slight give to accommodate movement during temperature changes.
Finally, bury the bottom edges 6 inches deep or weight them down with sandbags. This weatherproofs against wind while preventing heat loss.
Ventilation and Temperature Control
Getting your hoop house ventilation right is just as important as building a sturdy frame! I learned this the hard way during my first season when temperatures inside soared to over 100°F on a sunny spring day, wilting my seedlings before lunch. Proper airflow prevents overheating, reduces humidity that can lead to plant diseases, and keeps your plants thriving year-round.
The most practical ventilation solution is roll-up sides. Install your plastic sheeting with a base board at ground level, then attach wooden battens or PVC pipes horizontally at about 3-4 feet high. You can roll the plastic up around these pipes and secure them with bungee cords or rope. This design lets you adjust ventilation quickly based on daily weather conditions, and it’s wonderfully simple to operate.
Don’t forget end-wall vents! Even a small opening at each gable end creates crucial cross-ventilation. I cut flaps into my end walls that can be propped open with stakes, which works beautifully on those transitional spring and fall days. For those who can’t check their hoop house throughout the day, automatic vent openers are game-changers. These temperature-sensitive devices use expanding wax cylinders to open vents automatically when it gets too warm, no electricity needed.
Managing seasonal extremes requires different strategies. In summer, keep sides rolled up during the day and consider shade cloth for the hottest weeks. Winter calls for closing everything up at night, though you’ll still want to vent on sunny days to prevent condensation buildup. Pairing good ventilation with a simple watering solution creates the ideal growing environment your plants will love.
Common Mistakes and How to Avoid Them
Learning from others’ experiences can save you time, money, and plenty of headaches! One of the most common mistakes first-time builders make is underestimating the importance of proper anchoring. I’ve heard stories from seasoned gardeners who watched their beautiful hoop houses take flight during unexpected windstorms. The solution? Use ground anchors rated for your climate, secure every base pipe firmly, and consider adding sandbags along the bottom edges during particularly windy seasons.
Ventilation often gets overlooked until it’s too late. Without adequate airflow, temperatures inside can skyrocket on sunny days, even in winter, potentially cooking your precious plants. Plan for roll-up sides or end vents from the start rather than trying to retrofit later. Many experienced builders recommend positioning your hoop house where it catches prevailing breezes.
Choosing the wrong plastic thickness is another pitfall. That bargain-priced 3-mil plastic might seem appealing, but it typically won’t survive more than one season. Invest in 6-mil greenhouse plastic with UV protection from the beginning. Yes, it costs more upfront, but replacing plastic annually gets expensive quickly.
Finally, don’t forget seasonal maintenance! Remove snow buildup promptly to prevent collapse, and inspect your plastic regularly for tears. Small rips spread surprisingly fast when ignored. Keep a repair tape kit handy and address damage immediately. One gardener I interviewed learned this lesson after a tiny tear became a gaping hole during one windy night, undoing months of careful growing.
Maintaining Your Hoop House Through the Seasons
Your hoop house investment deserves proper care to keep it productive for years to come. Let’s walk through some simple maintenance practices that’ll help your structure weather every season successfully.
During winter, snow accumulation can stress your frame, so gently brush off heavy loads with a soft broom from inside the hoop house. If you live in particularly harsh climates, consider adding extra support hoops midway through your structure. I learned this lesson the hard way after a surprise blizzard!
Check your plastic covering monthly for tears or loose spots. Small rips can be patched with clear greenhouse repair tape before they become bigger problems. Clean your plastic twice yearly using mild soap and water to maximize light transmission. Those algae and dirt buildups can block up to 30% of valuable sunlight your plants need.
Before storm season arrives, reinforce your anchoring system and ensure all wiggle wire or fasteners are secure. Walk around your hoop house and tug gently on the plastic to identify weak points. Consider installing affordable DIY irrigation while you’re doing maintenance checks.
Replace worn wooden base boards before rot spreads, and tighten any loose PVC connections. Your end walls need special attention since they take the most abuse from daily use. Replace hinges and latches as needed to maintain proper ventilation control.
Think of maintenance as your hoop house’s regular checkup. A little attention throughout the year prevents costly repairs and keeps your growing environment thriving season after season.
Congratulations! You’ve just built yourself a functional hoop house that will transform your gardening experience. Take a moment to appreciate what you’ve accomplished—you’ve created a protected space where your plants can thrive beyond their normal seasons. Your efforts will reward you with earlier spring harvests, extended fall growing periods, and healthier plants sheltered from harsh weather and pests.
The beauty of your new hoop house is that it’s not just a structure; it’s an investment in longer growing seasons and more abundant yields. You’ll soon enjoy the satisfaction of harvesting tomatoes weeks before your neighbors or keeping your lettuce growing well into winter. Plus, you’ve done this affordably and on your own terms.
Now it’s your turn to make the most of this achievement. We’d love to hear how your hoop house project went! Share your experiences, photos, or any creative modifications you made in the comments below. If you encountered challenges or have questions about optimizing your structure, don’t hesitate to ask. Our gardening community is here to support each other, and your insights might inspire someone else to start their own project. Happy growing, and here’s to many successful seasons ahead in your new hoop house!