Aerate your lawn in early fall when soil temperatures drop between 50-65°F, punching holes 2-3 inches deep to allow oxygen, water, and nutrients to penetrate compacted soil before winter dormancy sets in. This single task dramatically improves root health and spring recovery. Apply a winterizer fertilizer with high potassium content four to six weeks before your first expected frost—this strengthens root systems and builds carbohydrate reserves that help grass survive freezing temperatures and emerge vigorous when warmth returns.
Mow your lawn shorter than usual for the final cut of the season, reducing blade height to about 2-2.5 inches to prevent snow mold and matting under heavy snow cover. Keep mowing as long as grass continues growing, even if it’s just once every two weeks in late fall. Remove fallen leaves promptly using a rake or mulching mower, as thick leaf layers suffocate grass and create perfect conditions for fungal diseases throughout winter months.
Overseed thin or bare patches six weeks before the first frost, giving new grass time to establish strong roots before cold weather arrives. Choose a grass variety suited to your climate zone and existing lawn type for seamless integration. These preparation steps transform winter from a stressful survival period into a time when your lawn quietly builds strength beneath the surface, setting the stage for that enviable spring green-up your neighbors will admire.
Understanding Your Grass’s Winter Survival Strategy

Cool-Season vs. Warm-Season Grasses
Understanding whether you have cool-season or warm-season grass is the foundation of successful winter preparation. Cool-season grasses, like Kentucky bluegrass, fescue, and ryegrass, thrive in cooler temperatures and actually do most of their growing in spring and fall. They stay green through winter in many climate zones and benefit from active care right up until the first hard freeze. Think of them as winter warriors that need your support to maintain their vigor.
Warm-season grasses, including Bermuda, zoysia, and St. Augustine, prefer hot summers and naturally go dormant when temperatures drop below 50-55°F. They turn brown in winter, which is completely normal and healthy. For these grasses, your preparation happens earlier in fall, focusing on helping them store energy before dormancy sets in.
Not sure which type you have? A simple test: if your grass is greenest in summer and struggles in cool weather, it’s warm-season. If it thrives in spring and fall, you’ve got cool-season grass. This distinction determines everything from your fertilization schedule to winterizing tasks.
What Winter Stress Actually Does to Your Lawn
Winter isn’t just cold and uncomfortable for you—it’s genuinely tough on your lawn too. Think of your grass like you’d think of your own skin exposed to harsh weather. Those repeated freeze-thaw cycles? They’re like your lawn experiencing temperature whiplash, causing the soil to expand and contract. This movement can actually push grass roots right out of the ground, leaving them vulnerable and exposed.
Then there’s snow mold, which sounds alarming but is incredibly common. When snow sits on your lawn for extended periods, especially if the grass went into winter too long or wasn’t properly prepared, fungal diseases can develop underneath that white blanket. You won’t even know it’s happening until spring reveals those telltale circular patches of matted, discolored grass.
And here’s something many of us don’t consider: foot traffic on frozen or snow-covered grass causes real damage. Walking across your lawn when it’s dormant and brittle is like snapping frozen twigs—those grass blades break rather than bend. Even something as simple as kids playing or you taking a shortcut to the mailbox can leave lasting brown pathways come spring. Understanding these stressors helps you see why a little preparation now saves considerable heartache later.
The Pre-Winter Lawn Checklist That Makes Spring Easier
Getting the Last Mow Right
That final mow before winter arrives is more crucial than many gardeners realize, and I’ve learned this lesson the hard way after dealing with spring disease issues years ago. The key is timing it just right—aim for your last mow when grass growth slows significantly, typically when temperatures consistently hover around 50°F (10°C).
Here’s what makes this mow special: you want to gradually lower your blade over your last few cuts, finishing at about 2 to 2.5 inches for cool-season grasses. This proper mowing height is the sweet spot—short enough to prevent matting under snow (which invites fungal diseases like snow mold) but tall enough to protect the grass crowns from freezing damage.
I always make sure my mower blade is sharp for this final cut. A clean cut heals faster and reduces stress on the grass as it heads into dormancy. Also, never mow when the grass is wet or frosty, as this can tear the blades and compact the soil.
One tip from master gardener Patricia Chen: “Think of this last mow as tucking your lawn in for winter—you’re creating the ideal blanket thickness.” Remove any grass clippings if they’re heavy, as thick layers can smother the grass beneath.
Fall Fertilization: Your Secret Weapon
Here’s something I learned from my neighbor, a retired groundskeeper: fall is actually when your grass is secretly working its hardest. While the blades slow their growth, the roots are busy spreading and storing energy for spring. That’s why fall fertilization is such a game-changer.
Think of late-season feeding as giving your lawn a nutritious meal before a long winter’s rest. When you fertilize in fall, you’re strengthening those underground roots, helping them survive freezing temperatures and emerge vigorous come spring. I’ve seen lawns that receive fall fertilizer green up weeks earlier than those that don’t.
The key is choosing the right formula. Look for a winterizer fertilizer with a higher potassium content, which promotes root development and disease resistance. The nitrogen-phosphorus-potassium ratio should favor potassium, something like 20-8-20 or similar. Many bags are specifically labeled as winterizer blends, making selection straightforward.
Timing matters significantly. Apply your fall fertilizer between late October and early November, or about two to three weeks before your first expected hard freeze. Your grass should still be green and growing, not yet dormant. This timing allows the nutrients to absorb before winter sets in.
The application itself is simple. Use a broadcast spreader for even coverage, following package directions carefully. Water lightly afterward if rain isn’t forecasted within a day or two. This simple step truly sets the stage for a spectacular spring lawn that’ll be the envy of your neighborhood.
Aeration and Overseeding Before the Freeze
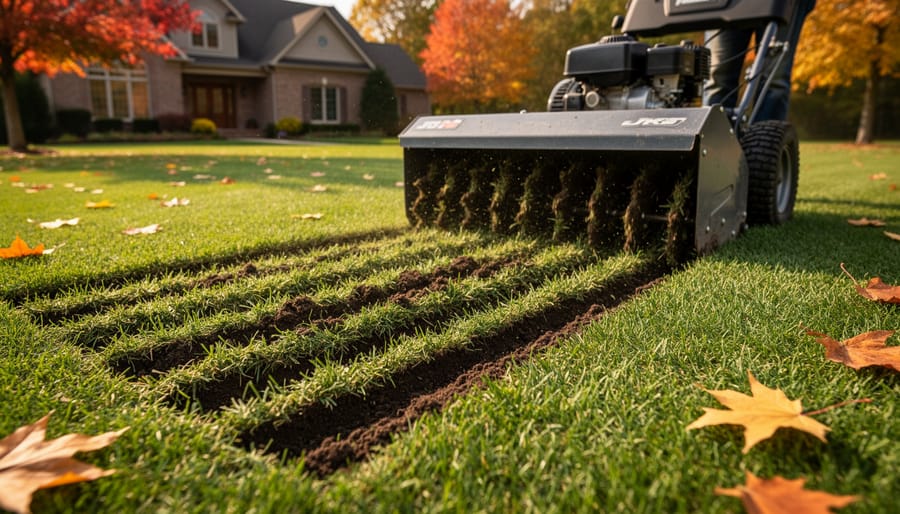
Late summer to early fall is your golden window for aeration and overseeding, giving your lawn one last boost before winter sets in. Think of aeration as giving your grass roots room to breathe—literally! This process creates small holes in the soil, breaking up compacted earth and allowing water, nutrients, and oxygen to penetrate deeper.
Start by aerating your lawn using either a spike aerator or, better yet, a core aerator that removes plugs of soil. You can rent one from most garden centers for a weekend project. The best time is when soil is slightly moist—not too wet, not bone dry. Simply make passes across your lawn in a crisscross pattern, focusing extra attention on high-traffic areas where soil compaction is worst.
Here’s where it gets exciting: immediately after aerating is the perfect moment for overseeding. Choose a grass seed variety suited to your climate and lawn conditions. Spread seeds evenly over the entire lawn, paying special attention to bare patches and thin areas. The aeration holes provide ideal pockets for seeds to settle and germinate.
Water lightly but consistently for the next two to three weeks, keeping the top inch of soil moist. This combination of aeration and overseeding creates healthy soil conditions and establishes strong grass plants that will survive winter’s challenges and emerge vigorous come spring. Your lawn will thank you with thick, lush growth next season!
The Leaf Management Mistake Most People Make
I’ll be honest with you – I’ve made this mistake myself! Many gardeners assume a blanket of autumn leaves provides cozy insulation for grass, but the reality is quite different. Left in place, those beautiful leaves create a suffocating mat that blocks sunlight, traps moisture, and invites fungal diseases. Your grass essentially can’t breathe underneath.
Here’s the good news: you don’t need to bag those leaves and send them to the landfill. Instead, run your mower over them when they’re dry, which chops them into small pieces. If you have just a light layer, these tiny fragments can actually decompose over winter and feed your lawn. However, if you’ve got a thick covering, rake or blow the shredded leaves into your garden beds instead.
This approach gives you the best of both worlds. Your lawn stays healthy and disease-free, while your perennial beds get a protective winter blanket that suppresses weeds and gradually enriches the soil. Master gardener Susan Park, whom I interviewed last fall, swears by this method: “I haven’t bought mulch in five years. My oak and maple leaves do all the work.” Just remember to keep the mulch a few inches away from plant crowns to prevent rot.
Winterizing Your Irrigation System
Before winter’s freeze arrives, protecting your irrigation system is absolutely essential to avoid costly repairs come spring. I learned this lesson the hard way my first winter as a homeowner when a forgotten hose bib burst and flooded my basement!
Start by draining all water from your sprinkler system. Most systems need professional blowout service using compressed air to remove every last drop from the lines. If you’re handy, you can rent the equipment, but honestly, hiring a pro gives you peace of mind. For above-ground hoses, disconnect them from outdoor faucets, drain completely, and store them in your garage or shed.
Don’t forget those outdoor faucets themselves. Install insulated foam covers on all spigots and hose bibs, available at any hardware store for just a few dollars. If you have backflow preventers or above-ground valves, wrap them with insulating tape or covers designed specifically for this purpose.
Mark your calendar for early fall, ideally before the first freeze. A little preventative care now saves hundreds in spring repairs and ensures your system’s ready to go when warmer weather returns.
What to Do (and Not Do) While Snow Is on the Ground
Traffic and Compaction: The Hidden Threat
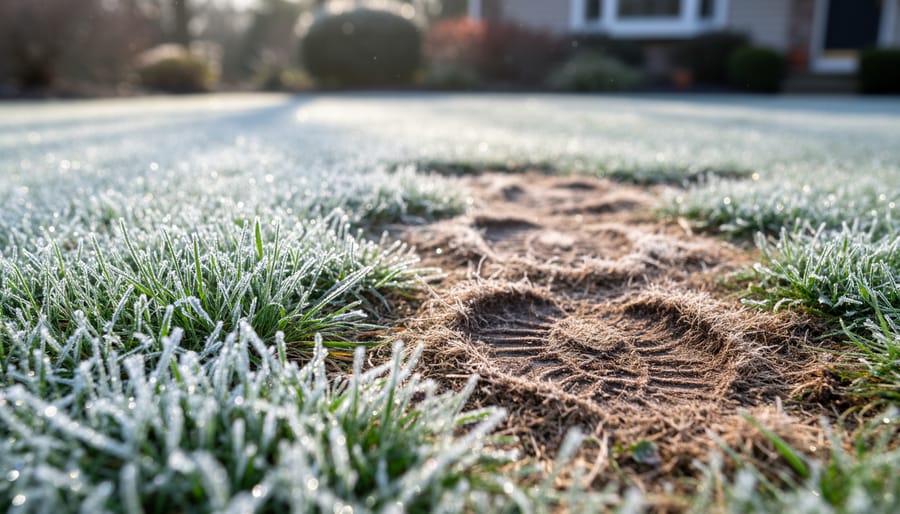
Here’s something many gardeners don’t realize until it’s too late: walking on frozen or snow-covered grass can cause serious damage that won’t become apparent until spring arrives. When grass blades are frozen, they become brittle and break easily under foot traffic. Even more problematic is soil compaction, which occurs when you walk on wet, thawing ground or compressed snow that later melts and refreezes.
Compacted soil restricts oxygen flow to grass roots and prevents proper drainage, creating perfect conditions for disease and dead patches. The weight of foot traffic essentially crushes the air pockets in the soil that roots desperately need during their dormant period.
The solution is surprisingly simple: create designated pathways using stepping stones, mulched trails, or temporary boardwalks for areas you must access regularly during winter. I learned this lesson the hard way after repeatedly crossing my lawn to reach the bird feeder, only to discover a worn, patchy trail come springtime.
If you absolutely must walk on your winter lawn, wait until the ground is thoroughly frozen and avoid areas with ice or compacted snow. Better yet, plan your winter garden layout in autumn to minimize the need for lawn crossing altogether.
De-Icing Products That Won’t Wreck Your Grass
Traditional rock salt can be a real troublemaker for your lawn, causing brown patches and damaged grass that won’t recover until spring. The good news? You have several effective alternatives that’ll keep your walkways safe without sacrificing your turf.
Calcium magnesium acetate (CMA) tops my list of lawn-friendly de-icers. It works well down to about 20°F and won’t harm your grass even if some gets tracked onto the lawn. It’s pricier than rock salt, but your grass will thank you come spring. Sand or kitty litter provides excellent traction without any chemical impact, though they won’t actually melt ice.
I recently chatted with landscape professional Maria Chen, who swears by urea-based de-icers for her clients’ properties. “They’re essentially a nitrogen fertilizer,” she explained. “In moderation, they’re completely safe for turf.” Just avoid overdoing it, as too much nitrogen in winter can encourage unwanted growth.
When applying any de-icer near your lawn, less is always more. Create a two-inch buffer zone between treated pavement and grass whenever possible. Apply products sparingly using a spreader rather than pouring directly from the bag, which creates concentrated spots that can burn turf.
For extra protection, consider placing temporary barriers like landscape edging or even cardboard along the grass edge before winter storms hit. This simple step catches runoff and prevents de-icing products from washing onto your lawn during melts. Your spring grass will emerge healthier and greener for the effort.
Setting Up Your Lawn for an Early Spring Comeback
When to Start Spring Prep
Timing your return to active lawn care is like waiting for the perfect moment to plant tomatoes—jump in too early, and you risk undoing all your winter preparation work. The key is patience and paying attention to nature’s signals rather than the calendar alone.
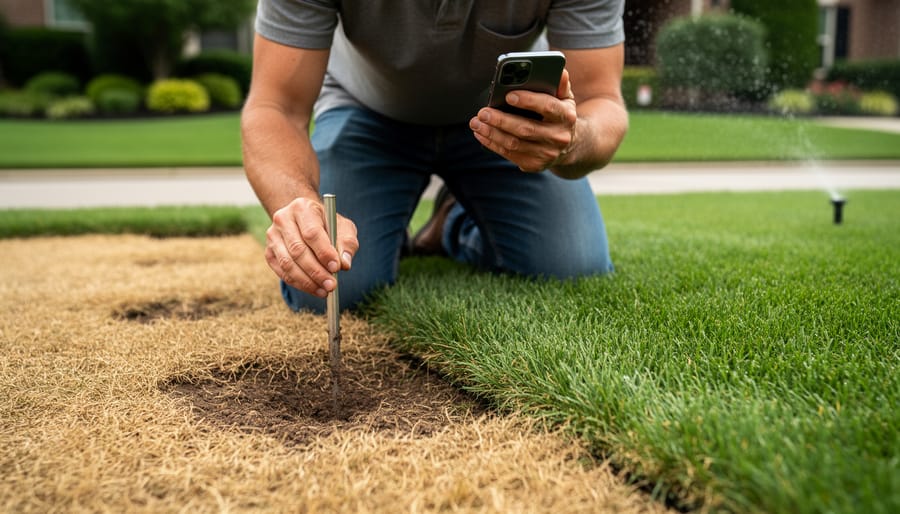
Start monitoring soil temperature when you notice consistent daytime warmth. Your grass needs soil temperatures to reach around 50-55°F (10-13°C) before it actively grows again. You can check this with an inexpensive soil thermometer, pushing it about two inches into the ground. When temperatures stay consistently in this range for several days, your lawn is waking up.
Watch for these visual cues too: grass blades showing fresh green growth at the base, earlier-blooming bulbs like crocuses appearing, and trees beginning to bud. However, resist the urge to start mowing, fertilizing, or heavy maintenance at the first sign of green. Walking on waterlogged or frost-covered grass can damage crowns and compact soil.
I learned this lesson the hard way when I eagerly aerated my lawn during a warm February spell, only to have a late freeze set everything back. Now I wait until I’ve had at least two weeks of consistent spring weather before resuming regular care. For comprehensive guidance on transitioning from winter dormancy, explore our tips on early spring preparation to set your lawn up for success.
Tools and Supplies to Have Ready
Winter is the perfect time to take stock of your equipment and get everything ready for spring. Start by inspecting your lawn mower—sharpen or replace blades, change the oil, and clean the deck thoroughly. You’ll thank yourself when March arrives! Check your spreader for rust or clogging and give it a good cleaning. Don’t forget hand tools like rakes, aerators, and edgers; repair broken handles and replace worn parts now while you have time.
If you’re planning any soil amendments or overseeding projects, this is when to purchase supplies like compost, grass seed, and fertilizer so they’re on hand when temperatures warm. Store everything in a dry location to maintain quality. Finally, test your irrigation system for leaks or damage that winter weather might have caused. Taking care of these tasks during the quiet season means you’ll hit the ground running when your lawn needs attention most.
You’ve done it! You’ve learned the essential steps to prepare your lawn for winter, and that’s something to feel genuinely proud of. From aerating and overseeding to those final fall fertilizer applications, each task you complete now is truly an investment in the lush, healthy lawn you’ll enjoy come spring.
Remember, winter preparation isn’t about perfection. Even tackling just a few of these steps will put your grass in a better position to weather the cold months ahead. Maybe this year you focus on proper mowing height and leaf removal, and next year you add aeration to your routine. Every effort counts, and your lawn will thank you for it.
The beauty of lawn care is that we’re all learning together, season after season. What works perfectly in one yard might need tweaking in another, and that’s completely normal. I’ve had my share of winter lawn experiments, and I’m still discovering new techniques that make a difference.
As you head into winter, keep an eye on your grass and trust your instincts. If something doesn’t look quite right, investigate it. And remember, spring always arrives with new opportunities to adjust and improve.
I’d love to hear about your winter preparation journey. What steps are you planning to tackle first? Do you have any questions about techniques we’ve covered? Share your experiences in the comments below. Your insights might be exactly what another gardener needs to hear, and together we can all grow stronger, healthier lawns.