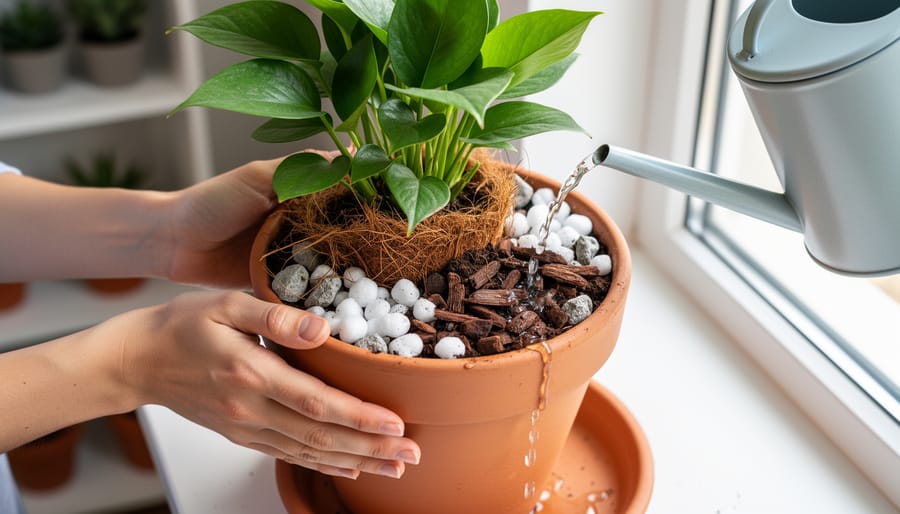
Replace traditional potting soil with inert growing media like perlite, coconut coir, or clay pebbles that anchor roots while allowing nutrient-rich water to flow freely through the system. Choose containers with multiple drainage holes or mesh-bottom net pots that prevent water stagnation—standard plastic buckets, food-grade storage bins, and even repurposed containers work beautifully when properly modified. Set up a simple drainage system by elevating your growing container above a reservoir that catches and recirculates the nutrient solution, eliminating the need for soil-based water retention entirely.
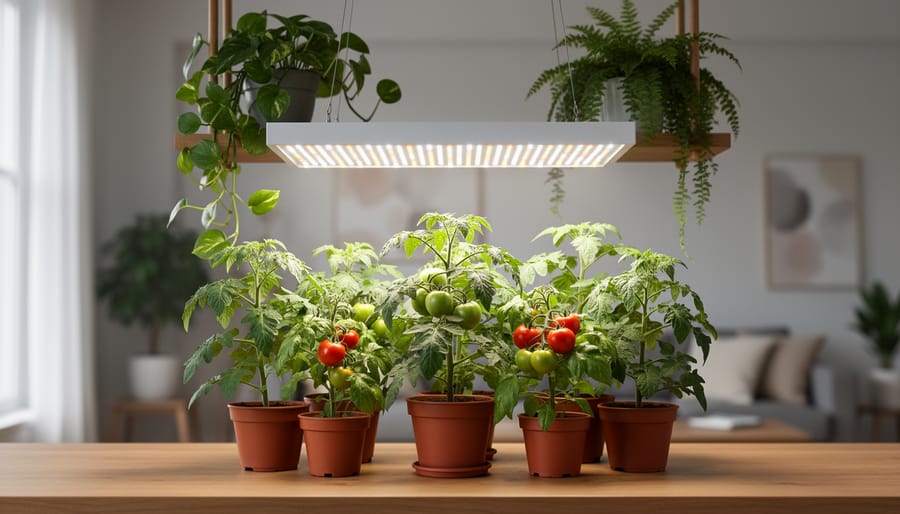
Hydroponics transforms container gardening by putting you in complete control of what your plants receive. Instead of guessing whether your soil has enough nutrients or proper drainage, you deliver a precise blend of minerals dissolved in water directly to the roots. This approach works remarkably well in small indoor spaces where traditional gardening feels limiting, since hydroponic containers can stack vertically and require no messy soil changes.
The beauty of container hydroponics lies in its accessibility. You don’t need expensive equipment or a greenhouse to start—a basic setup costs less than quality potting soil and containers combined, and plants typically grow 30 to 50 percent faster than their soil-grown counterparts. Whether you’re growing fresh herbs on your kitchen counter or cultivating tomatoes in your spare room, understanding how water, containers, and growing media work together opens up entirely new possibilities for your indoor garden.
What Makes Container Hydroponics Different from Traditional Methods
If you’ve ever grown tomatoes or herbs in pots on your patio, you’re already familiar with container gardening. But here’s where hydroponics takes a fascinating turn: instead of filling those containers with potting soil, you’re growing plants in water-based nutrient solutions, often supported by inert growing media. It’s a bit like the difference between serving dinner on a plate versus having an all-you-can-eat buffet directly available to your guests.
In traditional container gardening, soil acts as both anchor and pantry. Plants send roots through the soil to find water and nutrients, which microorganisms help break down into usable forms. It’s a beautiful natural process, but it can be inefficient. Nutrients might wash away with watering, or get locked up in the soil where roots can’t reach them.
Hydroponic container systems flip this script entirely. Your plants that thrive without soil receive a precisely measured nutrient solution delivered directly to their roots. Think of it as express delivery versus wandering through a grocery store hoping to find what you need. The growing media, whether it’s clay pebbles, coconut coir, or perlite, simply provides physical support and helps oxygen reach the roots. Unlike soil, these media don’t contribute nutrients, which actually gives you complete control over what your plants consume.
This is why containers work brilliantly for indoor hydroponics. You can scale systems to fit any space, from a windowsill to a spare room. Containers keep everything tidy and self-contained, preventing water damage to your floors. Plus, without soil, you eliminate many common pests and diseases that plague traditional indoor gardening.
The learning curve might seem steep at first, but many gardeners find hydroponics surprisingly forgiving once they understand the basics. You’re essentially becoming your plants’ personal nutritionist, and that control can lead to faster growth and bigger harvests than you’d achieve with soil alone.
Choosing the Right Containers for Your Hydroponic Setup
Container Materials That Work Best
Choosing the right container material makes a real difference in your hydroponic success. Food-safe plastics are your best bet—think high-density polyethylene or polypropylene. These materials won’t leach chemicals into your nutrient solution, keeping your plants healthy and your harvest safe to eat.
Here’s something I learned the hard way: opaque containers beat transparent ones every time. When light hits your nutrient solution, algae parties begin, competing with your plants for nutrients and oxygen. Dark or opaque containers block light completely, preventing this green menace from taking hold. If you’ve fallen in love with a clear container, simply wrap it in black plastic or paint the exterior with food-safe paint.
Avoid metal containers unless they’re food-grade stainless steel, as most metals react with nutrient solutions and can harm your plants. Similarly, skip treated wood or anything that might break down in constant moisture.
One experienced hydroponic gardener I interviewed swears by repurposing food-grade buckets from restaurants—they’re sturdy, opaque, and budget-friendly. The key is ensuring whatever you choose protects your roots from light exposure while safely holding your growing medium and nutrient solution.
Size Matters: Matching Containers to Your Plants
Choosing the right container size is crucial for your hydroponic success, and the good news is, it’s simpler than you might think! Let me walk you through some practical guidelines.
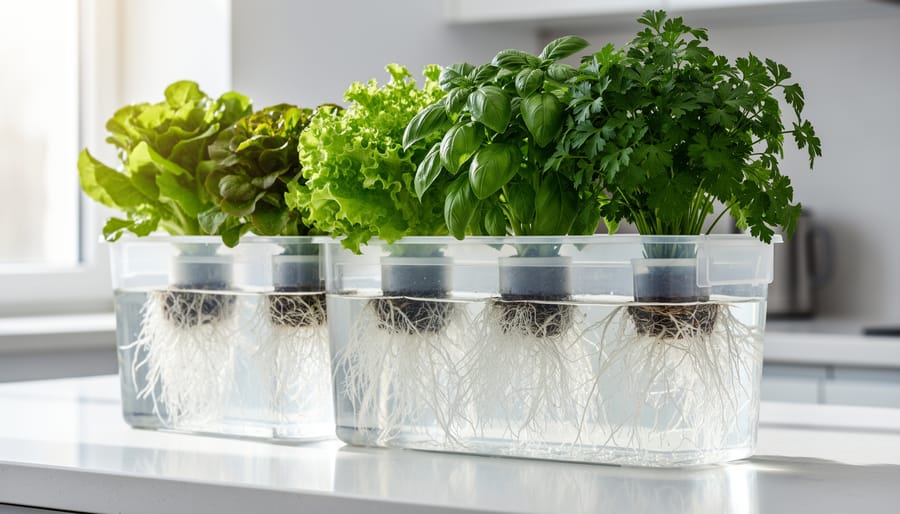
For herbs like basil, cilantro, and parsley, you’ll do wonderfully with smaller containers holding 1-2 gallons of nutrient solution. These shallow-rooted plants don’t need much space and actually thrive when their roots stay compact and cozy.
Leafy greens such as lettuce, spinach, and kale are equally content in modest quarters. Containers holding 2-3 gallons work beautifully, giving their root systems enough room to spread without overwhelming your growing space. I’ve found that these plants actually prefer being slightly snug rather than swimming in excess solution.
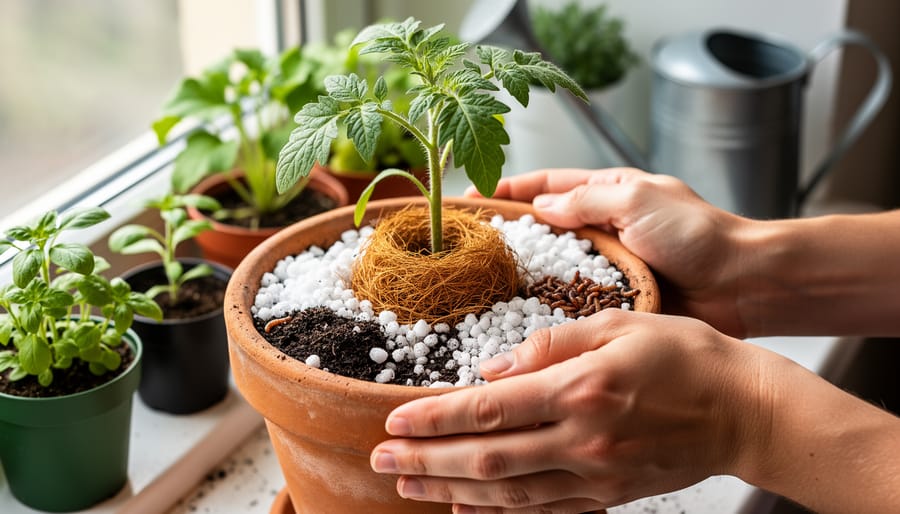
Now, fruiting plants like tomatoes, peppers, and cucumbers are the heavy hitters of the hydroponic world. They need 5-gallon containers minimum, with tomatoes often happiest in 7-10 gallon setups. Their extensive root systems support all that delicious fruit production, so don’t skimp here!
Here’s a friendly tip from experience: when in doubt, size up slightly. Larger containers maintain more stable nutrient levels and pH, which means less frequent adjustments for you. However, avoid going dramatically oversized, as young plants can struggle in vast containers where nutrients aren’t efficiently absorbed.
Special Features to Look For
When you’re choosing containers for hydroponics, a few features will make your journey much smoother. First, look for containers that accommodate net pots, those plastic cups with slotted sides that cradle your plants while letting roots dangle into the nutrient solution below. They’re absolute game-changers because they provide stability while promoting excellent air circulation around the roots.
Drainage works differently here than in soil gardening. You’ll actually want containers that hold water rather than drain it away, which feels counterintuitive at first! The key is having a reservoir beneath your growing medium that keeps nutrient solution available to roots without drowning them. Some containers have built-in reservoirs with water level indicators, which take the guesswork out of maintenance.
For beginners, I genuinely recommend starting with commercial hydroponic containers. Yes, DIY options are budget-friendly and fun to experiment with, but ready-made systems eliminate common mistakes. You’ll find self-watering containers specifically designed for hydroponics that handle the tricky balance of water and oxygen automatically. Once you’ve experienced success and understand how your plants respond, then dive into DIY projects. There’s something wonderfully satisfying about building your own system, but getting that first harvest under your belt builds confidence that makes future experiments more enjoyable.
Growing Media Options That Replace Traditional Potting Mix
Popular Hydroponic Growing Media Explained
When you’re stepping into the world of container hydroponics, choosing the right growing medium can feel overwhelming. Think of these media as the foundation that supports your plants and helps deliver nutrients where they’re needed most. Let me walk you through the most popular options so you can find what works best for your setup.
Clay pebbles, also called expanded clay or LECA, are lightweight, round pellets that provide excellent drainage and aeration. They’re reusable and pH-neutral, making them incredibly forgiving for beginners. However, they don’t retain much moisture, so they work best in systems with frequent watering cycles like ebb and flow setups.
Rockwool comes from spun volcanic rock and looks like fluffy insulation. It holds water exceptionally well while still providing good air pockets for roots. Many commercial growers swear by it for starting seeds and cuttings. The downside? It requires pH adjustment before use and isn’t biodegradable, which concerns environmentally-minded gardeners.
Perlite, those white volcanic glass pieces you’ve probably seen in potting soil, offers fantastic aeration and is incredibly lightweight. It’s inexpensive and widely available, though it tends to float in water-based systems and can create dust when dry.
Coconut coir has become my personal favorite for container hydroponics. Made from coconut husks, it’s sustainable, holds moisture beautifully, and provides good aeration. It behaves somewhat like traditional soil, making the transition to hydroponics feel less daunting for newcomers.
Vermiculite retains tremendous amounts of water and nutrients, making it perfect for mixing with other media to boost moisture retention. Used alone, however, it compacts easily and can suffocate roots.
Many successful hydroponic gardeners mix different media to balance drainage with moisture retention, customizing their blend for specific plants and container systems.

Can You Mix Growing Media?
Great news for budget-conscious growers—you can absolutely mix different growing media! In fact, blending media often produces better results than using a single type alone. The key is understanding what each material contributes to your container system.
One popular combination pairs perlite with coconut coir. The coir retains moisture and provides structure, while perlite ensures excellent aeration and drainage. Try a 60-40 or 70-30 coir-to-perlite ratio for most plants. Another winning mix combines clay pebbles with coco coir—place the larger pebbles at the bottom for drainage, then fill the upper portion with the coir-perlite blend.
Some experienced hydroponic gardeners I’ve spoken with swear by adding a small amount of vermiculite to their perlite-coir mixes, especially for plants that prefer slightly more moisture retention. Start with about 10-15% vermiculite if you’re experimenting.
The beauty of mixing media is customization. Leafy greens might thrive with more moisture-retaining coir, while herbs prefer extra perlite for faster drainage. Don’t be afraid to experiment with ratios—just document what works so you can replicate your successes!
Drainage and Water Management in Hydroponic Containers
How Drainage Works Differently in Hydroponics
In traditional container gardening, excess water drains through holes in the bottom and carries away dissolved nutrients. But hydroponics flips this concept on its head—the nutrient solution is precious and needs to be either recirculated or carefully managed.
Let’s break down how this works. Passive drainage systems are the simpler approach, perfect for beginners. Think of the Kratky method, where your plants sit in containers with their roots partially submerged in nutrient solution. As plants drink and transpire, the water level gradually drops, creating an air gap that provides oxygen to the roots. There’s no pump, no electricity—just gravity doing its thing. The key is starting with the right water level and choosing a container deep enough to last between refills.
Active drainage systems are more common in larger setups. Here’s where it gets interesting: instead of drainage holes that waste nutrients, these systems use pumps to circulate the solution back to a reservoir. I recently chatted with Maria Chen, a hydroponic grower in Portland, who explained it beautifully: “Your drainage isn’t throwing anything away—it’s bringing everything back home.”
Overflow prevention is crucial. Most active systems include overflow outlets positioned at your maximum desired water level, directing excess solution safely back to the reservoir. Air pumps play a supporting role here, keeping the nutrient solution oxygenated as it circulates, which prevents root rot and keeps plants thriving. This constant movement and aeration replace what soil naturally provides in traditional containers.
Avoiding the Most Common Water-Related Mistakes
Water management in hydroponics feels counterintuitive at first—you’d think plants sitting in water would thrive, right? But here’s the thing: roots need oxygen just as much as they need water, and finding that balance is key to avoiding the most common pitfalls.
Overwatering is practically impossible in a well-designed hydroponic system, which is actually one of its biggest advantages over traditional container gardening. However, stagnant water is your real enemy. When nutrient solution sits without movement or aeration, it becomes a breeding ground for harmful bacteria and fungi. I learned this the hard way with my first basil setup—within two weeks, those beautiful roots turned brown and slimy. Root rot had taken hold because I wasn’t circulating the water enough.
To prevent these issues, make sure your system includes either an air pump with air stones (for deep water culture setups) or a water pump that recirculates the solution regularly. The bubbles or movement deliver oxygen directly to the root zone, keeping roots white, healthy, and vigorous. If you notice roots starting to look brownish or smell unpleasant, that’s your early warning sign.
Temperature matters too. Warmer water holds less oxygen, so aim to keep your nutrient solution between 65-70°F. During summer months, frozen water bottles rotated in and out of your reservoir work surprisingly well as a simple cooling method. Remember, happy roots mean happy plants, and oxygen is half the equation.
Simple Container Hydroponic Systems Perfect for Beginners
The Kratky Method: Set It and Forget It
If you’re looking for the ultimate low-maintenance hydroponic system, the Kratky method is your answer. This brilliantly simple passive system requires no pumps, no electricity, and no complicated equipment—just a container, nutrient solution, and your plants.
Here’s how it works: Fill an opaque container with nutrient solution, leaving an air gap at the top. Place your seedlings in net pots suspended through holes in the lid, with roots dangling into the solution. As your plants drink and grow, the water level naturally drops, creating an expanding air space that provides oxygen to the roots. You never refill it—the plant uses what’s there throughout its lifecycle.
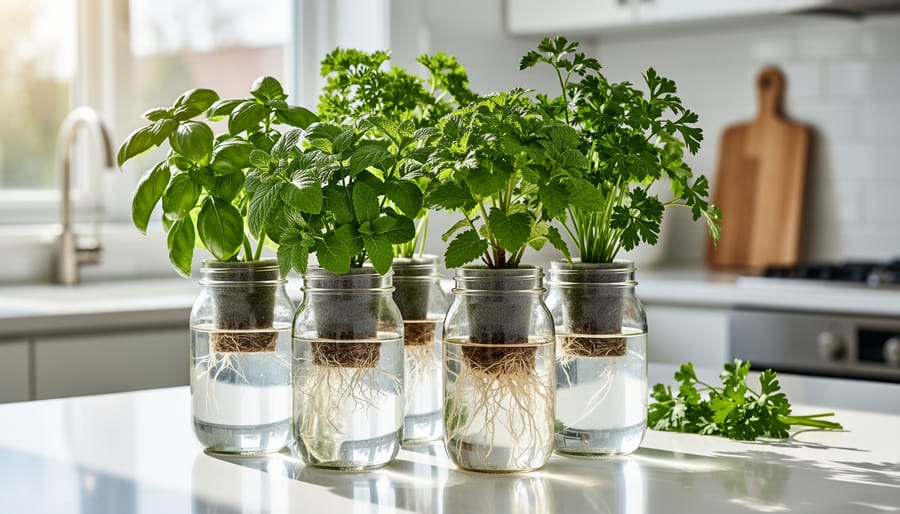
This method shines for fast-growing, shallow-rooted crops like lettuce, spinach, and herbs. I’ve watched beginners harvest gorgeous butterhead lettuce just four weeks after starting with this technique. The key is choosing the right container size—a half-gallon mason jar works perfectly for a single lettuce head, while a five-gallon bucket can support several herbs.
The Kratky method proves that hydroponics doesn’t need to be complicated. It’s genuinely set it and forget it, making it ideal for testing the hydroponic waters before investing in more elaborate systems.
Deep Water Culture for Small Spaces
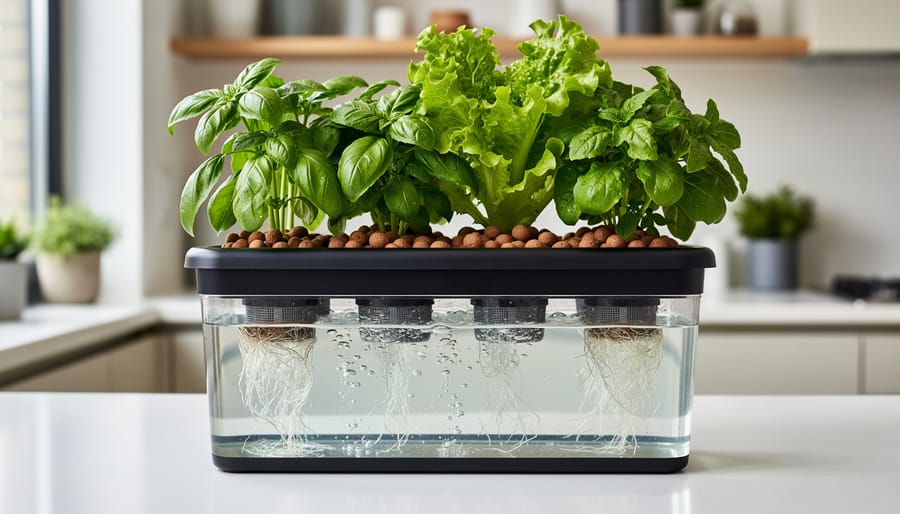
Deep Water Culture, or DWC, is one of the most exciting hydroponic methods for small spaces because it’s surprisingly simple and incredibly effective. Picture this: your plants suspended above a container of nutrient-rich water, their roots dangling directly into the solution while an air pump keeps everything oxygenated. It’s like giving your plants an all-access pass to everything they need, right when they need it.
Setting up a DWC system requires just a few key components. You’ll need an opaque container to prevent algae growth, net pots to hold your plants, an air pump with an airstone, and your nutrient solution. The air pump is essential because it keeps the water oxygenated, preventing root rot and ensuring healthy growth. Many gardeners start with five-gallon buckets, though smaller containers work beautifully for compact spaces. If you’re feeling handy, you can build your own system using readily available materials.
DWC excels with leafy greens like lettuce, spinach, and herbs such as basil and mint. These fast-growing plants thrive in the oxygen-rich environment. I’ve had tremendous success with cherry tomatoes and peppers too, though they need larger containers and stronger support structures.
The main maintenance involves monitoring water levels, checking pH regularly, and changing the nutrient solution every two weeks. While it requires attention, watching roots grow thick and white in crystal-clear water is genuinely rewarding.
If you’ve been curious about container hydroponics, there’s no better time to begin than right now. Start small and simple—choose just one or two plants that excite you, whether that’s fresh basil for your pasta nights or crisp lettuce for homemade salads. You don’t need an elaborate setup or expensive equipment to get going. A basic Kratky jar or a modest deep water culture system is all it takes to experience the joy of starting your indoor garden with hydroponics.
Remember, every experienced hydroponic gardener you admire started exactly where you are now—with questions, uncertainties, and a willingness to learn. Mistakes will happen, and that’s perfectly okay. Perhaps you’ll misjudge nutrient strength or forget to top up the water reservoir. These moments aren’t failures; they’re valuable lessons that deepen your understanding and make you a better grower.
The reward for your efforts? Clean, healthy plants thriving in your home throughout the year, regardless of the weather outside. There’s something deeply satisfying about harvesting herbs or greens you’ve grown yourself, knowing exactly what went into producing them.
We’d love to hear about your hydroponic journey. What plants are you growing? What challenges have you encountered? Share your experiences, photos, and questions with the Bluestem Gardening community. Your story might be exactly what inspires another gardener to take that first exciting step.