
Measure your gate opening width and add 2 inches for proper clearance, then select rot-resistant lumber like cedar or pressure-treated pine that can withstand your climate for at least 10-15 years. Choose between a simple Z-frame design for lightweight applications or a sturdier diagonal-braced frame if you’re securing against larger animals like deer or dogs—the construction method matters as much as the materials you select.
Design your gate to swing inward toward the garden, which naturally prevents most animals from pushing through while making it easier for you to enter with wheelbarrows or garden tools. For pest exclusion, leave no gap larger than 2 inches at the bottom, or better yet, extend hardware cloth 6 inches below ground level to stop digging critters like rabbits and groundhogs.
Match your gate’s style to existing garden structures for visual cohesion, whether that means rustic split-rail, clean horizontal slats, or classic picket designs. The beauty of DIY is customizing height, width, and decorative elements to suit both your aesthetic preferences and functional needs—perhaps adding a window box planter or an arched top that reflects your personality.
Invest in quality hinges rated for outdoor use and 150% of your gate’s weight, positioning them on the strongest vertical posts anchored at least 24 inches deep in concrete. A self-closing spring and reliable latch system transforms your handmade gate from a simple barrier into a dependable defense that operates smoothly for years, requiring only occasional tightening and seasonal weatherproofing to maintain its protective function.
Why Your Garden Gate Matters More Than You Think
I learned this lesson the hard way after watching a family of rabbits slip through my supposedly secure garden fence. They weren’t burrowing under or squeezing through the mesh—they were waltzing right through the gate! That’s when I realized that no matter how perfectly you construct your garden fence, a poorly designed gate can undo all your hard work in seconds.
Here’s the thing: gates are inherently the weakest point in any pest-exclusion system. While your fence posts are permanently anchored and your fencing material stretched tight, gates must swing open and closed, creating natural vulnerabilities. Pests are surprisingly clever at exploiting these weak spots. They notice the gaps where hinges attach, the space beneath the gate that allows it to swing freely, and the slight give in materials that aren’t as rigidly supported as the rest of your fence.
Think about it from a rabbit’s perspective. They’re not randomly testing your entire fence line—they’re looking for easy entry points. A gap of just two inches at ground level is an open invitation. Even smaller openings can welcome mice, chipmunks, and determined squirrels.
This is why proper gate construction matters so much in pest control. Gap management becomes crucial—you’ll need to minimize spaces at the bottom, sides, and latch point. Structural integrity ensures your gate doesn’t sag over time, creating new gaps where none existed before. And when you’re investing time and money into protecting your precious vegetables and flowers, your gate deserves the same attention to detail as the rest of your fencing system. Getting it right from the start saves you countless headaches later.

Choosing the Right Gate Design for Your Pest Problems
Matching Gate Height and Materials to Common Garden Pests
When designing your garden gate, matching specifications to your local wildlife makes all the difference between a successful barrier and an open invitation!
For rabbits, your gate needs to extend at least 36 inches high, with wire mesh no larger than 1 inch. Here’s a pro tip I learned from veteran gardener Maria Chen: bury the bottom 6 inches of fencing underground and bend it outward in an L-shape. Rabbits are persistent diggers, and this simple addition stops them cold.
Groundhogs present a tougher challenge. They’re excellent climbers and diggers, so plan for a 4-foot minimum height with the same buried L-footer as rabbits. Use sturdy welded wire or hardware cloth with half-inch openings along the bottom two feet.
Deer require serious height—at least 6 to 8 feet for an effective barrier. While your gate itself should match this height, many gardeners find success with a 5-foot gate combined with angled fencing that creates visual confusion for deer.
For keeping chickens contained (or excluded), a 4-foot gate with 2-inch chicken wire works perfectly. They’re not determined escape artists, so standard poultry netting does the job.
Dogs need 4 to 6 feet depending on breed and jumping ability. Solid materials like wood panels work better than see-through options, as they remove the temptation of what’s visible beyond. Use welded wire or chain-link for larger, more athletic breeds.
Remember, the sturdiest materials mean nothing if your gate has gaps underneath or along the sides!
Frame Styles That Work Best for Pest Exclusion
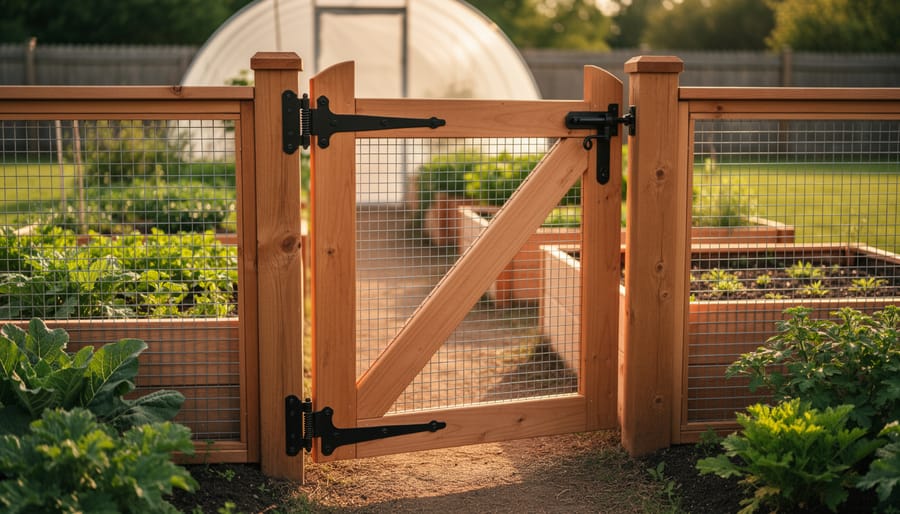
When choosing a frame style for your garden gate, think of it as building the skeleton that keeps everything tight and pest-free. The Z-frame design is my go-to recommendation for beginners—it’s wonderfully simple yet incredibly sturdy. Picture the letter Z laid across your gate boards: one diagonal brace running corner to corner with horizontal pieces at top and bottom. This creates natural tension that prevents sagging and the tiny gaps rabbits love to exploit.
The cross-brace frame takes things up a notch with an X-pattern support, offering superior strength for wider gates. I’ve seen these hold up beautifully for gates spanning four feet or more, maintaining that crucial tight seal even after years of use.
For materials, pressure-treated wood remains the most popular choice among gardeners I’ve interviewed. It’s affordable, easy to work with using basic tools, and lasts 15-20 years when properly maintained. Metal frames, particularly galvanized steel or aluminum, offer exceptional longevity and won’t warp in moisture, though they require welding skills or purchasing pre-made kits.
Whichever design you choose, ensure all joints fit snugly. Even quarter-inch gaps at corners become highway entrances for determined pests, so take time measuring and cutting precisely.
Ground-Level Considerations: Preventing the Under-Gate Sneak
Even the best-built gate becomes useless if critters simply squeeze underneath! I learned this the hard way when rabbits waltzed under my beautiful new gate like it had a welcome mat. The ground-level gap is often overlooked, but it’s your first line of defense.
For a permanent solution, bury hardware cloth or chicken wire 6-8 inches deep, extending it 6 inches outward in an L-shape. This underground barrier stops digging pests in their tracks. If you’re working with existing gates, add a sturdy kickboard along the bottom—a simple 6-inch piece of rot-resistant wood attached to the gate’s lower edge works wonders.
For uneven terrain, consider flexible rubber threshold strips that conform to ground contours while blocking gaps. Some gardeners pack gravel along the gate’s base, creating an uncomfortable digging surface that discourages persistent tunnelers. Whatever method you choose, check regularly for washouts after heavy rain and adjust as needed.
Materials and Tools You’ll Need
Gathering your materials before you start building makes the process smoother and more enjoyable, just like prepping ingredients before cooking a favorite recipe. Let me walk you through what you’ll need, organized by the type of gate you’re planning to create.
For a basic wooden garden gate, start with pressure-treated lumber for longevity. You’ll want 1×4 or 1×6 boards for the frame (typical dimensions are 36 inches wide by 48 inches tall), two 2x4s for diagonal bracing, and a 4×4 post for mounting. Cedar and redwood are beautiful alternatives that naturally resist rot, though they cost more.
If you’re building a pest-exclusion gate, hardware cloth becomes your best friend. Choose 1/4-inch mesh galvanized steel hardware cloth for keeping out small critters like rabbits and squirrels. For larger animals like deer, a taller gate with 2×4-inch welded wire mesh works better. You’ll need enough to cover your entire gate frame with 2-3 inches of overlap on all sides.
Hardware makes or breaks your gate’s functionality. Invest in quality galvanized or stainless steel T-hinges, at least 6 inches long for stability. Self-closing spring hinges are wonderful additions that ensure your gate stays shut. For latches, consider a two-way cane bolt for pest-exclusion gates or a simple thumb latch for decorative versions. Don’t forget a gate spring if you want automatic closing.
Essential tools include a circular saw or miter saw, drill with assorted bits, measuring tape, carpenter’s square, staple gun for attaching hardware cloth, and exterior wood screws in various lengths. Galvanized or stainless steel screws prevent rust.
Additional supplies worth having on hand include exterior wood stain or paint, sandpaper, level, post hole digger, quick-setting concrete, and wire cutters. Many of these tools and techniques overlap with other DIY garden projects, making them worthwhile investments for any gardening enthusiast looking to enhance their outdoor space.
Step-by-Step: Building Your Pest-Proof Garden Gate
Measuring and Planning Your Gate Opening
Getting your measurements right is the foundation of a successful gate project, and trust me, taking a few extra minutes here will save you from headaches later! Start by measuring the width of your gate opening at three points: top, middle, and bottom. Posts aren’t always perfectly parallel, so use the smallest measurement to ensure your gate fits comfortably.
Here’s the key detail many first-timers miss: subtract about 1 inch from your opening width to account for hinges and latch hardware, plus a bit of wiggle room. This prevents binding when the gate swings. For the height, measure from the ground up, but plan to leave a 1-inch gap at the bottom. This clearance prevents the gate from scraping or getting stuck on uneven terrain while still being small enough to deter rabbits and most ground-dwelling pests.
If you’re dealing with particularly determined critters like young rabbits or ground squirrels, consider adding a wire mesh barrier that extends 6 inches below ground level beneath your gate. Mark these measurements clearly on paper, noting where hinges and latches will attach. This blueprint becomes your roadmap, ensuring every piece fits together perfectly while keeping unwanted garden visitors firmly on the outside.
Constructing a Sturdy Frame
Start by measuring and cutting your lumber to size. For a standard garden gate, you’ll need two vertical stiles (the sides), two or three horizontal rails (top, bottom, and optional middle), and diagonal bracing for stability. A typical 3 to 4-foot wide gate works beautifully for most garden paths. Use a miter saw or circular saw for clean, square cuts, and always measure twice before cutting.
The secret to a stable gate lies in strong joints. For beginners, simple butt joints reinforced with galvanized screws and exterior wood glue work wonderfully. If you’re comfortable with power tools, half-lap joints create an even sturdier connection. Apply wood glue generously to all joint surfaces before securing with 2.5-inch exterior screws, spacing them about every 6 inches.
Here’s where building your own gate gets rewarding: assembling the frame. Lay your pieces on a flat surface and check for square using the 3-4-5 triangle method. Measure 3 feet along one side, 4 feet along the adjacent side, and the diagonal should measure exactly 5 feet when square.
Add a diagonal brace running from the bottom hinge-side corner to the top latch-side corner. This prevents sagging over time. For gates wider than 4 feet, consider adding a second diagonal or a Z-brace pattern for extra support. Secure all bracing with screws and glue, ensuring everything remains square as you work.
Attaching Pest-Exclusion Mesh or Fencing
Securing pest-exclusion mesh properly is essential for keeping critters out while ensuring your gate lasts for years. I learned this the hard way when rabbits found a tiny gap I’d missed along the bottom edge!
Start by unrolling your hardware cloth, chicken wire, or welded wire and lay it against the gate frame. Leave about 2-3 inches of overlap on all sides—you’ll trim excess later. For hardware cloth, which has sharper edges, wear heavy gloves to protect your hands.
Using a heavy-duty staple gun, begin fastening the mesh at one corner. Place staples every 3-4 inches along the frame, pulling the mesh taut as you work to prevent sagging. Here’s my favorite trick: work in a pattern, securing one full side first, then the opposite side, pulling firmly before stapling. This prevents wrinkles and ensures tight coverage.
Pay special attention to corners and the gate’s bottom edge where persistent diggers might try their luck. Overlap mesh sections by at least 2 inches if you need to join pieces, stapling through both layers. Some gardeners prefer using fence staples and a hammer for extra holding power on thicker wire.
Finally, walk around and check for any gaps wider than your mesh openings. Secure loose spots immediately—even small openings invite trouble!

Installing Hinges and Ensuring Smooth Operation
Position your hinges about 6-8 inches from the top and bottom of your gate for optimal support. Hold each hinge against the gate frame and mark screw holes with a pencil. Pre-drill these holes to prevent wood splitting—trust me, I learned this the hard way on my first gate project! Use galvanized or stainless steel screws that are at least 2 inches long to secure hinges firmly into the post.
Before fully tightening, hang the gate and check its swing. It should open and close smoothly without dragging on the ground. A small gap underneath (about half an inch) allows for seasonal ground movement and prevents sticking. If your gate sags, add a diagonal support brace running from the bottom hinge corner to the opposite top corner.
Test the operation several times, adjusting hinge placement if needed. Sometimes shimming one hinge with a thin washer creates perfect alignment. The goal is effortless swinging that’ll last for years while keeping those pesky critters out of your precious garden beds.
Adding the Latch and Final Pest-Proofing
Now comes the satisfying part—securing your gate with a reliable latch and making sure no critters can sneak through! I always start by choosing a sturdy latch appropriate for your gate size. A simple barrel bolt works beautifully for lightweight gates, while heavier structures benefit from heavy-duty slide bolts or thumb latches. Position it at a comfortable height and test the action several times before permanently fastening.
Next, walk around your completed gate with a critical eye. Run your hand along all edges, checking for gaps wider than half an inch. These are invitations for determined rabbits and other small pests. Fill any spaces with additional wood strips or hardware cloth, securing them firmly with galvanized staples or screws.
Add weather stripping along the latch side if there’s a noticeable gap between gate and post—this creates a tighter seal. For the bottom edge, consider attaching a rubber sweep or brush strip, especially if ground-dwelling critters are your main concern. This flexible barrier adjusts to slight ground irregularities while maintaining pest protection.
Finally, test everything thoroughly. Open and close the gate multiple times, checking that it swings freely, latches securely, and sits snugly in its frame without dragging or binding.
Smart Upgrades for Extra Protection
Self-Closing Mechanisms and Springs
Adding a self-closing mechanism to your garden gate is a game-changer, especially when you’re juggling plants, tools, or just forget to latch it behind you. These simple devices ensure your gate closes automatically, keeping unwanted wildlife out of your carefully tended garden beds.
Spring-loaded hinges are the easiest solution for most DIY builders. They install just like regular hinges but include a built-in spring that gently pulls the gate shut. You’ll find them at most hardware stores, and they work beautifully on lightweight to medium-weight gates. Just make sure your gate swings freely without rubbing the ground before installation.
For heavier gates, consider a hydraulic gate closer, similar to what you’d see on screen doors. These mount to the gate and post, offering adjustable closing speed so your gate doesn’t slam shut. They’re particularly helpful if you have children or pets who need extra time to pass through safely.
One quick tip from my own garden: test the tension regularly, especially after weather changes, as springs can lose their grip over time.

Double-Gate Airlock Systems
If you’re battling persistent pest pressure—whether it’s rabbits, deer, or sneaky raccoons—a double-gate airlock system might sound elaborate, but it’s surprisingly practical and worth every bit of effort. Think of it as a mudroom for your garden, creating a buffer zone that prevents animals from slipping in while you enter or exit.
Here’s how it works: you construct two gates positioned a few feet apart along your fence line, creating a small enclosed corridor between them. When you enter through the first gate, you close it behind you before opening the second gate into the garden proper. This prevents that frustrating moment when a clever deer rushes past you as you’re fumbling with a latch.
I learned this technique from Master Gardener Susan Cho, who uses a double-gate system to protect her raised beds. “It’s like building a hoop house—seems complicated initially, but once you understand the concept, it’s straightforward,” she explains.
For best results, make your corridor at least four feet long and ensure both gates swing toward the garden interior. Add hardware cloth along the bottom edges to block tunneling critters. While this setup requires more materials and space, the peace of mind in high-pressure situations makes it absolutely worthwhile.
Troubleshooting Common Gate Problems
Even the best-built gates can develop problems over time, but most issues are surprisingly simple to fix. The most common complaint I hear from fellow gardeners is sagging, which creates gaps at the bottom—an open invitation for rabbits and small critters. This usually happens when hinges loosen or the gate frame warps. To fix it, first tighten all hinge screws. If the wood around the screws has worn out, remove the hinge, fill the old holes with wood glue and toothpicks, and reattach the hinge in a slightly different position. For persistent sagging, install a diagonal tension wire or add a third hinge at the gate’s midpoint.
Gap development between the gate and posts often results from wood shrinkage or seasonal movement. Check if your latch hardware needs adjusting—sometimes moving the strike plate just half an inch makes all the difference. If gaps appear along the sides, attach weatherstripping or add thin strips of wood to the gate edges.
Latch failures typically stem from misalignment rather than broken parts. Mark where the latch actually hits the strike plate and adjust accordingly. I recommend checking latch function monthly, especially during spring when pest pressure increases.
For preventive maintenance, inspect your gate every few months. Look for loose screws, cracked wood, and rust on metal components. Apply wood preservative annually and touch up paint as needed. Oil hinges and latches twice yearly to keep them operating smoothly. These small investments of time will keep your gate functioning properly for years, maintaining that crucial barrier against garden invaders.

There’s something deeply satisfying about stepping back and admiring a garden gate you built with your own hands. You’ve created more than just a barrier—you’ve invested in your garden’s long-term success and protection. Every time you latch that gate behind you, knowing it’s keeping hungry critters at bay while welcoming you in, you’ll feel that pride all over again. Just like other garden maintenance projects, building your own gate saves money while giving you exactly what your space needs. We’d love to hear about your gate-building journey! Share your experiences, design tweaks, and pest-exclusion victories in the comments below—your insights might inspire fellow gardeners tackling their own projects.


