Time your garlic harvest when the lower three to four leaves turn brown but the top leaves remain green, typically in mid to late summer. This sweet spot ensures bulbs have developed fully without the protective outer wrappers beginning to deteriorate. Pull a test bulb to check if the cloves are plump and well-defined before harvesting your entire crop.
Handle your garlic gently during harvest by loosening soil with a garden fork about six inches from the base, then lifting bulbs carefully to avoid bruising. Brush off excess dirt with your hands rather than washing, which introduces moisture that encourages rot during storage.
Cure your harvest in a warm, dry location with excellent air circulation for two to three weeks. Hang bundles upside down or spread bulbs in a single layer on raised screens, keeping them out of direct sunlight. Properly cured garlic develops papery skin that rustles when touched and roots that feel completely dry and brittle.
Store cured bulbs in mesh bags, braided strings, or open baskets in a cool, dark location between 60-65°F with moderate humidity. This simple approach preserves your garlic for six to eight months, ensuring you enjoy the fruits of your labor well into winter. The difference between garlic that lasts and garlic that spoils often comes down to these crucial post-harvest steps.
Reading Your Garlic’s Secret Signals

The Lower Leaf Rule That Never Fails
Here’s my secret for perfect garlic timing every single time: the lower leaf rule. Simply put, when you see 3-5 of the bottom leaves turning brown while the upper leaves stay green, your garlic is ready to harvest. It’s like nature’s built-in harvest alarm clock!
I learned this method from master gardener Patricia Chen during a workshop years ago, and it hasn’t let me down since. The beauty of this approach is that you don’t need to disturb your plants to check their progress. Those browning lower leaves are your visual cue that the bulbs have finished developing underground.
To monitor your garlic properly, make it part of your weekly garden routine. Walk through your garlic patch and do a quick visual scan of the lower foliage. You’re looking for that telltale browning that starts at the very bottom and works its way up. When about half your plants show 3-5 brown leaves, it’s go time.
A gentle reminder: resist the urge to pull up a plant to check the bulb size. This disrupts growth and can introduce disease. Trust the leaves—they’re telling you everything you need to know. If you’re growing multiple varieties, keep notes on which ones show browning first, as timing can vary slightly between types.
Why Your Hardneck and Softneck Need Different Timing
Not all garlic is created equal when it comes to harvest timing, and understanding your variety makes all the difference between success and disappointment. Hardneck varieties, which thrive in colder climates, typically mature about two weeks earlier than their softneck cousins. This is because hardnecks send up those beautiful curling scapes in early summer, signaling that bulb development is well underway.
I learned this lesson the hard way during my first year growing both types. I harvested everything at once and ended up with over-mature hardnecks that had started splitting their wrappers. Softneck varieties, popular in milder climates, need that extra time to form their papery layers since they don’t expend energy producing scapes.
Your climate plays a huge role too. In warmer zones, garlic planted in fall may be ready by late May or early June, while gardeners in cooler regions might wait until July or even early August. The key is watching for that magic moment when about half the lower leaves have browned but the top leaves remain green. This sweet spot ensures your bulbs have developed fully without starting to deteriorate. Check a test bulb by carefully uncovering it to confirm the cloves are plump and well-defined before harvesting your entire crop.
The Right Way to Pull Your Bulbs
Getting the Soil Ready (Two Days Before)
Here’s a tip that’ll make harvest day so much easier: water your garlic bed thoroughly two days before you plan to dig. This simple step softens the soil, allowing bulbs to slide out cleanly without breaking or bruising. Think of it as preparing your soil for a gentle release rather than a wrestling match.
If you’ve had recent rain, you can skip this step. The goal is moist, workable soil that won’t cling stubbornly to your garlic. Overly dry, compacted ground can damage those precious wrappers you’ll need intact for long-term storage. I learned this the hard way my first year, fighting with rock-hard clay and ending up with scraped, shortened bulbs that didn’t keep well. Trust me, a little advance planning saves both your back and your harvest.
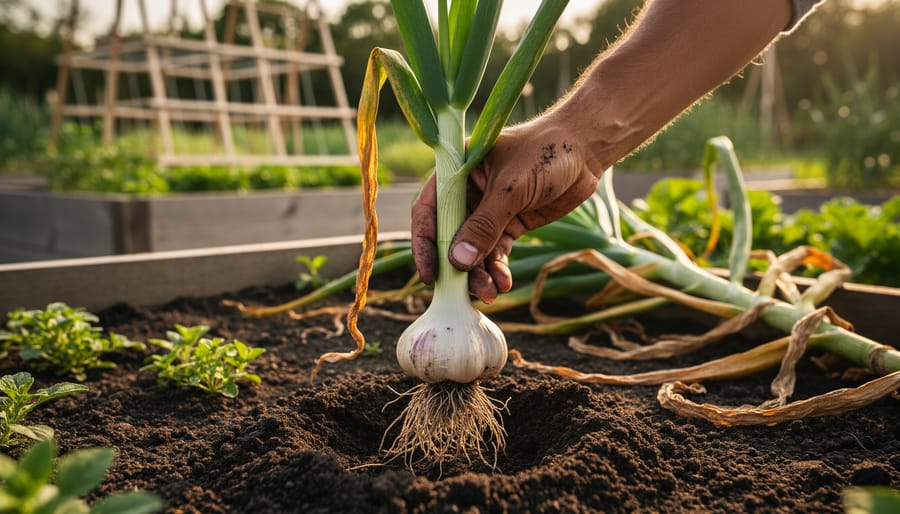
The Gentle Extraction Method
The moment has arrived to harvest your garlic, and how you extract those bulbs makes all the difference between perfect heads and damaged disappointments. I learned this the hard way my first season when I eagerly grabbed stems and pulled, only to separate tops from bulbs buried stubbornly in the soil!
Start by loosening the soil around each plant with a garden fork, positioning it about six inches away from the stem. Gently push the fork straight down and rock it back slightly to break the soil’s grip without piercing the bulb. Think of it as carefully lifting a treasure rather than yanking weeds. Once loosened, you can grasp the stem near the soil line and ease the entire bulb upward.
For those working in lighter, sandier soils, a sturdy trowel works beautifully. Insert it at an angle, creating a wedge that lifts the bulb from below.
Common mistakes to avoid: never pull garlic by the stems alone, as they’ll often snap off, leaving your harvest underground. Don’t rush this process or dig too close to the bulb. Even small nicks or bruises significantly reduce storage life. And resist the urge to bang off excess soil by knocking bulbs together. Instead, gently brush away loose dirt with your hands, leaving the protective papery layers intact.
What to Do Right After You Pull Them
Once you’ve pulled your garlic bulbs from the soil, resist the urge to brush them clean. Leave that dirt right where it is! The soil acts as a protective layer during the curing process. I learned this the hard way my first year when I enthusiastically cleaned every bulb, only to discover they didn’t cure as well as my neighbor’s dusty ones.
Get your freshly harvested garlic out of direct sunlight immediately. Those UV rays can quickly damage the bulbs and reduce their storage life. Move them to a shaded spot within minutes of pulling them. Think of it like protecting your own skin from a sunburn.
Give each bulb a quick visual inspection as you harvest. Look for any obvious damage, soft spots, or signs of disease. Set aside any compromised bulbs to use first in your kitchen. Don’t worry about minor blemishes though. Most garlic will have some imperfections, and that’s perfectly normal. The goal is simply to identify any bulbs that won’t store well long-term.
The Curing Process That Makes or Breaks Storage
Setting Up Your Curing Space
Your garlic has been harvested, and now it needs the perfect spot to cure for the next few weeks. The good news? You don’t need fancy equipment or a dedicated storage building. What matters most is getting four key conditions right: good airflow, moderate temperatures, low humidity, and protection from direct sunlight.
Look for a space with excellent ventilation where air can circulate freely around your bulbs. A covered porch, garage with open windows, or even a spare bedroom with a fan running works beautifully. The ideal temperature range is between 75-90°F, though slightly cooler won’t hurt the process, it will just take a bit longer. You want humidity levels around 60-70%, which is typically drier than most homes but not desert-dry.
Direct sunlight can actually bleach your garlic wrappers and create uneven drying, so choose a shaded location. If your only option gets some light exposure, simply drape a light cloth over your garlic.
I learned from a Michigan gardener who successfully cures hundreds of bulbs in her detached garage by setting up box fans on low speed to keep air moving. Another friend with limited space hangs her braided garlic bundles from a covered balcony railing, where gentle breezes do all the work.
Don’t have ideal conditions? Get creative! A well-ventilated basement with a dehumidifier, an attic with proper airflow, or even under a carport can work. The key is avoiding enclosed, stagnant spaces where moisture can’t escape.

How Long to Wait (and How You’ll Know It’s Ready)
The curing process typically takes between 2 to 4 weeks, depending on your climate conditions and air circulation. I remember my first year curing garlic—I was so eager to trim and store it that I rushed the process, and half my bulbs ended up moldy by December. Trust me, patience really pays off here!
Your garlic will tell you when it’s ready through a few reliable signs. The outer papery skins should feel dry and crackly to the touch, similar to tissue paper. Give the bulbs a gentle squeeze—they should feel firm, not spongy or soft. The neck where the stem meets the bulb should be completely dry and brittle enough that it snaps easily when bent.
Here’s a simple test I learned from a garlic farmer in Oregon: try rubbing the outer skin between your fingers. If it rustles and slides easily against the layers beneath, you’re good to go. If it still feels slightly damp or clings to the bulb, give it a few more days.
During the curing period, check your garlic every few days. Look for any bulbs showing signs of mold or soft spots and remove them immediately to prevent spread. You might notice some outer layers becoming loose or papery—that’s perfectly normal and actually a good sign.
The curing time can vary based on humidity levels in your area. In dry climates, garlic might be ready in two weeks, while humid regions may need the full four weeks or occasionally longer. Don’t rush this step—properly cured garlic can last six months or more in storage.
Cleaning and Preparing Bulbs for Long-Term Storage
The Trim That Extends Shelf Life
How you trim your garlic heads makes a real difference in preventing early spoilage. I learned this lesson the hard way when my first harvest started rotting within weeks, simply because I’d cut too close to the bulb.
For the roots, trim them to about a quarter-inch from the base. Cutting them completely flush creates an entry point for moisture and bacteria. Leave this small protective barrier intact. Use clean, sharp scissors or pruning shears to make precise cuts rather than tearing.
The stem requires a different approach. Leave about one to two inches of stem above the bulb after curing is complete. This length allows for proper air circulation around the neck area while preventing moisture from settling directly on top of the cloves. Some gardeners I’ve interviewed prefer leaving stems slightly longer for braiding, which works beautifully for softneck varieties.
Always sanitize your cutting tools between bulbs, especially if you spot any signs of disease. A quick wipe with rubbing alcohol takes seconds but prevents spreading problems through your entire harvest. These simple trimming techniques create the ideal balance between protection and airflow.
Which Bulbs Get Stored and Which Get Used First
After your garlic has cured, it’s time to sort through your harvest with a critical eye. Start by examining each bulb closely. The best candidates for long-term storage are firm, tight bulbs with intact wrappers and no visible damage. These beauties can last 6-8 months under proper conditions.
Set aside any bulbs with loose wrappers, soft spots, or minor damage for immediate use in your kitchen over the next few weeks. They’re perfectly good to eat but won’t store well. Bulbs with broken cloves or significant bruising should go straight into tonight’s dinner!
Here’s a tip from experienced grower Maria Chen: “Save your biggest, most perfect bulbs for replanting in fall. They’ll give you an even better harvest next year.” Select 10-15 percent of your finest specimens as seed stock and store them separately.
Small bulbs, often called “rounds,” are ideal for pickling or making into garlic powder since they won’t keep as long. By sorting strategically, you’ll minimize waste and enjoy your harvest for months to come.
Storage Methods That Actually Work

The Mesh Bag Method (Simple and Effective)
The mesh bag method is my go-to recommendation for most home gardeners because it combines simplicity with excellent results. Once your garlic is fully cured, simply place the bulbs in mesh produce bags or onion bags, which you can find at most garden centers or repurpose from grocery store purchases. These bags allow continuous air circulation while keeping your garlic contained and easy to access.
Look for bags that hold about 5-10 pounds of garlic each to prevent overcrowding. Hang the filled bags in a cool, dark spot like a pantry, basement, or spare closet where temperatures stay between 60-65°F. I personally hang mine from ceiling hooks in my basement using simple S-hooks.
The beauty of this method is how it keeps garlic visible and accessible for kitchen use while maintaining ideal storage conditions. Check your bags monthly, removing any bulbs that show signs of sprouting or softening. A veteran gardener I interviewed swears this approach keeps her garlic fresh for 6-8 months with minimal effort, making it perfect for busy gardeners who want reliable storage without complicated systems.
Braiding for Beauty and Function
Softneck garlic varieties are perfect for creating beautiful braids that serve double duty as functional storage and kitchen décor. Start with at least eight to twelve heads of freshly harvested garlic with their stems still attached and slightly pliable. Begin by laying three bulbs side by side, then cross the stems as you would when starting a traditional braid. Continue adding new bulbs every few crosses, incorporating the stem of each new head into the braid. Keep your tension consistent but not too tight, allowing air to circulate around each bulb.
As you work your way up, the braid will grow heavier and more impressive. When you’ve reached your desired length, secure the top with twine or raffia, leaving a loop for hanging. The ideal spot for your garlic braid is a cool, dry location with good air circulation, away from direct sunlight. I love hanging mine in my pantry where it’s both accessible and becomes a conversation starter. Not only does braiding keep your garlic organized, but it also makes it incredibly easy to snip off bulbs as you need them throughout the season.
Paper Bag and Box Storage
For shorter-term storage or when you need easy access to your garlic, paper bags and cardboard boxes work beautifully. I’ve found this method particularly handy for garlic I’ll use within three to four months. The key is creating layers with good airflow between each one.
Start by placing a single layer of cured garlic bulbs in a clean, dry paper bag or shallow cardboard box. If you’re stacking multiple layers, add a sheet of newspaper between them to prevent direct contact and improve air circulation. Don’t pack them tightly—think of it like arranging eggs, where each bulb has a bit of breathing room. This spacing prevents moisture buildup, which is garlic’s biggest enemy in storage.
Punch a few holes in the sides of bags or boxes to boost ventilation. Store these containers in a cool, dark spot like a pantry or closet where temperatures stay between 60-65°F. I asked my neighbor Maria, who’s been growing garlic for twenty years, about her paper bag method. She swears by labeling each bag with the variety and harvest date, which helps track which types store longest. Check your garlic monthly, removing any bulbs showing soft spots or sprouting to protect the rest.
What NOT to Do (Common Storage Mistakes)
Even with careful harvesting, storage mistakes can quickly undo months of hard work. One of the biggest misconceptions is storing garlic in the refrigerator—the cold, moist environment actually encourages sprouting and mold growth rather than preserving your bulbs. Similarly, keeping garlic in plastic bags or sealed containers traps moisture, creating perfect conditions for rot.
Another common error is storing garlic before it’s fully cured. Those few weeks of drying aren’t optional—they’re essential for developing the protective papery skin that keeps your garlic fresh for months. I learned this the hard way my first year when impatience cost me half my harvest!
Avoid storing garlic near other produce that releases moisture, and don’t expose it to direct sunlight, which causes it to dry out and become bitter. Just as with preserving garden produce, proper storage conditions make all the difference. Finally, resist the temptation to remove all the papery layers—they’re your garlic’s natural protection system against spoilage.
Monitoring and Using Your Stored Garlic
Once your garlic is safely stored, checking on it regularly becomes your new routine – think of it as visiting an old friend! I make it a habit to inspect my stored garlic every two to three weeks, and this simple practice has saved countless bulbs from spoilage.
During your inspections, look for soft spots, sprouting green shoots, or any signs of mold. These are your early warning signals that something needs attention. If you spot a problematic bulb, remove it immediately to prevent issues from spreading to its neighbors. I’ve learned this lesson the hard way – one moldy bulb can compromise an entire basket if left unchecked.
Storage timelines vary considerably based on variety and conditions. Softneck varieties typically last six to nine months when properly stored, making them excellent for long-term use. Hardneck types, while incredibly flavorful, generally keep for four to six months. If you’re storing in warmer conditions or higher humidity than ideal, expect these timelines to shorten by a month or two.
Keep notes about which varieties store longest in your specific conditions – this knowledge becomes invaluable for future seasons! I jot down quick observations in my garden journal, noting which bulbs stayed firm through winter and which sprouted early.
Remember, slight papery browning of outer skins is completely normal and doesn’t affect the cloves inside. However, if bulbs feel light and hollow or cloves are turning yellow, it’s time to use them up quickly. Trust your senses – your nose and fingertips are excellent detection tools!
There’s something deeply satisfying about reaching into your pantry months after harvest and pulling out a firm, flavorful bulb of garlic you grew yourself. By following the timing cues and storage conditions we’ve covered, you’ll enjoy your homegrown harvest well into spring, and maybe even until the next crop is ready. Remember, the key to success lies in those final weeks: waiting for that perfect moment when leaves begin to brown, curing thoroughly in a warm space with good airflow, and storing only the healthiest bulbs in cool, dark conditions.
Every gardener’s experience with garlic is unique, shaped by climate, variety, and those delightful surprises that come with any growing season. As you clean your harvested garlic and plan next season’s garden, you’re participating in a tradition that connects kitchen to garden in the most rewarding way. Proper storage isn’t just about preservation; it’s about extending the joy of your gardening efforts into everyday cooking, sharing bulbs with friends, and saving your best cloves for planting again. We’d love to hear how your garlic harvest turned out or answer any questions you might have about the process.