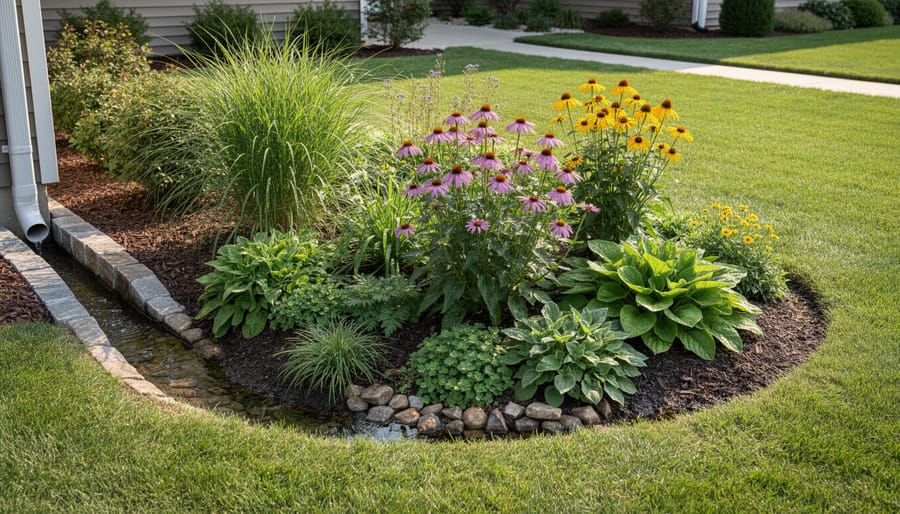
Transform your waterlogged yard into a natural drainage system by creating a rain garden in your lowest-lying area. Dig a shallow depression 4-6 inches deep, amend the soil with compost to improve absorption, and plant native perennials with deep root systems that thrive in both wet and dry conditions. This living sponge captures runoff from your roof and driveway, filtering pollutants while adding beauty to problem spots where grass struggles to grow.
Replace sections of your concrete driveway or walkway with permeable pavers, gravel pathways, or porous materials that allow water to soak through rather than sheet across your property. Even converting a 10-foot section makes a measurable difference in reducing the volume of water rushing toward foundations and storm drains.
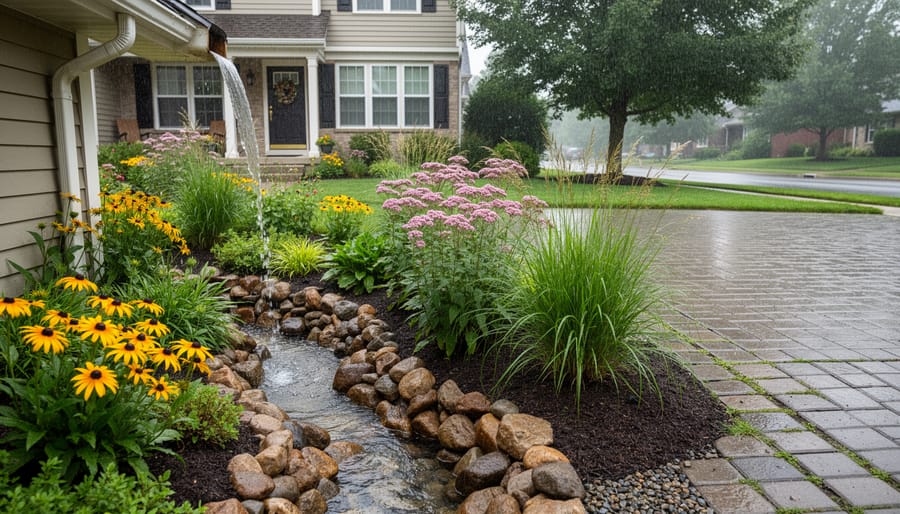
Direct your downspouts away from foundations and into planted areas using simple extensions or decorative dry creek beds lined with river rocks. Position these drainage features to guide water through garden beds where plants can use the moisture, turning a maintenance headache into free irrigation.
Grade problem areas away from structures by adding soil to create gentle slopes of at least 6 inches of drop over 10 feet. Combine this with strategic plantings of water-hungry shrubs and ornamental grasses that stabilize soil while absorbing excess moisture.
These practical solutions work together as a system, managing stormwater right where it falls on your property. You will protect your home’s foundation, prevent erosion, keep nutrients in your soil instead of washing into streets, and create thriving garden spaces in areas that once caused frustration. Each project builds on the others, giving you control over water flow while supporting healthier landscapes and local ecosystems.
Why Your Yard Floods (And Why It’s Getting Worse)
You’ve probably noticed it after a good rain—those stubborn puddles in the driveway, the soggy patches that take days to dry, or worse, that water creeping toward your basement. If it seems like your yard floods more than it used to, you’re not imagining things.
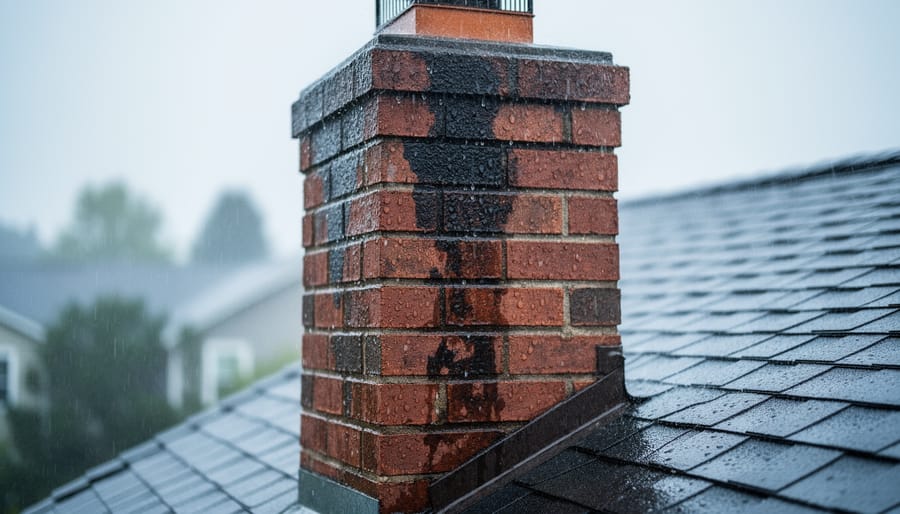
Here’s what’s happening beneath the surface, quite literally. Every time a new house goes up, a driveway gets paved, or a garden bed gets covered with decking, we’re creating what experts call impervious surfaces. These are areas where water simply can’t soak into the ground anymore. Think about your neighborhood—roofs, sidewalks, patios, driveways. Rain that once would have gently absorbed into soil now has nowhere to go but sideways and downward, racing toward the lowest point it can find. Often, that’s your yard.
Traditional storm drains were designed decades ago for neighborhoods that had far fewer hard surfaces. They’re now trying to handle two or three times the water volume they were built for, and they’re failing. When these systems get overwhelmed during heavy rains, all that excess water backs up and spreads across your property.
And there’s another factor making things worse: rainfall patterns are changing. Those gentle, all-day rains are being replaced by intense downpours that dump massive amounts of water in short bursts. Your soil simply can’t absorb water that quickly, even if it could reach the soil in the first place.
I spoke with landscape designer Maria Chen, who explained it perfectly: “Your yard is trying to handle the water from not just your roof, but potentially your neighbor’s driveway runoff, the street, everywhere upstream. It’s overwhelming.”
The good news? Understanding this problem is the first step. There are practical, garden-friendly ways to prevent flooding and work with water instead of fighting against it.
What Green Infrastructure Really Means for Your Property
If you’ve ever wondered what all the buzz about “green infrastructure” means for your actual backyard, here’s the wonderfully simple truth: it’s really just working with nature instead of against it. Think of it as inviting your garden to become part of the solution to managing stormwater right where it falls on your property.
At its heart, green infrastructure uses the natural superpowers that plants, soil, and thoughtful landscaping already possess. When rain hits a traditional concrete driveway or asphalt path, it races off carrying pollutants straight into storm drains. But when that same rain encounters a rain garden, a patch of deep-rooted native plants, or permeable paving, something magical happens. The water slows down, soaks in, and gets filtered naturally through layers of soil and plant roots. Your garden essentially becomes a living sponge and purification system combined.
This isn’t just good for the environment—it’s genuinely good for your wallet too. Many gardeners who’ve implemented these strategies report noticeably lower water bills because their soil retains moisture longer, reducing irrigation needs. When you pair these practices with rainwater harvesting, the savings multiply. Real estate professionals increasingly note that properties with established green infrastructure features often command higher values, as buyers appreciate both the environmental benefits and reduced maintenance headaches.
Here’s what really gets me excited: once established, these nature-based systems typically require less maintenance than traditional landscaping. Native plants adapted to your local rainfall patterns need less fussing, and permeable surfaces don’t develop the drainage problems that plague conventional hardscaping. You’re essentially creating a garden that works smarter, not harder.
Rain Gardens: Your Front-Yard Flood Fighter
How Rain Gardens Work Their Magic
Think of a rain garden as nature’s own water filtration system working right in your yard! The concept is beautifully simple yet remarkably effective. When you create a shallow depression—typically 4 to 8 inches deep—and fill it with specially amended soil and water-loving plants, you’ve built a powerful stormwater solution.
Here’s the magic: when rain falls, runoff from your roof, driveway, or lawn flows into this gentle bowl instead of racing toward storm drains. The rain garden basics involve layering sandy, loam-enriched soil that acts like a sponge, allowing water to percolate slowly downward over 24 to 48 hours.
During this time, three wonderful things happen. First, the pooled water has nowhere to rush, preventing flooding and erosion on your property. Second, as water moves through the soil and plant roots, pollutants like oil, fertilizers, and sediment get naturally filtered out. Third, the water soaks deep into the ground, replenishing underground aquifers rather than overwhelming municipal systems.
The specialized plants you choose—native species with deep root systems—are the unsung heroes, creating channels in the soil that enhance absorption while thriving in both wet and dry conditions.
Choosing the Perfect Spot
Finding the right location for your rain garden makes all the difference between success and frustration. Start by positioning it at least 10 feet away from your home’s foundation—this keeps water flowing away from your basement rather than toward it. I learned this the hard way when my first attempt sat too close and created minor seepage issues!
Natural low spots in your yard are ideal candidates, especially those areas where water already pools after heavy rainfall. Walk around after a storm and observe where puddles linger. These spots tell you exactly where the water wants to go anyway. Similarly, look for problem areas near downspouts where runoff currently washes out your flowerbeds or creates muddy patches.
Before breaking ground, test your drainage by digging a small hole about 12 inches deep, filling it with water, and watching how quickly it drains. Ideally, it should empty within 12 to 24 hours. If water sits much longer, you might need to amend the soil or choose a different location.
Finally, call 811 before any digging to mark underground utilities—this free service protects you from costly and dangerous mistakes. Taking these simple steps ensures your rain garden works with your property’s natural flow.
Plants That Love Getting Their Feet Wet
Choosing the right plants makes all the difference when creating areas that manage stormwater naturally. You’ll want species that can handle both extremes—standing water after heavy rain and drier conditions during sunny spells.
Native plants are your best friends here because they’ve adapted to your local climate over thousands of years. Swamp milkweed is a fantastic choice that butterflies absolutely adore, thriving in those wet-to-dry transitions while adding beautiful pink blooms in summer. Joe Pye weed creates impressive height and structure, producing dusty rose flower clusters that pollinators can’t resist from midsummer through fall.
For early season color, blue flag iris brings stunning purple blooms in spring and handles soggy soil like a champion. Sedges are the unsung heroes of wet areas—these grass-like plants provide year-round texture and many species stay evergreen through winter.
The secret to success is checking what’s native to your specific region. A plant that thrives in Pacific Northwest rain gardens might struggle in a Midwest bioswale. Your local native plant society or extension office can point you toward the best choices for your area.
Here’s a pro tip I learned from a landscape designer: mix plants with different bloom times. You’ll get visual interest from spring through fall while providing continuous food sources for beneficial insects. Combine early bloomers like iris with summer stars like swamp milkweed and late-season performers like Joe Pye weed. This layered approach creates a dynamic, functional landscape that works hard managing stormwater while looking beautiful all season long.
Building Your Rain Garden This Weekend
Ready to create your rain garden? You can complete this project in a weekend with just a few basic supplies.
Start by marking a 4-8 foot diameter area that’s at least 10 feet from your foundation. Dig down 4-8 inches deep—the shallow depth makes this surprisingly manageable, even for first-timers. Save that soil!
Mix your excavated soil with compost at a 2:1 ratio (two parts soil, one part compost) to improve drainage. If you have heavy clay, add some sand too—about 20% of your total mix works beautifully.
For materials, you’ll need: a spade, wheelbarrow, compost, mulch, and native plants suited to wet conditions. Budget about 6-8 hours total work time.
Layer your amended soil back into the depression, creating a gentle bowl shape. Plant taller species in the center and shorter ones around the edges, spacing them according to their mature size. Finish with 2-3 inches of mulch, keeping it away from plant stems.
Water thoroughly after planting. Your rain garden will initially need weekly watering, but once established, rainfall does the work. You’ve just created a functional, beautiful solution that captures runoff right where you need it!
Permeable Surfaces That Work Overtime
Permeable Pavers for Patios and Walkways
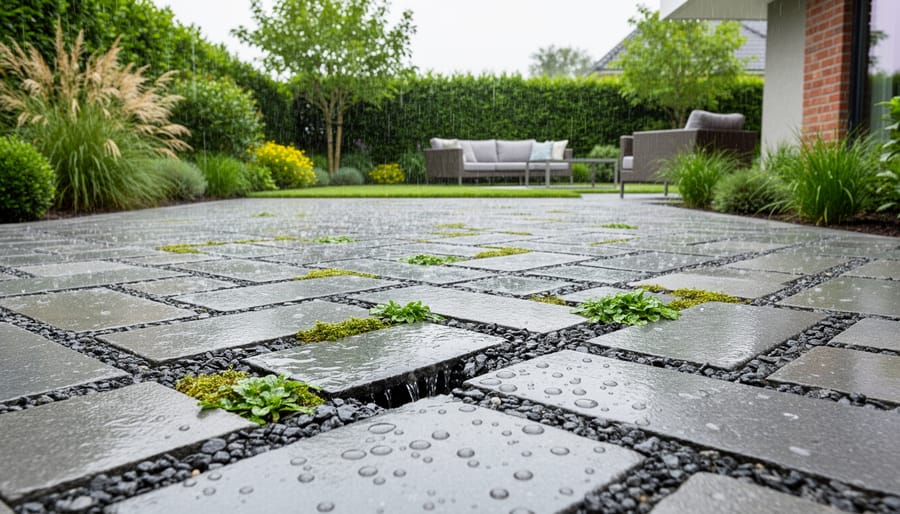
Permeable pavers offer a brilliant solution for creating beautiful, functional outdoor spaces that actually help manage stormwater rather than contributing to runoff problems. These clever grid-style pavers work by leaving intentional gaps between solid surfaces, which you can fill with grass, gravel, or even low-growing ground covers. The result? A sturdy patio or walkway that looks great while allowing rainwater to soak naturally into the ground.
When I first installed permeable pavers in my own garden, I was amazed at how much they transformed a chronically muddy area into a usable space. The beauty is in their versatility—you can choose from various materials like concrete grids, plastic lattices, or even recycled rubber options. For grass-filled pavers, select a tough turf variety that tolerates foot traffic well. Gravel-filled versions require less maintenance and work wonderfully in high-traffic areas.
Installation does require some preparation. You’ll need to excavate about 6-8 inches deep, add a gravel base for drainage, and ensure proper leveling. The good news? This is definitely a weekend DIY project for most gardeners. The aesthetic possibilities are endless too—mix and match materials, create patterns, or let creeping thyme fill the gaps for a fragrant, pollinator-friendly surface that manages water beautifully.
Gravel Driveways Done Right
If you need a driveway that can handle daily car traffic while still managing stormwater beautifully, gravel might be your perfect solution. I’ve watched neighbors struggle with cracked asphalt and puddle-filled driveways, while properly installed gravel driveways quietly do double duty—supporting vehicles and letting water filter naturally into the ground below.
The secret lies in the foundation. Start by excavating 8-10 inches deep and laying down a geotextile fabric (also called landscape fabric). This crucial underlayment prevents gravel from migrating into the soil while allowing water to pass through. Without it, you’ll end up with divots and an uneven surface within a year.
For the base layer, use angular crushed stone rather than smooth river rock. I learned this the hard way—smooth stones shift constantly under tires. Lay down 4-6 inches of larger crushed stone (about 2-3 inches in diameter), then top with 2-4 inches of smaller gravel for the driving surface. Pea gravel or crushed granite works wonderfully and looks attractive too.
During rainstorms, water percolates right through your gravel layers instead of rushing into storm drains. It’s genuinely satisfying to watch!
Maintenance is refreshingly simple. Rake the surface occasionally to redistribute gravel and fill any shallow spots that develop. Every few years, add a fresh layer of top gravel to maintain proper depth. Edge your driveway with stone or timber to keep everything contained and looking sharp.
Smart Landscaping Tricks That Control Water Flow
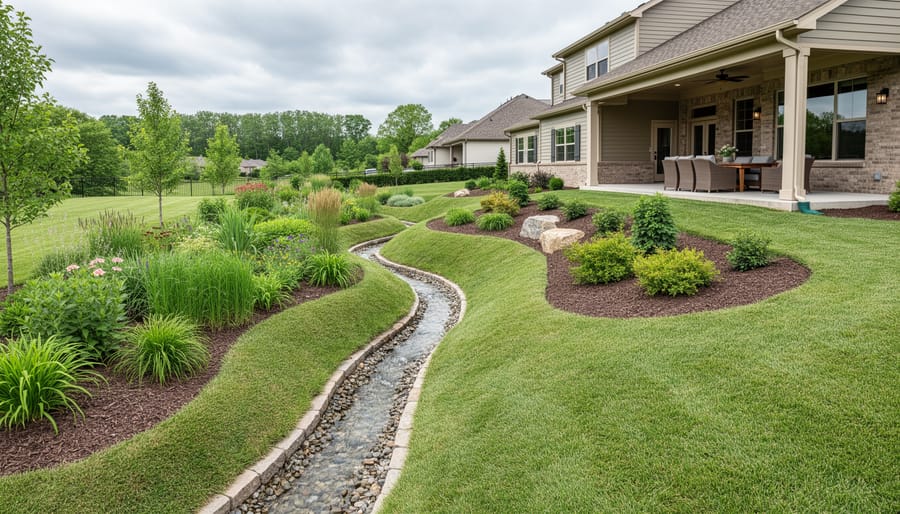
Strategic Berms and Swales
Think of berms and swales as your yard’s gentle guides, directing water exactly where you want it to go. A berm is simply a low mound of soil, while a swale is a shallow depression that channels water. Together, they’re incredibly effective at steering runoff away from your house foundation and toward areas that can absorb it, like rain gardens or planted beds.
The beauty of this system is its flexibility. You might create a subtle 6-inch berm along your property line to keep a neighbor’s runoff from pooling near your patio, with a companion swale directing that water to thirsty shrubs instead. I’ve seen gardeners transform problem slopes this way, using a series of gentle contours that slow water while preventing erosion.
To keep things looking natural, curve your berms and swales following the landscape’s existing flow. Plant them densely with native grasses and perennials whose roots will stabilize the soil. Avoid harsh, straight lines—nature doesn’t work that way. The goal is seamless integration, where visitors might not even notice your clever water management at work.
Tree and Shrub Placement for Maximum Absorption
Trees and shrubs are nature’s ultimate stormwater champions, and placing them strategically around your property can make a dramatic difference in managing excess rainfall. Deep-rooted trees like red maple, river birch, and willow oak act like living sponges, absorbing hundreds of gallons of water annually while their canopies intercept rain before it ever hits the ground.
For maximum impact, position these water-loving trees near downspouts, along slopes prone to erosion, or in low-lying areas where water tends to pool. Complement them with dense shrubs such as inkberry holly, winterberry, and red twig dogwood—they create a layered absorption system that handles runoff at multiple levels.
I learned from a conversation with landscape designer Maria Chen that grouping three to five shrubs together near problem areas creates what she calls “absorption islands” that outperform single plantings. Consider this approach part of your broader water-wise landscaping strategy, transforming drainage headaches into beautiful, functional garden features that work hard year-round.
Interview: How a Master Gardener Stopped Her Basement Flooding
When Margaret Chen bought her 1960s bungalow in Portland, she fell in love with the mature trees and cozy backyard. What she didn’t love? The basement that flooded every winter, leaving her fighting mold and ruined storage boxes. “I had three dehumidifiers running constantly,” she laughs. “My electric bill was ridiculous, and I was getting nowhere.”
As a Master Gardener with 15 years of experience, Margaret knew there had to be a better solution than the $8,000 French drain system contractors kept recommending. “I thought, why fight the water? Why not work with it instead?”
Her transformation started with observation. “I spent one rainy November literally following the water,” she explains. “I discovered my downspouts were dumping thousands of gallons right against the foundation, and my neighbor’s runoff was flowing straight into my yard because of how the properties sloped.”
Margaret’s solution combined two rain gardens and a simple bioswale along her property line. “The rain gardens went where water naturally pooled anyway. The bioswale intercepts my neighbor’s runoff before it reaches my house—it’s basically a shallow, planted ditch that slows everything down.”
The before photo shows a soggy, grass-sparse yard with standing water. The after? A lush landscape featuring native sedges, blue flag iris, and red twig dogwood. “It’s completely transformed,” she says. “Even during our wettest months, the basement stays dry.”
Her biggest mistake? “Going too shallow with my first rain garden. I didn’t dig deep enough, so it overflowed. I had to redo it, going down 18 inches this time. That extra depth made all the difference.”
The unexpected benefits surprised her most. “I’ve counted 14 different bird species now, including cedar waxwings that never visited before. My neighbors actually stop to comment on how beautiful it looks.”
The cost breakdown sealed the deal. Margaret spent $1,200 on plants, soil amendments, and river rock, completing the work over three weekends with her husband’s help. Compare that to the quoted $8,000 for French drains, plus ongoing sump pump electricity costs she’s now avoiding. “Five years later, bone-dry basement, lower water bills, and a yard that’s genuinely gorgeous. Best investment I’ve made in this house.”
Maintaining Your Stormwater Garden (It’s Easier Than You Think)
Here’s the good news that surprised me when I installed my first rain garden: once established, it needs far less attention than my traditional lawn ever did. No weekly mowing, minimal watering, and just a few seasonal tasks keep everything running smoothly.
Your maintenance calendar is refreshingly simple. In spring, remove any winter debris and add a fresh two-inch layer of mulch to suppress weeds and retain moisture. This is also the perfect time to divide any overgrown native plants and share them with neighbors. Early summer means occasional weeding while plants are still establishing, but this decreases dramatically after year two.
Fall brings the easiest task of all: simply leave the seed heads standing. They provide winter interest and food for birds while protecting plant crowns from frost. You might want to check inlet and outlet areas for sediment buildup, clearing away any accumulated debris that could block water flow.
Troubleshooting common issues is straightforward. If water stands for more than 48 hours after rain, your soil may need amendment with additional compost to improve drainage. Poor plant performance usually indicates you’ve placed sun-lovers in shade or vice versa. The solution? Swap them with neighbors whose conditions match better.
Compared to conventional landscaping, your stormwater garden becomes increasingly self-sufficient. Native plants develop deep root systems that eliminate the need for regular watering, making them excellent water-saving solutions for your property. Most gardeners report spending just a few hours per season on maintenance once their gardens mature. That’s time saved for enjoying your outdoor space rather than constantly tending it.
You don’t need to transform your entire property overnight. Start small—perhaps with a single rain garden near a downspout or by replacing one section of your patio with permeable pavers. These manageable projects deliver impressive results, protecting your home from flooding while creating genuinely beautiful spaces that butterflies, bees, and songbirds will adore.
What makes these efforts especially meaningful is that you’re not just solving problems on your own property. Every rain garden you plant and every square foot of permeable surface you install reduces the volume of stormwater rushing into your neighborhood’s storm drains. When multiple homeowners embrace these practices, the collective impact significantly eases the burden on municipal systems, reducing neighborhood flooding and improving local water quality.
Think of yourself as part of a growing network of green infrastructure champions. Your garden isn’t just lovely to look at—it’s actively working to make your community more resilient. Whether you’re redirecting one downspout or reimagining your entire landscape, you’re demonstrating that practical stormwater solutions can be both functional and delightful. So grab your shovel, choose your first project, and join the movement toward healthier, more sustainable neighborhoods.