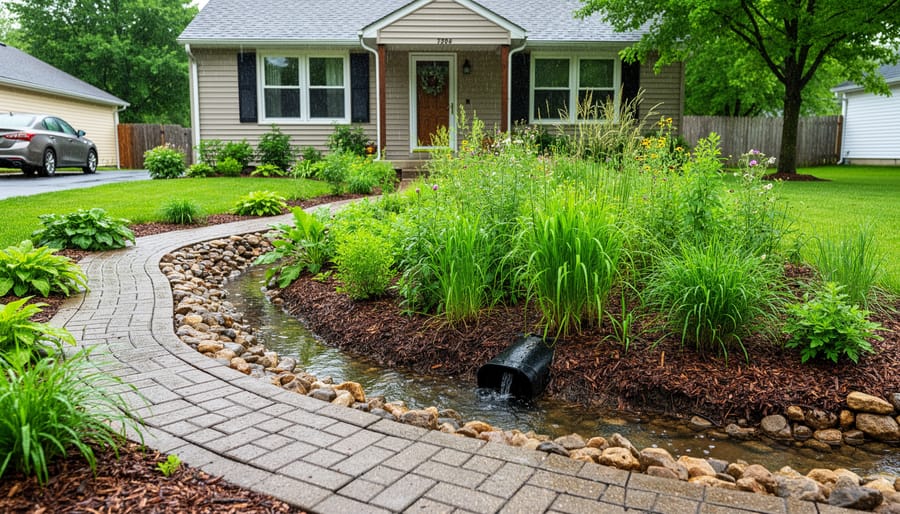
Redirect downspouts into rain gardens filled with native perennials like black-eyed Susans and coneflowers that absorb hundreds of gallons during storms. Install a rain barrel at each gutter downspout to capture runoff for watering vegetables and flower beds during dry spells. Replace sections of concrete driveway or patio with permeable pavers surrounded by creeping thyme, allowing water to filter naturally into the soil instead of rushing toward storm drains. Create shallow swales along property edges planted with moisture-loving ornamental grasses that slow water movement and prevent erosion.
Every time it rains in your neighborhood, thousands of gallons of water race across rooftops, driveways, and lawns, picking up fertilizers, pesticides, and pollutants before flooding into overwhelmed storm systems. This runoff doesn’t just disappear—it carries contaminants into local streams and rivers, contributing to water quality problems that affect entire communities. But here’s the exciting part: your garden can become a powerful solution to this growing environmental challenge.
Urban stormwater management might sound like something only city planners and engineers handle, but gardeners are actually on the front lines of change. The techniques that control water on your property—rain gardens, bioswales, permeable surfaces, and strategic plantings—are the same green infrastructure strategies municipalities are investing millions to implement on larger scales. The difference is you can start transforming your yard this weekend.
Think of stormwater management as gardening with purpose. You’re not just creating beautiful outdoor spaces; you’re building natural systems that capture, filter, and slowly release rainwater right where it falls. These projects reduce flooding, recharge groundwater, support pollinators, and cut your water bills. Whether you’re dealing with a perpetually soggy corner, want to harvest free water for your tomatoes, or simply care about your watershed, practical solutions exist that enhance rather than compromise your landscape’s beauty.
Why Your Garden Should Care About Stormwater
Here’s what happens every time it rains in most cities and suburbs: water hits rooftops, driveways, and compacted lawns, then races away through gutters and storm drains. Instead of soaking into the ground like nature intended, it rushes into streams carrying oil, fertilizers, pesticides, and whatever else it picks up along the way. This isn’t just an environmental problem—it’s a missed opportunity for your garden.
Think about it from your soil’s perspective. Rain is like a gift delivery service, but in urban areas, we’re sending that package straight to the creek before your garden even knows it arrived. That water could be nourishing your plants, recharging groundwater, and building healthy soil structure. Instead, it’s gone in minutes, often taking topsoil with it.
For gardeners, this creates a frustrating cycle. We watch perfectly good rainwater disappear down the street while our garden beds dry out days later, forcing us to drag out the hose. Meanwhile, that runoff is polluting the same watersheds we rely on for irrigation water. It’s like throwing away groceries at the front door and then driving to the store because you’re hungry.
The traditional approach treats stormwater as a problem to eliminate quickly. Gray concrete systems whisk it away, but at what cost? Studies show that even moderate rainstorms can cause stream erosion and habitat loss when all that water hits at once. Plus, those pollutants that hitch a ride end up affecting everyone downstream.
Here’s the good news: your garden can be part of the solution. By implementing simple water recycling techniques, you can capture and use stormwater right where it falls. This means healthier plants, reduced water bills, less erosion, and cleaner streams. Your garden becomes a functional landscape that works with nature rather than against it, turning a problem into an asset.
What Green Infrastructure Actually Means for Your Property
Think of green infrastructure as partnering with nature instead of trying to control it. Rather than rushing rainwater away through gutters and storm drains, we’re inviting it to stick around and soak in where it falls. It’s really that simple.
At its heart, green infrastructure means using plants, soil, and natural processes to handle stormwater right in your own yard. Instead of concrete channels and underground pipes, you’re creating living systems that capture, filter, and absorb rainwater. Your garden becomes part of the solution, not just a pretty space.
This approach mirrors what happens in forests and meadows, where rain naturally seeps into the ground rather than racing across pavement. When you implement natural stormwater solutions, you’re essentially recreating these natural processes in an urban setting.
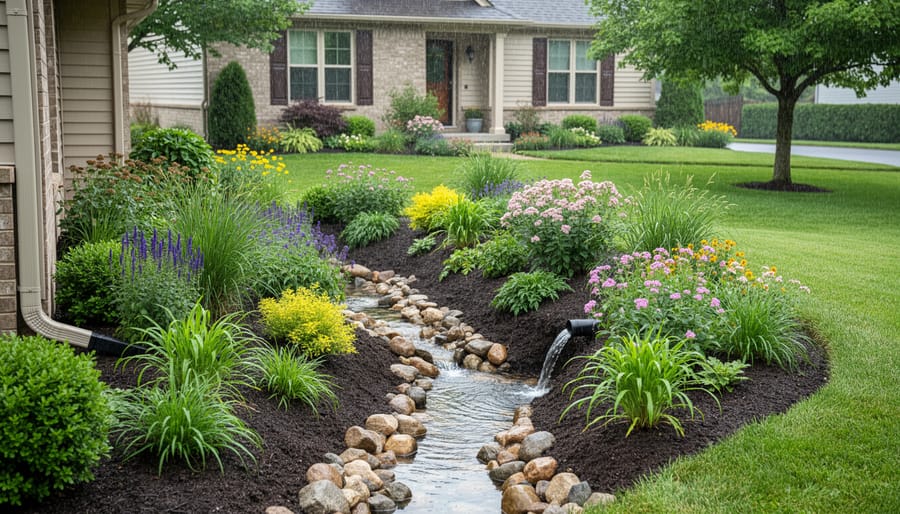
The beauty of this philosophy is that it aligns perfectly with what many of us already love about gardening. You’re not installing industrial-looking drainage systems or expensive infrastructure. You’re planting rain gardens, creating bioswales filled with native plants, and building healthy soil that acts like a sponge. These features are functional and attractive, solving drainage problems while adding beauty and habitat to your property.
Best of all, green infrastructure works with your property’s unique characteristics. Every yard has its own water story, and you’ll learn to read yours and respond accordingly.
Rain Gardens: The Beautiful Problem-Solver
How Rain Gardens Work Their Magic
Think of a rain garden as nature’s own filtration system right in your backyard. These gentle, shallow basins—typically 4-8 inches deep—are strategically placed to capture rainwater rushing off your roof, driveway, or lawn before it races into storm drains.
Here’s where the magic happens: instead of water pooling indefinitely, the depression allows it to slowly soak into the ground over 24-48 hours. While it sits there, the carefully chosen plants act as living filters, with their roots breaking down pollutants like oil, fertilizers, and heavy metals. The soil itself provides another layer of cleaning, trapping sediments and absorbing contaminants.
What makes rain gardens truly brilliant is their dual purpose. During dry spells, they look like beautiful garden beds filled with native perennials and grasses. When storms arrive, they transform into temporary ponds that protect your neighborhood’s waterways from polluted runoff.
The plant selection is key—you’ll want species that tolerate both occasional flooding and drought periods. Native options work best because they’re adapted to your local rainfall patterns and require less maintenance once established. It’s essentially creating a mini-wetland that handles stormwater naturally while adding beauty and habitat to your landscape.
Creating Your First Rain Garden
Ready to tackle stormwater runoff while creating a beautiful garden feature? A rain garden is easier to build than you might think, and the results are both practical and lovely. Let me walk you through the process that transformed my own soggy side yard into a thriving habitat for butterflies and birds.
Start by choosing the right spot. Look for a natural low point in your yard, ideally 10 feet away from your home’s foundation and at least 25 feet from septic systems or wells. The perfect location is within 15-20 feet of a downspout, allowing you to direct roof runoff straight into your garden. Avoid areas over utility lines or tree roots.
Sizing your rain garden depends on how much water you need to capture. A good rule of thumb is to make it about 20-30% the size of the impervious surface draining into it. For a typical residential downspout, a garden measuring 10 by 15 feet works wonderfully. Mark your area with garden hoses or stakes to visualize the space before digging.
Now for the muscle work! Excavate your chosen area to create a shallow depression, typically 4-6 inches deep in the center with gently sloping sides. Save that removed soil for creating a berm on the downslope side to help contain water. The key to successful rain garden design is proper drainage, so test your soil by digging a hole, filling it with water, and ensuring it drains within 24 hours. If drainage is slow, amend with compost and sand.
Plant selection makes all the difference. Choose native plants that tolerate both soggy and dry conditions. For the center zone where water collects, try blue flag iris, cardinal flower, or joe-pye weed. The middle zone suits black-eyed Susans, swamp milkweed, and purple coneflowers. Edge plantings like little bluestem grass and asters handle drier conditions beautifully.
Mulch with 2-3 inches of shredded hardwood to retain moisture and suppress weeds. Water regularly during the first growing season while plants establish their roots. Within two years, you’ll have a self-sustaining garden that handles heavy rains while providing year-round beauty.
Permeable Surfaces That Let Water Through
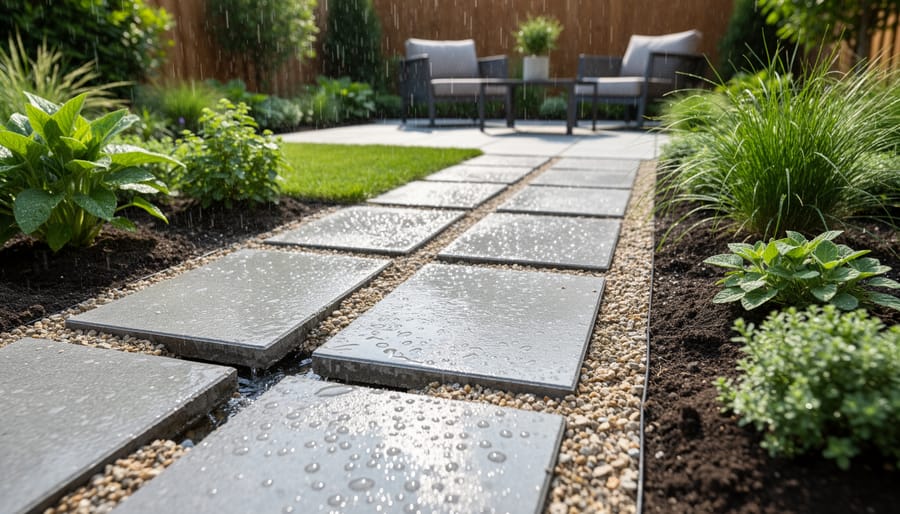
Traditional concrete and asphalt surfaces create a waterproof barrier that sends every drop of rain rushing toward storm drains instead of letting it soak naturally into the ground. The good news? You have several attractive alternatives that allow water to filter through while still providing sturdy, functional surfaces for your outdoor spaces.
Permeable pavers are my personal favorite for driveways and patios. These interlocking units have small gaps between them that let water seep through to the ground below. They come in various materials including concrete, clay brick, and natural stone. The installation requires a gravel base that helps with drainage, and you can fill the gaps with sand or even grow low-profile ground covers like creeping thyme for a living finish. I visited a garden last spring where the homeowner had installed grass pavers in their driveway, creating a checkerboard effect that was both practical and beautiful.
Permeable concrete and asphalt contain larger aggregates with open spaces throughout, allowing water to pass through the surface. While they look similar to traditional paving, they function completely differently. These materials work wonderfully for pathways and lightly-used parking areas. Just keep in mind they need occasional maintenance to prevent the pores from clogging with debris.
Gravel remains one of the simplest and most budget-friendly permeable options. Crushed stone or pea gravel provides excellent drainage and works beautifully for walkways, driveways, and informal patios. Choose larger grades for high-traffic areas and smaller, rounded stones for comfortable walking surfaces. Adding edge restraints keeps everything tidy and prevents gravel from migrating into planting beds.
Ground covers offer another living solution for areas with light foot traffic. Clover, moss, and low-growing sedums can transform spaces between stepping stones or fill entire pathways while absorbing rainfall effectively.
Smart Ways to Capture and Use Rooftop Rain
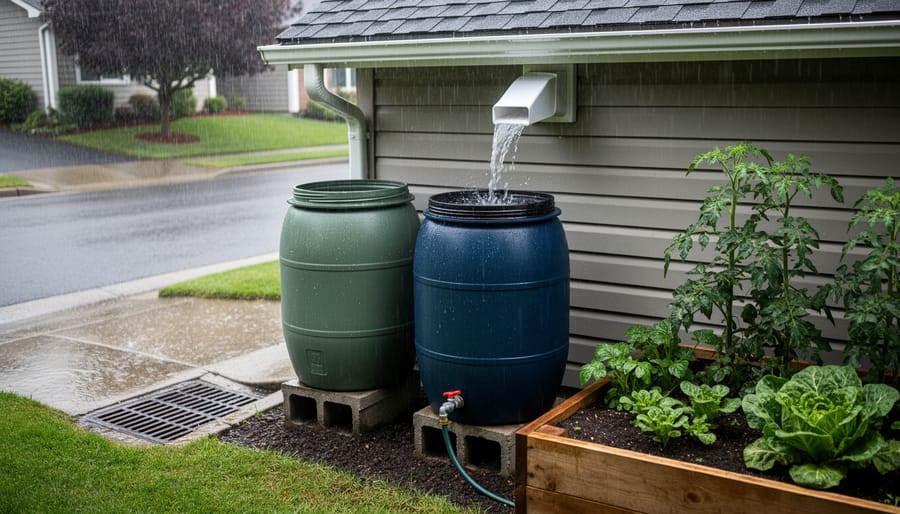
Rain Barrels for Beginners
Starting with rain barrels is easier than you might think, and they’re one of the most rewarding steps you can take toward sustainable water management. Think of them as your garden’s personal water savings account!
When choosing a barrel, look for food-grade containers with a minimum 50-gallon capacity. Many garden centers now offer purpose-built rain barrels with built-in spigots and overflow valves, though you can certainly repurpose large containers. The key is ensuring they’re opaque to prevent algae growth and have a secure, screened lid.
Rainwater harvesting systems start with proper rain barrel installation. Position your barrel on a stable, level platform near a downspout, elevated at least 12 inches off the ground for better water pressure. This height makes filling watering cans much easier too!
Mosquito prevention is straightforward: keep all openings covered with fine mesh screening. Check these screens monthly and ensure your lid fits snugly. Any gap becomes an invitation for unwanted visitors.
Winter care depends on your climate. In freezing regions, drain your barrel completely before the first hard freeze, disconnect it from the downspout, and store it upside down or in a protected area. In milder climates, you can leave it in place but keep it empty to prevent overflow during winter rains.
Regular maintenance is minimal: rinse out sediment twice yearly and check connections for leaks. That’s really all there is to it!
Redirecting Downspouts to Garden Beds
One of the simplest yet most effective steps you can take is redirecting your downspouts away from storm drains and into your garden beds instead. This straightforward project transforms runoff from your roof into a valuable resource for your plants while reducing the burden on municipal stormwater systems.
Start by examining where your downspouts currently drain. If they’re connected to underground pipes leading to the street, you’re sending perfectly good water away from your garden. Disconnecting these downspouts is usually quite manageable. You’ll simply remove the section that connects to the underground drain and extend the downspout to direct water into a nearby planted area.
The key is positioning the outlet where water can spread naturally across your garden bed without creating erosion. I like to place a flat stone or shallow basin beneath the downspout to disperse the initial flow gently. For areas farther from your foundation, consider using flexible downspout extensions or creating a simple drainage swale lined with river rocks.
Remember to direct water at least six feet away from your home’s foundation to prevent moisture problems. Your plants will thank you for this reliable water source, especially during dry spells between rainstorms, and you’ll feel great knowing you’re managing water sustainably right at home.
Green Roofs and Living Walls for the Ambitious Gardener
If you’re ready to take your stormwater management ambitions to new heights—literally—green roofs and living walls offer exciting possibilities. These sophisticated systems transform vertical and overhead spaces into functional ecosystems that capture rainwater before it ever reaches the ground.
Green roofs, also called eco-roofs, consist of layered waterproofing membranes, drainage systems, growing medium, and hardy plants installed atop existing or new buildings. They can absorb 50-90% of rainfall, dramatically reducing runoff while providing insulation, wildlife habitat, and stunning visual appeal. Living walls work similarly on vertical surfaces, using mounted planters or specialized panels to create lush, rain-absorbing gardens on otherwise unused wall space.
Before diving in, understand that these are significant investments requiring careful planning. Your structure must support the additional weight—a saturated green roof can add 15-50 pounds per square foot. Start by consulting a structural engineer to assess your building’s capacity. For new construction, this evaluation happens naturally during the design phase, making integration much simpler.
The basic requirements include proper waterproofing (absolutely essential), a root barrier to protect your building, drainage layers, lightweight growing medium, and appropriate plant selection. Sedums, succulents, and native grasses typically thrive in these challenging environments.
When should you call in professionals? Always involve structural engineers and waterproofing specialists at minimum. These systems are unforgiving of mistakes. However, if you have a suitable garden shed, garage, or small outbuilding verified safe by an engineer, ambitious gardeners can tackle modest green roof installations following manufacturer guidelines.
The rewards extend beyond stormwater benefits—you’ll create unique growing space, reduce energy costs, and enjoy a truly distinctive garden feature that makes neighbors stop and marvel.
Plant Power: Choosing Vegetation That Manages Water
The plants you choose for your stormwater garden are the real workhorses of the system, so selecting the right ones makes all the difference. Think of them as your green infrastructure team, each member bringing unique abilities to manage water and keep your yard healthy.
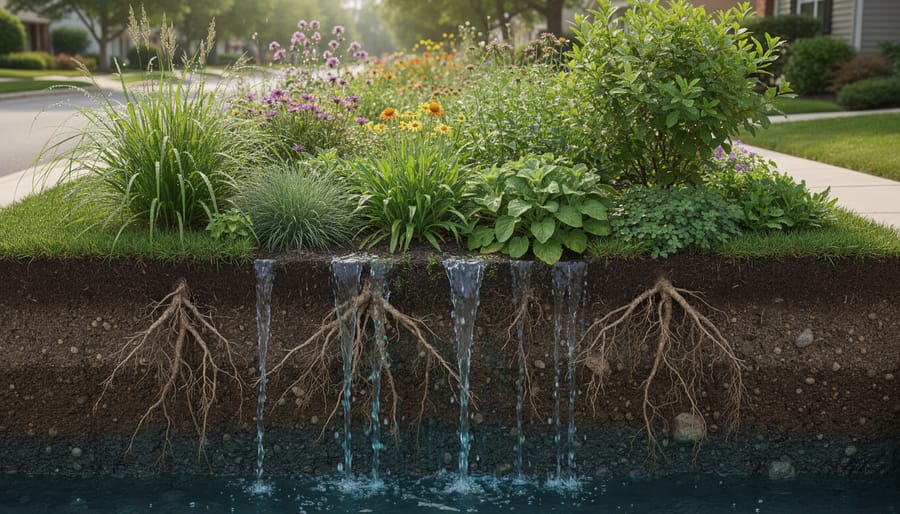
Deep-rooted native plants are your first string players. Their extensive root systems, which can reach several feet down, create channels that help water infiltrate the soil quickly while preventing erosion. Native species like Joe Pye weed, ironweed, and switchgrass are fantastic choices because they’ve evolved alongside your local climate and soil conditions. I learned this firsthand from landscape designer Maria Chen, who transformed her clients’ soggy yard using nothing but natives. “Within two seasons, the standing water was gone,” she told me. “The roots had done their job.”
But here’s the challenge: your stormwater garden isn’t always wet. During dry spells, these same plants need to survive with minimal moisture. That’s why versatility matters. Look for species that handle both extremes, like black-eyed Susans, cardinal flower, and blue flag iris. These adaptable performers won’t complain whether it’s feast or famine.
Pollutant filtering is another superpower worth considering. As stormwater flows across roads and roofs, it picks up oils, heavy metals, and other contaminants. Certain plants actively absorb or trap these pollutants. Sedges are exceptional at this, along with swamp milkweed and common rush. Their dense root systems and foliage act like natural filters, cleaning water before it reaches groundwater supplies.
When planning your plant palette, aim for diversity. A mix of grasses, flowering perennials, and sedges creates layers of roots at different depths, maximizing water absorption and creating habitat for pollinators. Start with three to five species if you’re new to this, gradually expanding as you gain confidence. Your local native plant nursery can recommend specific varieties that thrive in your region’s conditions.
Simple Steps to Get Started This Weekend
Ready to make a difference in your yard this weekend? You don’t need to tackle everything at once. Start with these simple projects that pack a real punch when it comes to managing stormwater right where it falls.
Begin with the easiest win: add a 2-3 inch layer of mulch around your existing plants and trees. This simple act helps rain soak into the soil instead of running off, plus it suppresses weeds and keeps roots happy. I always tell fellow gardeners that mulch is like a sponge for your garden, and you probably already have the tools you need.
Next, take a walk around your house during a rainstorm (bring an umbrella!). Notice where your downspouts are sending water. If they’re dumping directly onto paved surfaces or creating mini-rivers in your yard, pick just one to redirect. You can disconnect it from the drainage system and extend it toward a garden bed using a simple flexible downspout extension from any hardware store. This immediately turns problem water into a resource for your plants.
Got a soggy spot that never seems to dry out? Plant a water-loving shrub there this weekend. Native options like red twig dogwood, winterberry holly, or elderberry actually thrive in wet conditions and will help absorb excess water while looking beautiful.
Finally, consider installing a single rain barrel under one downspout. Modern versions come with easy DIY installation kits, and you’ll have free water for your containers and vegetable garden all summer long.
Pick one or two projects that speak to you. Every small action helps manage stormwater while making your garden more resilient and productive.
When you step outside to plant a rain garden or install a simple rain barrel, you might think you’re just improving your own little corner of the world. And you are! But here’s something even more inspiring: you’re also becoming part of a much larger solution. Every garden that absorbs rainwater, every permeable pathway you create, and every native plant you tuck into the soil contributes to your neighborhood’s ability to handle whatever weather comes its way.
Think of your garden as a living piece of the watershed puzzle. The water that falls on your property doesn’t just disappear—it travels, connecting your yard to your neighbor’s, flowing through storm drains, and eventually reaching streams, rivers, and lakes. When you manage stormwater thoughtfully in your garden, you’re helping to protect these waterways and everything that depends on them.
I love that the solutions we’ve explored aren’t just functional—they’re genuinely beautiful. A bioswale can be a stunning garden bed. A rain garden becomes a habitat for butterflies and songbirds. You’re not sacrificing aesthetics for environmental responsibility; you’re creating spaces that are both gorgeous and purposeful.
So as you plan your next garden project, remember that you’re not alone in this effort. Across your community, other gardeners are making similar choices, and together, you’re building resilience one garden at a time. That’s the kind of change that truly matters.