Pour concrete to a depth of at least 24 inches in most climates, or below your local frost line, to prevent heaving that can topple even the sturdiest fence posts. This foundation work might seem excessive when you’re eager to see your fence standing tall, but I’ve watched too many weekend projects become wobbly disappointments by spring because builders skipped proper depth requirements.
Mix your concrete to a thick, oatmeal-like consistency that holds its shape when squeezed but still flows around the post without air pockets. The sweet spot sits between soupy and crumbly, allowing you to work efficiently while ensuring maximum post stability. Most fence posts need footings three times wider than the post diameter, so a 4-inch post requires a 12-inch diameter hole.
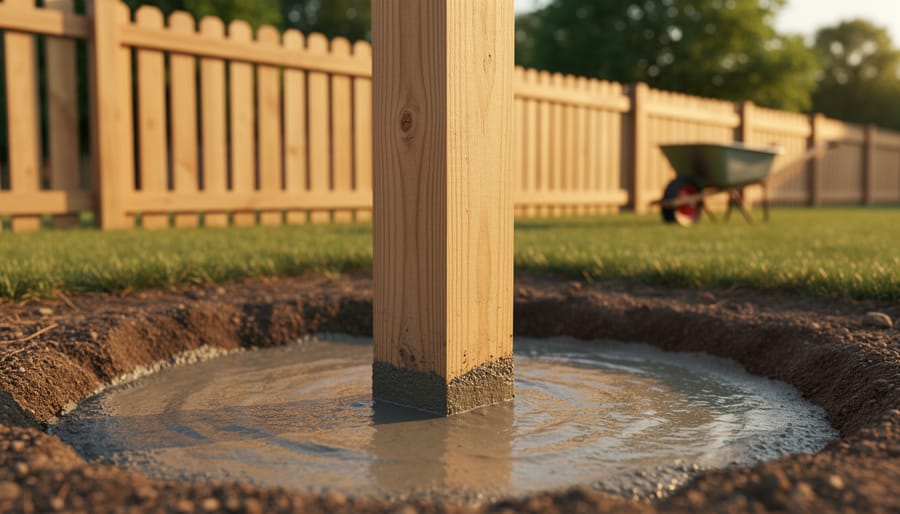
Set posts in fresh concrete immediately after pouring, using a level to check plumb from two perpendicular sides before the mixture begins its initial set within 20-30 minutes. This narrow window demands preparation, but working methodically through one post at a time prevents the frustration of racing against hardening concrete. Like stable garden structures throughout your landscape, properly installed concrete footings create permanent solutions that withstand decades of weather, eliminating the annual ritual of straightening leaning fence sections that many gardeners endure.
What Makes Concrete Footings Essential for Lasting Fences
Think of a fence post like a tree in your garden. A healthy tree needs strong roots to anchor it through storms, and your fence posts need the same kind of support underground. That’s exactly what concrete footings provide, and once you understand why they work so beautifully, you’ll see why experienced gardeners and builders swear by them.
Concrete footings do two important jobs that make all the difference for fence longevity. First, they distribute the weight of your fence evenly into the surrounding soil, preventing those frustrating lean-to-one-side situations we’ve all seen in older fences. Second, and perhaps more importantly in colder climates, they resist frost heave. When water in the soil freezes and expands, it can literally push fence posts upward and sideways. Concrete footings, when installed below the frost line using proper foundation techniques, anchor your posts where frost can’t reach them.
You might wonder whether simpler methods like tamped earth or gravel could work just as well. Honestly, for lightweight decorative borders or temporary garden dividers, those alternatives can be perfectly adequate. I’ve used gravel-set posts for sweet pea trellises that only need to last a season or two. However, concrete becomes absolutely necessary when you’re installing a permanent privacy fence, supporting heavy gates, dealing with sloped terrain, or building in areas with freeze-thaw cycles. If your fence will face strong winds or needs to last for decades, concrete is your best friend.
The beauty of concrete is its permanence. While tamped earth settles over time and gravel shifts with moisture changes, properly installed concrete footings create a stable foundation that can outlast the fence itself. This means you’re building once and enjoying the results for twenty years or more—a wonderful return on your weekend investment.

Choosing the Right Concrete Footing Method for Your Project
The Fast-Set Method: Dry Pour Concrete
If you’re looking for the quickest way to secure fence posts for a lightweight garden fence, the dry pour method might be your new best friend. I’ll admit, when I first heard about this technique, I was skeptical. Pouring dry concrete mix straight into the hole without mixing it first? It seemed too simple to work. But after using it for several small fence projects in my garden, I’m a convert.
Here’s how it works: Once you’ve dug your post hole and positioned your post, you simply pour the dry concrete mix directly from the bag into the hole around the post. The magic happens underground, where the mix gradually absorbs moisture from the surrounding soil and air, setting up solid over time. No mixing, no mess, no buckets required.
This method works best for smaller garden fences, decorative borders, or quick weekend projects where you’re working with lighter-weight posts. Think picket fences, trellis supports, or garden bed dividers rather than heavy privacy fences. The key is ensuring the soil has adequate moisture. If you’re in a particularly dry climate, you might want to add a bit of water to help the curing process along.
The beauty of dry pour is its simplicity and speed. You can set multiple posts in a fraction of the time traditional mixing takes, leaving you more time to enjoy your garden rather than standing over a concrete mixer.
The Traditional Wet Mix Approach
The wet mix method is your tried-and-true friend when it comes to setting fence posts, and for good reason. This approach has been the go-to choice for generations because it simply works in almost any situation you’ll encounter in your garden.
Here’s how it goes: you’ll mix your concrete to a thick, pourable consistency (think milkshake texture), then pour it directly into the post hole around your already-positioned post. The beauty of this method is its adaptability. Whether you’re working with clay-heavy soil, sandy conditions, or that frustrating rocky ground many of us deal with, wet-mixed concrete flows around obstacles and fills every nook and cranny.
I remember talking with veteran landscaper Tom Martinez, who’s been installing fences for over thirty years. He told me, “The wet mix gives you time to adjust. If your post shifts while you’re working, you can still make corrections before everything sets up.” That working time is invaluable, especially if you’re new to fence building.
The process is straightforward: dig your hole, set the post with temporary bracing, mix your concrete following the bag instructions, pour it in layers while tamping out air pockets, and create a slight slope at the top for water drainage. Most concrete reaches handling strength within 24 to 48 hours, though you’ll want to wait a few days before attaching fence panels.
This method works beautifully for wooden posts, vinyl, chain-link, and heavy ornamental fencing alike.

The Concrete Collar Technique
If you’re working with well-draining soil and want a middle-ground solution, the concrete collar technique might be just right for you. I discovered this approach while chatting with a seasoned fence installer who swears by it for certain situations, and I’ve been impressed with the results ever since.
Here’s how it works: instead of filling your entire post hole with concrete, you create a solid concrete “collar” or cap at ground level, while the bottom portion of the hole gets filled with compacted gravel. Think of it like giving your fence post a sturdy concrete necklace that locks it in place right where it matters most.
Start by digging your hole to the proper depth, typically one-third the height of your above-ground post. Add about 6 to 8 inches of gravel at the bottom and tamp it down firmly with a post hole tamper or a sturdy piece of lumber. Set your post in place, ensuring it’s perfectly level and plumb. Then, fill the remaining hole with more gravel up to about 4 inches below ground level, compacting as you go.
Now comes the collar part. Mix your concrete and pour it into the top 4 to 6 inches of the hole, creating a crown that slopes slightly away from the post to shed water. This technique uses significantly less concrete than full pour methods, making it budget-friendly while still providing excellent stability where it counts. The gravel below allows for drainage, reducing frost heave concerns and extending your fence’s lifespan in areas with good natural drainage.
How Deep Should Your Fence Post Footings Really Be?
Getting the depth right for your fence post footings is like giving your fence a firm handshake with the earth—it needs to be solid enough to last. Let me share a simple approach that’s worked for countless DIY gardeners.
The golden rule many builders follow is the one-third principle: bury one-third of your post’s total length in concrete. For a six-foot fence, that means digging down two feet. Planning an eight-foot privacy fence? You’ll want about 2.5 to 3 feet underground. This ratio provides excellent stability for most standard fencing projects.
However, there’s more to consider than just height. Your local frost line is absolutely crucial—this is the depth at which ground freezing occurs in winter. Footings must extend below this line, or frost heave will push your posts around like chess pieces, creating leaning, twisted sections come spring. In northern climates, frost lines can reach 4 feet or deeper, while southern regions might only require 12-18 inches.
Gate posts deserve special attention since they carry extra weight and stress from repeated opening and closing. I always recommend going 6-12 inches deeper for gate posts than standard line posts. A heavy wooden gate on a standard fence might need a 3-foot footing instead of the usual 2 feet.
Your soil conditions also influence depth requirements. Sandy or loose soil needs deeper footings for adequate grip, while dense clay provides better natural support. If you hit bedrock or extremely hard-packed earth before reaching your target depth, that’s generally sufficient—you’ve found nature’s concrete.
When in doubt, check with your local building department. They’ll provide specific requirements for your area, and this small investment of time can save you from costly repairs down the road.
Your Step-by-Step Guide to Installing Concrete Fence Footings
Gathering Your Tools and Materials
Before you grab your shovel, let’s make sure you have everything on hand. The good news? You probably already own some of these items!
You’ll definitely need a post hole digger or auger (manual versions work great for a few posts, but consider renting a power auger for larger projects), a sturdy shovel, and a level. For mixing, a wheelbarrow or large mixing tub is essential, along with a garden hoe or mixing paddle. Don’t forget safety gear: work gloves, safety glasses, and sturdy boots.
For materials, you’ll need concrete mix (one 50-pound bag typically fills one standard post hole), gravel for drainage, and of course, your fence posts. A garden hose with water access makes mixing easier.
Budget-friendly tip: Basic hand tools from your garden shed work perfectly fine. I’ve built countless footings with a simple post hole digger and old wheelbarrow.
Worth the investment: A good carpenter’s level and quality work gloves make the job significantly easier. If you’re installing more than four posts, renting a power auger saves hours of back-breaking work and costs around thirty dollars for a half-day rental.
Keep a tape measure, stakes, and string handy for marking your fence line accurately.
Marking and Digging Your Post Holes
Getting your post holes properly marked and dug is half the battle, and it’s easier than you might think! Start by measuring and marking each post location with spray paint or wooden stakes. For most fences, spacing posts 6 to 8 feet apart works beautifully, though you’ll want closer spacing for heavy gates or in areas with strong winds.
Here’s a tip from my own fence-building experience: run a taut string line between corner posts to ensure your fence stays perfectly straight. Trust me, your eyes can deceive you, but that string won’t lie! Mark each post location along the line, then double-check your measurements before you start digging.
When it comes to digging, a post hole digger or clamshell digger makes the job manageable for most gardeners. For multiple holes, consider renting a power auger to save your back and time. Aim for holes about three times wider than your post diameter and deep enough that one-third of the post sits below ground.
Now, let’s talk about those inevitable challenges. Hit rocky soil? Keep a sturdy digging bar handy to break up stubborn stones. Encountering roots? Small ones can be cut with loppers, but if you find a substantial root, it’s often better to shift your post location slightly rather than compromising a tree’s health. Rocky ground might require you to adjust your footing depth, which is perfectly fine as long as you maintain that crucial below-ground ratio for stability.
Setting Posts with the Right Amount of Concrete
Getting the concrete amount just right is one of those Goldilocks moments in fence building—not too much, not too little, but just right! For most standard 4×4 fence posts in an 8-10 inch diameter hole, you’ll need about one 50-pound bag of concrete mix per post. If you’re working with larger posts or deeper holes, plan on two bags. I always keep an extra bag on hand, just in case.
Once you’ve poured your concrete mix into the hole (remember to add water according to package directions and mix thoroughly), it’s time for the crucial positioning work. Center your post in the hole, making sure it sits at the correct depth—typically one-third of the post’s above-ground height, plus 6 inches for the gravel base we discussed earlier.
Now comes the fun part: making everything perfectly level and aligned. Use a carpenter’s level on two adjacent sides of the post to check for plumb in both directions. This is where bracing becomes your best friend. I like to use scrap 2x4s as temporary braces, securing them at an angle from the post to stakes driven into the ground about 3 feet away. You’ll want at least two braces per post, positioned at right angles to each other.
Here’s a tip from my neighbor Tom, who’s built countless fences over the years: once your post is braced and level, step back and sight down your fence line from both directions. This helps catch any twisting or misalignment before the concrete sets. Make small adjustments now—you’ll have about 20-30 minutes of working time.
Add the remaining concrete around the post, tamping it down with a stick or rod to eliminate air pockets. Create a slight slope away from the post at the surface to encourage water drainage, and you’re all set!

Finishing and Curing Your Footings
Once your concrete is poured, you’re in the home stretch! Take a moment to smooth the top surface with a trowel, gently working in circular motions. Here’s a little trick I learned from a seasoned fence builder: create a slight dome shape on top of each footing, sloping away from where your post will sit. This simple step ensures water runs off rather than pooling around your posts, which can lead to rot over time.
Now comes the hardest part for eager gardeners like us: waiting! Concrete needs proper curing time to reach its full strength. Keep the surface moist by lightly misting it with water daily for the first week, especially during hot weather. You can also cover footings with plastic sheeting to slow moisture evaporation. Think of it like nurturing seedlings—a little daily attention goes a long way.
While concrete begins setting within hours, resist the temptation to rush ahead. Wait at least 48 hours before handling posts gently, and ideally give it a full seven days before attaching fence panels or gates. For heavier gates or if you’re in a particularly wet climate, waiting ten days provides extra insurance.
I know patience isn’t always easy when you’re excited about completing your garden fence, but this curing period is crucial. Use this time to organize your fence panels, gather hardware, or plan the climbing roses you’ll eventually train along your beautiful new fence. Your patience now means decades of sturdy, reliable fencing ahead.
Avoiding the Mistakes That Lead to Failed Footings
We’ve all been there – excited to start a project and eager to see results quickly. But when it comes to concrete fence footings, a few common missteps can turn your dream fence into a leaning tower of frustration. The good news? These mistakes are easy to avoid once you know what to watch for.
The shallow grave problem is surprisingly common. Many folks underestimate just how deep those footings need to go. If you’re in a region with freezing winters, skimping on depth means frost heave will push your posts around like chess pieces. Always dig below your area’s frost line, and when in doubt, go deeper rather than shallower.
Here’s something I learned from a seasoned contractor: forgetting about water is a recipe for disaster. Poor drainage planning means water pools around your footings, which can lead to erosion, frost damage, and weakened concrete over time. Make sure water flows away from your footings, and consider adding gravel at the bottom of your holes for drainage.
The wobble factor catches even experienced DIYers off guard. You’ve poured perfect concrete, but if you don’t brace your posts properly while the concrete cures, they’ll shift and settle crooked. Use temporary braces in two directions, check them with a level, and don’t touch them until curing is complete.
Speaking of curing, patience is your friend here. I know you’re eager to attach those fence panels, but concrete needs time to reach full strength. Rushing this process, especially in hot or cold weather, compromises everything you’ve worked for. Give it at least three days, preferably longer, before adding weight or stress to those posts. Your future self will thank you for the wait.

When to Call a Professional Instead of DIY
Let me be honest with you: tackling concrete footings yourself is completely doable for many projects, but there are times when calling in a professional is the smarter choice, and there’s absolutely no shame in that decision.
If you’re planning to install heavy gates, especially motorized ones or solid wood entry gates, professional help is worth considering. These structures place enormous stress on footings, and a structural engineer can calculate the exact specifications needed. Getting this wrong could mean a sagging gate within months.
Extensive fencing projects covering large properties can quickly become overwhelming. Professionals have the equipment to dig multiple holes efficiently and can maintain consistent quality across dozens of footings. What might take you several weekends could be completed in days.
Challenging soil conditions are another game-changer. If you’re dealing with high water tables, rocky terrain, expansive clay, or steep slopes, professionals have specialized tools and experience to handle these complications safely. I once spoke with a seasoned contractor who said that difficult soil accounts for most DIY footing failures he’s called to repair.
Local building codes can be surprisingly complex, particularly regarding frost lines, setback requirements, and inspection processes. Professionals navigate these regulations daily and often have established relationships with local inspectors, smoothing the approval process.
Consider your own physical abilities and time constraints too. Digging and pouring concrete is physically demanding work. If you have health concerns or limited time, investing in professional installation means your beautiful fence gets completed without sacrificing your weekends or wellbeing. Making the right choice for your situation is what matters most.
There’s something wonderfully satisfying about stepping back and admiring a fence you’ve built yourself, knowing that those solid concrete footings beneath will keep everything standing strong for decades to come. If you’ve made it this far through the planning and preparation, you’re already well on your way to success. Installing concrete fence footings truly is an achievable weekend project, even if you’re tackling it for the first time.
Remember, thousands of gardeners and homeowners just like you have successfully poured their own footings without professional help. The key is taking your time, following the steps carefully, and not rushing through the curing process. Yes, your arms might be a bit sore from mixing concrete and digging post holes, but that effort pays dividends every time you see your finished fence standing straight and sturdy through wind, rain, and seasons of change.
The skills you’ve learned here extend beyond just this one project. You’re now equipped to tackle other outdoor structures with confidence, whether that’s a garden arbor, mailbox post, or pergola.
We’d love to hear about your fencing journey. What challenges did you encounter? What tricks made the job easier? Drop your experiences, photos, or questions in the comments below. Your insights might be exactly what another gardener needs to take that first step toward their own successful fence project.