Build your potting bench by repurposing old pallets, salvaged doors, or weathered lumber to create a sturdy 36-inch-high workspace that puts everything at comfortable arm’s reach. Mount a pegboard backing to hang trowels, pruners, and hand tools within easy grasp, then add hooks along the sides for gloves and aprons. Install a lower shelf using 2×4 boards spaced 16 inches below your work surface to store bags of soil, pots, and watering cans while keeping your workspace clear.
Transform a basic bench into an organized gardening command center by incorporating galvanized buckets mounted on the side for tool storage, attaching a towel bar for hanging S-hooks that hold small hand tools, and drilling holes across the back edge to hold bamboo stakes or garden markers upright. Add a simple potting soil dispenser using a large funnel mounted through the work surface with a sliding gate underneath, letting you fill pots without lifting heavy bags.
Create the frame using pressure-treated 4×4 posts for the legs and 2×4 boards for support rails, securing everything with 3-inch exterior screws and reinforcing corners with metal brackets. Top it with a single sheet of plywood, reclaimed wood planks, or even an old countertop that you can easily hose down after messy potting sessions.
Position your bench near a water source and add caster wheels to two legs if you need occasional mobility around your garden space.
Why Every Gardener Needs a Dedicated Potting Bench
If you’ve ever found yourself hunched over a rickety table or kneeling on damp ground while repotting plants, you already know the answer to why a dedicated potting bench matters. The difference between having a proper workspace and making do with whatever’s available is like night and day for your gardening routine.
Let’s talk about your back first. Sarah Chen, a master gardener from Vancouver, puts it perfectly: “After years of bending over my patio table to pot plants, I finally built myself a proper potting bench at the right height. Within a week, those nagging lower back aches I’d accepted as part of gardening just disappeared.” Working at the correct height isn’t a luxury—it’s essential for enjoying gardening long-term without paying the price in aches and pains.
Beyond ergonomics, organization transforms how efficiently you work. Instead of running back and forth to the shed for potting soil, fertilizer, or that elusive bag of perlite, everything lives right where you need it. Hooks hold your trowels and pruners. Shelves keep different soil mixes separate and accessible. You can set up your potting bench near your seed starting station for a complete propagation zone.
The practical benefits extend to cleanliness too. With a designated potting surface, soil spills stay contained rather than spreading across your deck or garage floor. Many designs include a lower shelf that catches dropped soil for easy cleanup or reuse.
Tom Rodriguez, who gardens on his Toronto balcony, shares: “My DIY potting bench gave me permission to actually enjoy the messy parts of gardening. I’m not worried about dirt on the dining table anymore. I just get to focus on my plants.”
Whether you’re repotting houseplants weekly or preparing dozens of containers each spring, having that dedicated space waiting for you makes gardening feel less like a chore and more like the pleasure it should be.
Choosing the Right Potting Bench Design for Your Space
Compact Benches for Small Patios and Balconies
Living in an apartment or condo doesn’t mean you have to give up your potting bench dreams! I’ve discovered some brilliant space-saving solutions that work beautifully in compact spaces, and I’m excited to share them with you.
Fold-down designs are absolute game-changers for small patios and balconies. These clever benches mount to your wall and fold up flat when not in use, instantly reclaiming your precious outdoor space. Think of them as Murphy beds for gardeners! You can build one using simple hinges and a sturdy support bracket that locks into place when open. When you’re done potting, just fold it up and enjoy your uncluttered space.
Wall-mounted potting benches are another fantastic option. By attaching a narrow shelf-style bench directly to your balcony wall or railing, you create a permanent workspace without sacrificing floor space. Add hooks underneath for hanging hand tools, and use vertical storage solutions like pegboards or magnetic strips to keep everything organized and within reach.
For ultimate flexibility, consider a rolling cart design with a small footprint. These mobile benches can be wheeled to where you need them and tucked into a corner when not in use. The key is maximizing vertical storage with tiered shelving and hanging organizers, keeping your essential supplies accessible without crowding your space.
Full-Size Workstations for Serious Gardeners
If you’re the kind of gardener who starts seeds by the hundreds, mixes soil in bulk, and has accumulated more tools than you can count, a full-size workstation is calling your name. These substantial benches become the command center of your gardening operation, offering everything you need within arm’s reach.
The beauty of building a full-size potting bench is creating exactly the workspace you’ve been dreaming about. Consider a design that’s at least 6 feet long with a depth of 24 to 30 inches, giving you plenty of room to spread out. I once interviewed master gardener Patricia Chen, who told me her 8-foot bench transformed her gardening routine. “I can pot up an entire season’s worth of tomatoes in one afternoon without feeling cramped,” she said.
Include multiple levels for different tasks. A lower shelf holds bags of soil and larger pots, while upper shelves keep fertilizers and smaller containers organized. Add hooks along the sides for hanging tools, and don’t forget a pegboard backing for ultimate flexibility.
Many serious gardeners incorporate dual work surfaces: one at standard counter height for comfortable potting work, and a lower section for heavier tasks like mixing soil or washing root vegetables.
Mobile Benches That Move With You
Adding casters to your potting bench transforms it into a flexible workspace that adapts to your gardening rhythm throughout the seasons. I discovered this game-changer after lugging my first heavy bench across the patio one too many times! Choose heavy-duty locking casters rated for at least 100 pounds each to support your loaded bench plus soil bags and tools.
The beauty of a mobile design is positioning your bench in full sun during spring seedling season, then rolling it into shade for summer transplanting work. When winter arrives, simply wheel it into your garage or shed to reclaim precious outdoor space. For stability during use, install two locking casters at one end and two standard wheels at the other. This configuration makes the bench easy to tilt and move while staying rock-solid when you’re working. Consider adding a removable handle or grip area to make pushing more comfortable, especially when navigating uneven ground or garden paths.
Weather-Resistant Materials That Last
Choosing the right material for your potting bench makes all the difference between a project that lasts years versus one that warps after a single season. Cedar naturally resists rot and insects, making it my top pick for benches that’ll live outdoors year-round. It weathers to a beautiful silver-gray and typically lasts 15-20 years untreated. Treated pine offers a budget-friendly alternative that holds up well for 10-15 years when properly maintained with annual sealant applications.
If you’re looking for truly low-maintenance options, composite decking materials are gaining popularity for potting bench tops. They won’t splinter, need zero maintenance, and resist moisture beautifully, though they cost more upfront. Metal frames paired with wooden tops give you structural strength that won’t wobble, and powder-coated steel can last decades. I’ve seen gardeners combine galvanized steel legs with cedar tops for benches that truly stand the test of time, combining the best qualities of both materials while keeping costs reasonable.
Essential Features That Make a Potting Bench Actually Useful
The Perfect Working Height (And How to Find Yours)
Finding your ideal bench height prevents backaches and makes potting truly enjoyable. Here’s a simple way to determine yours: stand naturally with your arms relaxed at your sides, then bend your elbows to 90 degrees. The distance from the ground to your hands is your perfect working height, typically between 36 and 42 inches for most adults.
I learned this the hard way after building my first bench too low and spending a weekend hunched over repotting tomatoes. My lower back reminded me for days afterward! Now I adjust my bench to suit the task. For detail work like seedling transplants, I prefer the surface slightly higher. For heavier tasks like mixing soil or dividing large plants, a bit lower gives better leverage.
If multiple family members will use the bench, aim for the tallest person’s measurement or consider building an adjustable design with removable leg extensions.
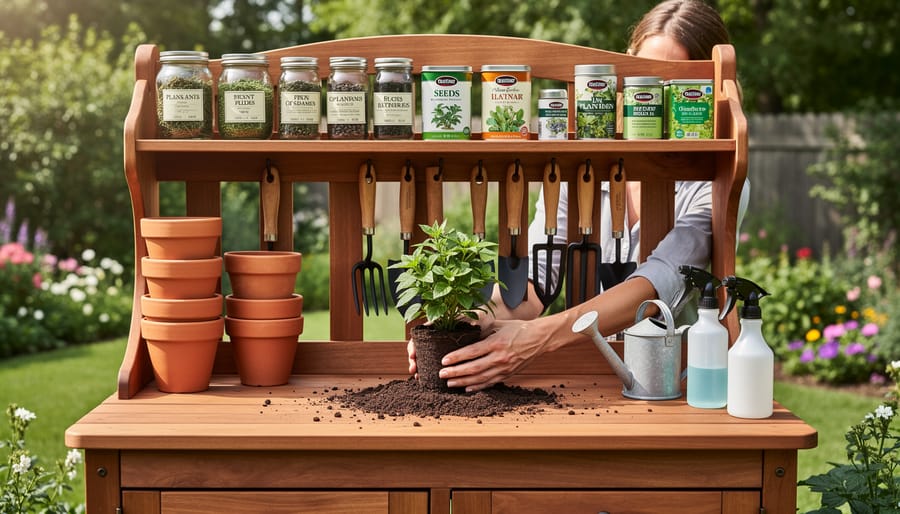
Built-In Storage Solutions That Keep Everything at Hand
The real magic of a potting bench comes from thoughtful storage that keeps everything within arm’s reach. Start by adding a lower shelf beneath your work surface – it’s perfect for storing bags of soil, peat moss, and larger pots. I learned this the hard way after spending my first season bending down to grab supplies from the ground!
Install a pegboard backing above your bench to create a flexible storage system. Hooks can hold hand trowels, pruners, and spray bottles, and you can rearrange them as your needs change. For smaller items like seed packets, plant markers, and twist ties, consider mounting small bins or mason jars along the sides or back edge of your bench.
Drawers are wonderful for keeping gardening gloves, labels, and twine organized and protected from weather. Even a simple drawer made from scrap wood can transform your workflow. If drawers seem too complex, try nailing wooden crates to the side of your bench as open cubbies.
Don’t forget vertical space! Add S-hooks under the work surface to hang watering cans or bucket handles. Renowned gardener Martha Williams suggests dedicating one section specifically for clean, empty pots so they’re always ready when inspiration strikes. With these built-in solutions, you’ll spend less time hunting for tools and more time enjoying the creative process of potting.
Soil-Catching Features That Save Cleanup Time
Trust me, you’ll thank yourself later for incorporating soil-catching features into your potting bench design. A mesh or slat top allows excess soil to fall through while you work, keeping your potting surface cleaner and giving you better control when filling containers. Space the slats about a half-inch apart for the best balance between drainage and stability.
Consider adding a removable metal or plastic tray underneath the work surface to catch falling soil. I learned this the hard way after sweeping up countless piles of potting mix from my shed floor. The tray slides out easily, and you can dump everything back into your soil bin without waste.
Another clever touch is adding a lip or raised edge around three sides of your work surface, leaving the front open. This prevents soil from cascading onto the floor while still allowing you to brush debris forward into your collection tray or bucket.
Sink or Water Access Options
Consider whether you truly need running water at your potting bench or if simpler options will work just as well. While plumbing adds convenience, it requires more complex construction and may not be practical for most DIY builds. Many gardeners find success with nearby water access solutions like a strategically placed rain barrel, a large basin set into the work surface, or a repurposed drink dispenser mounted on the side. You can also dedicate a shelf for watering cans or install hooks for spray bottles. If you’re determined to add a sink, consider gravity-fed systems using elevated water containers, which eliminate the need for plumbing altogether. Think about your actual watering habits before committing to permanent installations.
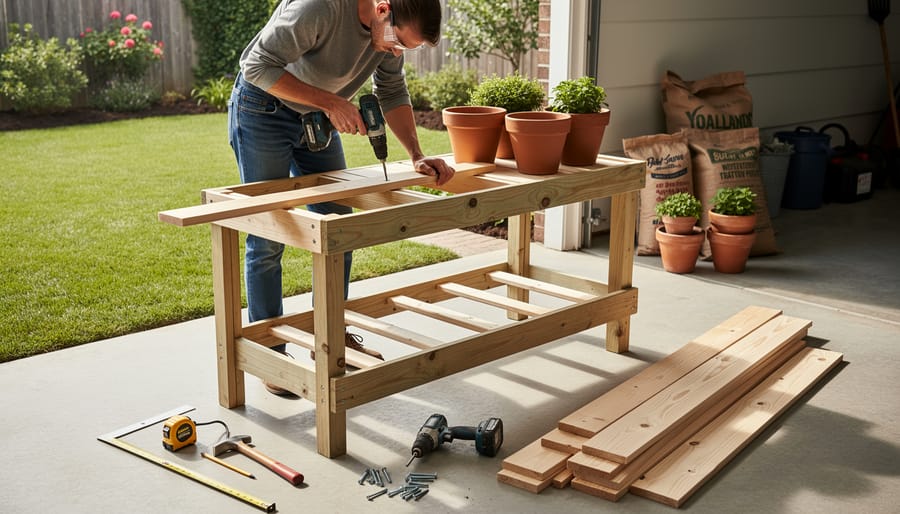
Step-by-Step: Building Your First Potting Bench
Tools and Materials You’ll Need
Building your own potting bench is one of those rewarding beginner-friendly DIY projects that doesn’t require a huge investment. Here’s what you’ll need to get started.
For the structure, gather 2×4 lumber (approximately 20-24 feet total, around $30-40), exterior-grade plywood or reclaimed wood for the work surface (one 4×4 sheet, about $35-50), and galvanized screws or deck screws in various lengths ($10-15). You’ll also want wood glue for extra stability ($5) and exterior wood stain or sealant to protect your bench from the elements ($15-25).
Tool-wise, you’ll need a drill with basic bits (cordless models run $50-100, or borrow from a neighbor), a saw for cutting lumber (a handsaw works fine for beginners at $15-20, though a circular saw speeds things up), a tape measure, carpenter’s square, and pencil for marking cuts. Sandpaper or a sanding block ($5-10) will smooth rough edges.
Total estimated cost ranges from $150-250, depending on whether you choose premium lumber or reclaimed materials. Many gardeners find that using salvaged wood and borrowed tools keeps costs under $100.
Cutting and Prep Work Made Simple
Before you make that first cut, let’s get organized! Start by laying out all your lumber and double-checking each piece against your materials list. Trust me, I learned the hard way that measuring twice really does save you from cutting once incorrectly.
Create a simple cutting list on paper or your phone, marking off each piece as you complete it. For a standard 4-foot wide bench, you’ll typically need pieces like 48-inch top boards, 34-inch legs, and 16-inch shelf supports. Use a carpenter’s square to mark your cut lines clearly, making them visible from multiple angles as you work.
Here’s a game-changer tip: clamp a straight board along your cut line to guide your circular saw for perfectly straight cuts every time. This technique transforms even beginner cuts into professional-looking results.
Sand all cut edges lightly with 120-grit sandpaper before assembly. This small step prevents splinters and helps your finish coat look smooth and polished. Pre-drill holes for screws wherever you’ll be joining pieces near board ends to prevent splitting. Group similar cuts together to maintain consistent settings on your saw, which improves accuracy and speeds up the process considerably.
Assembly Process From Frame to Finish
Start by laying out all your pieces and hardware before you begin—trust me, there’s nothing more frustrating than realizing you’re missing a bolt halfway through! Begin with the frame, connecting the four legs to the back supports first. This creates a stable foundation that won’t wobble as you work.
Here’s a common pitfall: don’t fully tighten your screws or bolts during initial assembly. Keep them finger-tight until the entire frame is together. This gives you wiggle room to adjust alignment, ensuring everything sits square. I learned this the hard way on my first bench when one leg ended up shorter than the others!
Once your frame stands securely, attach the lower shelf supports, checking with a level as you go. Even a slight tilt can cause pots to slide off later. Next, secure your work surface planks, leaving small gaps between boards for drainage—about a quarter-inch works perfectly.
When adding the backsplash or tool storage components, pre-drill your holes to prevent wood splitting. This extra step takes two minutes but saves hours of frustration. For the finishing touches, lightly sand any rough edges that might snag gloves or scratch your arms during use.
Work on a flat surface whenever possible, and don’t rush. Take breaks to step back and assess your progress. If something doesn’t look right, it probably isn’t—adjust before moving forward. Remember, a sturdy potting bench built carefully will serve you for years of gardening adventures ahead.
Finishing Touches and Weatherproofing
Once your potting bench is assembled, protect it from the elements to ensure years of gardening enjoyment. Start by thoroughly sanding all surfaces with 120-grit sandpaper, smoothing any rough edges that could snag gloves or clothing. Pay extra attention to corners and joints where splinters might hide.
For weather protection, choose a finish that suits your style and climate. Exterior-grade sealers work beautifully on natural wood, preserving its character while blocking moisture. If you prefer color, outdoor paint or stain adds personality and shields against sun damage and rot. I learned this lesson the hard way when my first bench aged prematurely from skipping this step.
Apply two coats of your chosen finish, letting each dry completely. Don’t forget the undersides and hidden areas where water loves to settle. For benches near sprinklers or in damp locations, marine-grade sealers offer superior protection. This small investment of time now prevents costly repairs later and keeps your workspace looking fresh season after season.
Smart Tool Storage Solutions to Add to Your Bench
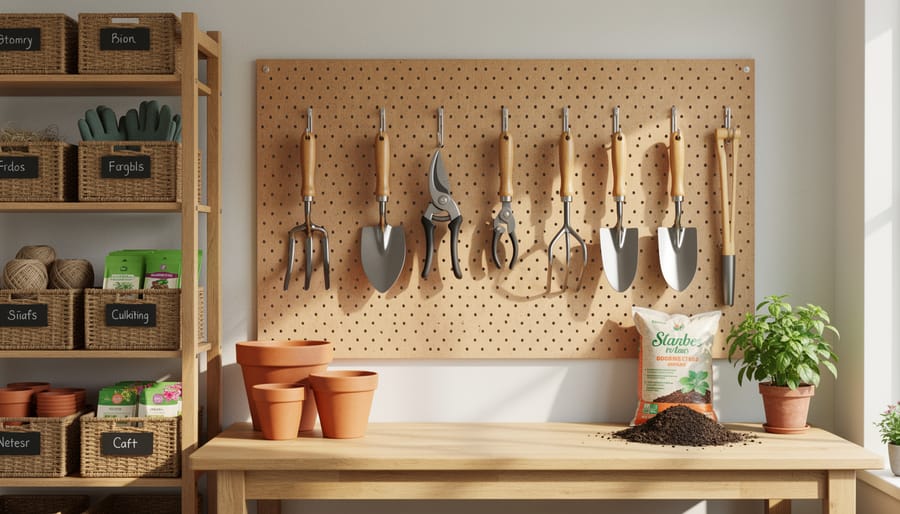
Pegboard Backsplash for Flexible Storage
A pegboard backsplash transforms your potting bench into an efficiency powerhouse by keeping your most-used tools within easy reach. Mount a piece of pegboard directly to the wall behind your bench or attach it to a wooden frame for a freestanding option. The beauty of pegboard lies in its flexibility—you can rearrange hooks and holders as your needs change throughout the seasons.
Start by selecting pegboard with quarter-inch holes, which accommodates standard hooks and accessories. Paint it before installation to protect against moisture and match your garden aesthetic. Space the pegboard about an inch away from the wall using furring strips to ensure hooks fit properly.
Organize your tools thoughtfully: place frequently-grabbed items like hand trowels, pruners, and gloves at eye level. Use deeper hooks for heavier tools and small bins for seed packets or plant labels. Outline each tool with a marker or paint pen so you’ll instantly notice what’s missing—a trick professional gardeners swear by. Consider adding a small shelf across the top for storing twine, plant ties, or your favorite gardening gloves.
Underneath Storage That Doesn’t Waste Space
The space beneath your potting bench is prime real estate you definitely don’t want to waste. I’ve found that adding a simple lower shelf about six inches from the ground creates the perfect spot for storing bags of potting soil, perlite, and compost. It keeps everything off damp ground while remaining easily accessible when you’re in the middle of a project.
Rolling bins are absolute game-changers for under-bench storage. I use plastic storage containers mounted on basic furniture casters, which lets me pull out exactly what I need without awkward bending or shuffling things around. One bin holds my hand tools, another stores plant labels and markers, and a third keeps all my fertilizers organized. When potting season hits full swing, I simply roll out what I need and tuck it back when I’m done.
Consider installing hooks or mounting a pegboard on the back panel of your lower shelf area too. This vertical approach maximizes every inch and keeps smaller items visible. My friend Sarah drilled holes along her bench legs to create adjustable shelf heights, which cleverly adapts to whatever she’s storing that season.
Overhead Racks for Long-Handled Tools
Long-handled tools like rakes, shovels, and hoes deserve a proper home above your potting bench. A simple overhead rack keeps them off the floor and within easy reach when you need them.
The easiest approach is mounting a horizontal board with evenly spaced hooks or J-brackets. Position the rack about 6-7 feet high, securing it directly into wall studs for maximum strength. Space your hooks about 4 inches apart to prevent tools from crowding together.
For a clever space-saving design, try creating a slotted system using two parallel boards mounted 3-4 inches apart. Cut shallow notches along the bottom board to hold tool handles in place. This method works beautifully because the handles rest securely in the slots while the tool heads keep everything stable.
Master gardener Elena Rodriguez shared with me that she uses PVC pipe cut in half lengthwise, mounted to the wall. The curved surface cradles round handles perfectly and costs just a few dollars to create. She painted hers to match her garden shed, proving that practical can also be pretty.
Small Item Organization Systems
Keeping small gardening essentials organized can transform your potting bench from cluttered chaos to efficient workspace. Mason jars are perfect for storing seeds, plant labels, and twist ties – just mount them under an overhead shelf using their lids screwed into the wood, creating accessible storage that frees up counter space. I’ve found this trick incredibly handy during busy planting season when I need quick access to everything.
Magnetic strips attached to the side of your bench work wonderfully for holding scissors, small trowels, and other metal tools right at arm’s reach. For a budget-friendly option, repurpose old coffee cans or metal tins by painting them in cheerful colors and mounting them to a pegboard or directly to your bench’s back panel.
Clear plastic containers with labels help you instantly identify contents like different seed varieties or plant markers. Consider adding small drawer dividers made from cardboard or thin wood strips to organize loose items like rubber bands, clips, and jewelry tags for plant identification. These simple systems keep everything visible and within reach, making your gardening sessions more enjoyable and productive.
Real Gardeners Share Their DIY Potting Bench Wins (and Lessons Learned)
We reached out to experienced gardeners who’ve tackled their own potting bench builds, and their insights are pure gold for anyone planning their project.
Maria from Ontario transformed an old wooden pallet into a compact potting station. “My biggest win was adding a removable plastic tub underneath for catching soil,” she shares. “It keeps cleanup simple and I can dump it straight into my compost. If I could do it over, I’d make the work surface six inches deeper. I constantly run out of space when transplanting larger plants.”
Tom, a retired teacher who’s been gardening for twenty years, built an elaborate cedar bench with multiple shelves. His advice? “Start simpler than you think you need. I got carried away with my design and spent three weekends on construction. My friend made a basic bench in one afternoon, and honestly, it works just as well for her needs.” His favorite feature is the pegboard backing he installed. “Game changer for hanging hand tools. Everything’s visible and within reach.”
Jennifer’s biggest lesson came from material choice. “I used untreated pine to save money, thinking my covered porch would protect it. Two seasons later, it’s warping badly. Spend the extra money on weather-resistant wood or seal everything thoroughly.” Her recommendation? “Put wheels on it, even if you think it’ll stay put. Being able to move my bench into better light or closer to different garden beds has been incredibly useful.”
These experiences mirror what we hear across DIY garden projects—starting with clear priorities, choosing durable materials, and building in flexibility always pays off.
The common thread? Every gardener wished they’d added more tool storage hooks and slightly more work surface than originally planned. As Maria puts it, “You’ll find uses for every inch of space you create.”
Common Mistakes to Avoid When Building Your Potting Bench
I’ve learned through trial and error—and heard from countless fellow gardeners—that certain mistakes can turn your dream potting bench into a frustrating experience. Let me share the most common pitfalls and how to avoid them.
Getting the height wrong is probably the biggest issue I see. Many builders simply copy standard table dimensions without considering their own comfort. Here’s a quick fix: stand upright and bend your elbows at 90 degrees—your forearms should rest comfortably on the work surface. This usually means a bench height between 36 and 40 inches for most people. Trust me, your back will thank you after hours of potting!
Inadequate drainage is another sneaky problem. If you’re building your first structure, you might forget that water needs somewhere to go. Always angle your work surface slightly toward the front and leave gaps between boards or drill drainage holes. I learned this the hard way when my first bench became a muddy mess.
Poor weather protection can shorten your bench’s lifespan dramatically. Even pressure-treated lumber benefits from a good outdoor sealant or stain. Apply it before assembly for complete coverage, and reapply annually. If you’re using untreated wood, this step is absolutely essential.
Finally, insufficient storage planning leaves tools scattered everywhere. Before cutting any wood, map out what you’ll store and where. Measure your pots, bags of soil, and tools, then design your shelves and hooks accordingly. Adding storage later means awkward modifications that rarely work as well as integrated solutions.
You’re now ready to build the potting bench that will transform your gardening routine! Remember, your first DIY project doesn’t need to look like something from a magazine spread. Those little imperfections and personal touches are what make it uniquely yours. What matters most is creating a functional workspace that keeps your tools organized and makes those hours in the garden more enjoyable.
The beauty of a potting bench is that it grows with you. Start with the basic structure now, and add hooks, shelves, or storage solutions as you discover what works best for your gardening style. Maybe you’ll realize you need an extra shelf for seed packets, or perhaps a magnetic strip for hand tools would be perfect. These additions are easy to make once you’re using your bench regularly.
A well-designed potting bench isn’t just furniture—it’s an investment in countless peaceful mornings and productive afternoons surrounded by plants. It will be there for you through seasons of sowing seeds, transplanting seedlings, and nurturing your garden dreams.
We’d love to see what you create! Share photos of your completed potting bench in the comments below, or ask any questions that come up during your build. The gardening community is here to help and celebrate your success.