Transform your raised bed gardening experience with a professional-grade drip irrigation system that delivers precise, consistent moisture to your plants while cutting water usage by up to 70%. Modern drip irrigation kits eliminate the guesswork of manual watering, prevent common gardening headaches like leaf diseases and uneven growth, and free up hours of your time each week. Whether you’re growing heritage tomatoes or maintaining a thriving herb garden, these customizable systems adapt to any bed configuration and soil type, ensuring each plant receives exactly what it needs to thrive. With straightforward installation that typically takes just one afternoon, and components designed to last multiple growing seasons, a quality drip irrigation kit represents one of the smartest investments you can make in your garden’s success.
Why Your Raised Bed Garden Needs Drip Irrigation
Water Conservation Benefits
Installing a drip irrigation system in your raised bed garden can reduce water consumption by up to 70% compared to traditional watering methods. This remarkable efficiency comes from delivering water directly to plant roots, eliminating wasteful overspray and evaporation that typically occurs with overhead watering.
By maintaining consistent soil moisture levels, drip irrigation helps create the perfect growing environment while using significantly less water. A typical raised bed measuring 4×8 feet can thrive on just 2-3 gallons of water per day during peak growing season, compared to 8-10 gallons with traditional watering methods.
Beyond water savings, these systems offer substantial environmental benefits. Less water usage means reduced strain on local water resources, particularly important in drought-prone areas. The precise water delivery also minimizes soil erosion and nutrient runoff, protecting nearby water sources from contamination.
Many gardeners report lower water bills within the first growing season after installation. Plus, by connecting your system to a smart timer, you’ll ensure your plants receive exactly what they need, when they need it – no more, no less. This set-it-and-forget-it approach not only conserves water but also gives you more time to enjoy your garden rather than managing its irrigation needs.
Plant Health Advantages
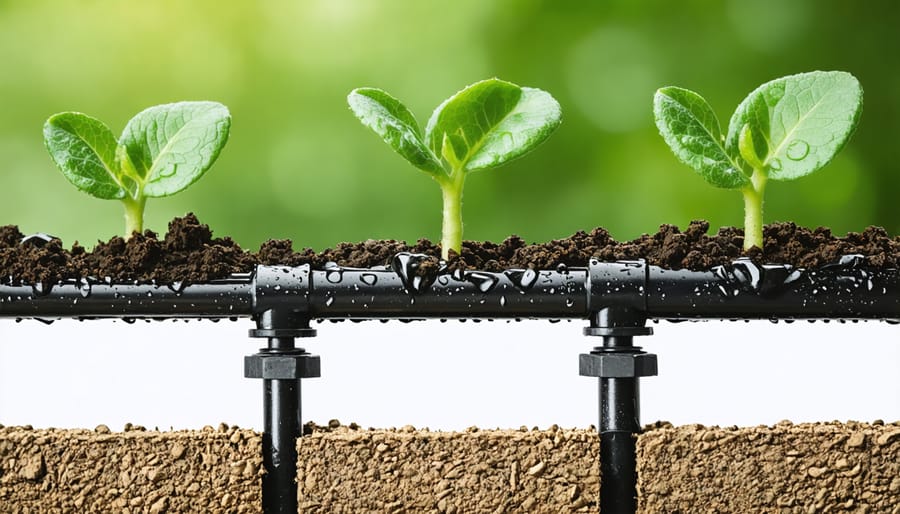
Drip irrigation isn’t just about convenience – it’s a game-changer for plant health that can help you maximize your garden yields throughout the growing season. By delivering water directly to the root zone, plants receive consistent moisture without the stress of alternating wet and dry periods. This steady hydration promotes deeper root growth, making your plants more resilient and better able to access nutrients in the soil.
Unlike overhead watering, drip irrigation keeps foliage dry, significantly reducing the risk of fungal diseases that thrive in wet conditions. The slow, precise water delivery also prevents soil erosion and nutrient leaching, ensuring your carefully amended raised bed soil stays rich and fertile. Plants respond by developing stronger stems and producing more abundant flowers and fruits.
Another fantastic benefit is the reduced competition from weeds. Since water is targeted specifically to your garden plants, weed seeds in surrounding areas receive less moisture, making them less likely to germinate and compete with your crops for resources. This targeted approach to watering creates an optimal growing environment where your plants can truly thrive.
Essential Components of a Raised Bed Drip Kit
Basic Components
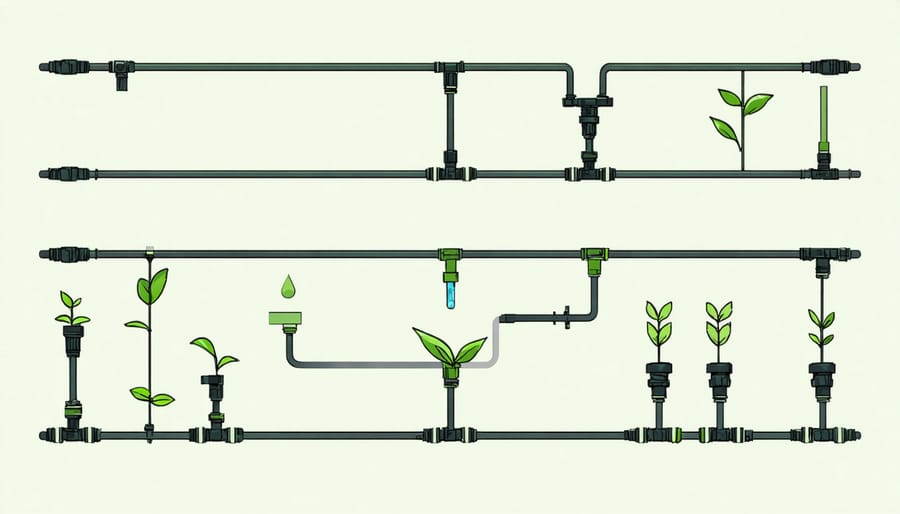
A drip irrigation kit for your raised bed garden consists of three main components that work together to deliver water efficiently to your plants. The backbone of the system is the mainline tubing, typically 1/2 inch in diameter, which connects to your water source and runs along the perimeter or center of your raised bed. This durable polyethylene tubing is UV-resistant and flexible enough to customize to your garden’s layout.
Connected to the mainline are smaller 1/4-inch distribution tubes, often called micro-tubing or feeder lines. These smaller tubes branch out to individual plants or rows, ensuring targeted water delivery. They’re easily customizable – you can cut them to the perfect length for your setup.
The stars of the show are the drip emitters, which control the water flow rate. These small devices come in various styles, from simple drippers to sophisticated pressure-compensating models. Most kits include emitters that release water at a rate of 0.5 to 2 gallons per hour, perfect for steady, deep watering.
To bring everything together, you’ll need connectors and fittings. These include T-connectors for branching lines, end caps to close off tubing, and barbed connectors to secure emitters. Many kits also include stakes or clips to hold tubing in place and a filter to prevent clogging. A pressure regulator is essential to maintain consistent water flow and protect your system from damage.
Optional Accessories
To enhance your drip irrigation system’s efficiency and convenience, consider adding these valuable accessories that can transform your setup into one of the most sophisticated self-watering garden systems available.
A programmable timer is perhaps the most beneficial add-on, allowing you to automate your watering schedule. Whether you choose a simple mechanical timer or a smart digital version with weather monitoring capabilities, this accessory ensures your plants receive consistent watering even when you’re away. Look for models with multiple programming options and battery backup for added reliability.
Water filters are essential for preventing clogged emitters and extending your system’s lifespan. A basic mesh filter will catch sediment and debris, while more advanced filters can remove minerals that might cause buildup in your lines. Install the filter between your water source and the main line for best results.
Don’t overlook the importance of a pressure regulator. Most drip systems operate best between 20-40 PSI, but household water pressure often exceeds this range. A quality pressure regulator helps maintain optimal flow and prevents damage to your irrigation components. Consider adding pressure-compensating emitters for beds with varying elevations to ensure even water distribution.
For convenience, quick-connect fittings make it easy to attach and detach your system when needed, while end caps with flush valves help with seasonal maintenance and cleaning.
Setting Up Your Drip System
Planning Your Layout
Before diving into installation, taking time to plan your drip irrigation layout is crucial for success. Start by sketching your raised bed dimensions on paper, noting the location and height of different plants you’ll be growing. This visual guide will help you determine how many drip lines you’ll need and their optimal placement.
For most raised beds, running a main supply line along one edge works well, with smaller drip lines branching off to serve different planting zones. Consider spacing your drip emitters 12-18 inches apart for most vegetables, though you may want closer spacing for thirsty plants like tomatoes or wider spacing for drought-tolerant herbs.
Remember to factor in your water source location and pressure. Measure the distance from your spigot to the furthest point of your garden, as this affects the system’s performance. Most home systems work best when keeping runs under 100 feet to maintain consistent water pressure.
Zone planning is another essential consideration. Group plants with similar water needs together to ensure efficient irrigation. For example, place moisture-loving leafy greens in one zone and water-wise root vegetables in another. This thoughtful arrangement allows you to adjust water delivery precisely where needed.
Don’t forget to include easy access points for maintenance and future modifications. Leave enough space between beds for adjusting connections and checking for leaks. Also, plan for slight slopes in your supply lines (about 2%) to help with drainage when the system isn’t running.
By taking time to plan carefully now, you’ll create an efficient system that serves your garden’s needs while saving water and reducing maintenance time later.
Installation Steps
Setting up your drip irrigation kit is simpler than you might think. Start by laying out all components and checking that nothing’s missing from your kit. You’ll typically find tubing, drip emitters, connectors, and a timer.
Begin by connecting your main water source to the timer and pressure regulator. This ensures consistent water flow and prevents damage to your system. Next, run your main supply line along the outside edge of your raised bed, securing it with stakes every few feet to keep it in place.
For the distribution lines that will water your plants, cut sections of smaller tubing to run across your bed width. Space these lines about 12 inches apart for optimal coverage. Use T-connectors to attach these lines to your main supply line, ensuring all connections are tight to prevent leaks.
Install drip emitters along the distribution lines where your plants will be. For most vegetables, space emitters 12 inches apart. Push them firmly into the tubing until you hear a click. If you’re having trouble inserting emitters, dip the ends in warm water to soften the tubing slightly.
Before covering the lines with mulch, test your system. Turn on the water and check for leaks or blocked emitters. If you notice uneven water distribution, adjust emitter placement or clean any clogged ones by gently removing and rinsing them.
Common issues include leaky connections (fix by cutting the tube back slightly and reconnecting) and clogged emitters (resolve by removing and cleaning with vinegar solution). Once everything’s running smoothly, cover the lines with a light layer of mulch to protect them from sun damage and maintain soil moisture.
Maintenance and Care
Seasonal Maintenance
Regular maintenance of your drip irrigation system is essential for keeping your thriving raised bed garden healthy throughout the growing season. Start each spring by flushing the system to remove any debris or mineral buildup. Simply remove the end caps and run the water for a few minutes until it flows clear.
Monthly inspections are crucial – walk along your beds and check for any signs of clogging, leaks, or damaged components. Clean the filters regularly, especially if you’re using well water or have hard water. A simple vinegar solution can help dissolve mineral deposits in emitters and tubes.
During peak growing season, monitor water distribution patterns to ensure all plants receive adequate moisture. Adjust emitter positions as plants grow and their watering needs change. Remember to periodically check pressure levels and timer settings to maintain optimal performance.
As autumn approaches, prepare your system for winter by draining all lines completely. Remove the timer and any above-ground components that could be damaged by freezing temperatures. Store these parts in a dry, protected area until spring.
Keep spare parts on hand – a few extra emitters, connectors, and length of tubing can save you time when quick repairs are needed. With proper maintenance, your drip irrigation system can provide reliable service for many growing seasons.
Common Issues and Solutions
Even the best-designed drip irrigation systems can encounter occasional hiccups. Here are some common issues you might face and their simple solutions:
Uneven Water Distribution: If some plants are getting too much water while others seem thirsty, check for clogged emitters. Flush the system by opening the end caps and running water through at full pressure. You can also try gently cleaning individual emitters with a soft brush.
Low Water Pressure: When your system isn’t delivering enough water, first check for kinked tubes or closed valves. If these aren’t the issue, you might have too many emitters for your water source. Try dividing your system into zones that water at different times.
Leaking Connections: Water pooling around connection points usually means fittings aren’t properly secured. Disconnect the leaking parts, ensure they’re clean and free from debris, then firmly reconnect them. If leaks persist, replace the affected components.
Plant Stress Despite Irrigation: If plants show signs of stress even with regular watering, check your timer settings. You might need to adjust watering duration or frequency based on weather conditions and plant needs. Remember that newly planted beds often require more frequent watering than established ones.
System Freezing: In colder climates, drain your system before winter arrives and disconnect the timer. Store components indoors if possible, and inspect all parts for damage when spring returns.
Regular maintenance checks and quick responses to these issues will keep your drip irrigation system running smoothly throughout the growing season.
Installing a drip irrigation system in your raised bed garden is one of the best investments you can make for both your plants and your time. By delivering water directly to the root zone, these systems ensure your plants receive consistent moisture while conserving water and reducing weed growth. The automation features mean you can finally take that weekend trip without worrying about your garden wilting in your absence!
The benefits we’ve explored throughout this article – from water conservation and improved plant health to time savings and reduced maintenance – make drip irrigation an invaluable addition to any raised bed garden. What’s more, with the variety of kits available today, you can find a solution that fits both your garden’s needs and your budget.
Remember, while the initial setup might take a few hours of your time, the long-term rewards far outweigh this small investment. Your plants will thrive with consistent watering, you’ll spend less time dragging hoses around, and you’ll likely see a reduction in your water bill.
Whether you’re a seasoned gardener or just starting your growing journey, a drip irrigation system can transform your gardening experience. Why not take that next step toward a more efficient and productive garden? Your plants – and your back – will thank you for it. Start planning your drip irrigation system today, and get ready to enjoy a more sustainable and successful growing season ahead.