Position safety railings around your rooftop garden’s perimeter before your first planting season begins, giving you peace of mind every time you lean forward to deadhead petals or check soil moisture near the edges. Install guardrails at least 42 inches high with minimal gaps to prevent accidental slips while you’re absorbed in pruning or carrying watering cans across wet surfaces.
Create designated pathways through your garden using pavers or decking boards that keep you at least three feet from unprotected edges during routine tasks. This simple layout strategy lets you focus on nurturing your tomatoes and herbs without constantly calculating distances from dangerous drops.
Secure heavy containers and raised beds with permanent anchoring systems rather than relying on weight alone—a strong wind gust while you’re wrestling a large pot can quickly become dangerous. Bolt down your heaviest planters and position them away from edges where they double as protective barriers.
Establish a personal safety rule: never water, harvest, or tend plants within two feet of an unprotected edge without proper fall protection equipment, even for quick tasks. Those “just one minute” moments when you’re reaching for ripe strawberries or adjusting a trellis are precisely when accidents happen.
Your rooftop garden should be a sanctuary where you cultivate both plants and wellbeing, not a space that creates anxiety with every visit. The right protection systems transform your elevated growing space into somewhere you’ll confidently spend hours, whether you’re transplanting seedlings on calm mornings or securing plants before storms roll in.
Why Fall Protection Matters for Your Rooftop Garden
You might think that tending to your rooftop oasis is a far cry from high-risk construction work, but the truth is that everyday gardening activities put you closer to danger than you’d expect. Each year, thousands of people are injured in falls from rooftops and elevated spaces, and many of these accidents happen during routine tasks that feel completely safe in the moment.
Picture this common scenario: you’re reaching over to water those tomatoes near the edge, distracted by checking for ripe fruit. Or you’re wrestling a heavy ceramic pot across the deck, taking small backward steps without looking. Perhaps you’re pruning that climbing rose, focused entirely on finding the perfect angle for your shears. These are exactly the moments when falls happen—not because you’re being reckless, but because gardening naturally pulls your attention away from your surroundings.
The statistics tell an important story. Falls from heights account for a significant portion of home accidents requiring emergency care, and balconies and rooftops rank among the most common locations. What’s particularly striking is that most victims had no intention of going near an edge—they were simply absorbed in their tasks.
Here’s what experienced gardeners already know but sometimes forget: expertise with plants doesn’t translate to immunity from falls. In fact, seasoned gardeners might face greater risks because they’ve grown comfortable with their elevated spaces. That familiarity can lead to taking shortcuts or underestimating hazards, especially when you’re in the flow of garden work.
This is where garden safety measures become essential. Fall protection isn’t just construction site protocol—it’s about creating an environment where you can garden freely without that nagging worry in the back of your mind. When properly implemented, safety systems let you focus on what you love: nurturing your plants and enjoying your elevated garden sanctuary.
Understanding Your Space: Structural Safety First
Assessing Your Rooftop or Balcony’s Weight Capacity
Before transforming your rooftop or balcony into a lush garden paradise, understanding what your space can safely support is essential. Think of it as getting to know your garden’s foundation, much like you’d test soil before planting.
Start by checking your building’s original construction documents, which often specify load limits. Residential balconies typically support 50-100 pounds per square foot, but rooftop gardens may need additional reinforcement. Remember, you’re calculating not just soil and containers, but also water weight (which significantly increases after rainfall), people moving about, and safety equipment like railings or guardrails.
Watch for warning signs that might indicate structural safety concerns: cracks in walls or floors, sagging surfaces, water pooling in unusual spots, or doors that suddenly stick. These red flags warrant immediate attention before adding garden weight.
When should you call a structural engineer? Always consult one if you’re planning a substantial garden transformation, notice any concerning signs, live in an older building, or want to install permanent safety systems. It’s a worthwhile investment that brings peace of mind.
A structural engineer can provide a detailed assessment and recommendations for weight distribution. They might suggest spreading heavy planters across support beams or using lightweight growing media alternatives. This professional guidance ensures your garden thrives safely for years to come, protecting both your plants and the people who tend them.
Evaluating Existing Railings and Barriers
Before you start planting your rooftop garden, let’s make sure your existing railings and barriers are up to the task of keeping you safe. Think of this as a garden health check, but for your safety equipment.
Start by measuring the height of your railings. Most safety standards require barriers to be at least 42 inches tall, measured from the rooftop surface. If your railing falls short, it’s a red flag that needs addressing. I learned this the hard way when a gardener friend of mine, Maria, realized her decorative 30-inch railing was lovely but dangerously inadequate when she began carrying large containers near the edge.
Next, test the sturdiness. Give your railing a firm push (not a shove!) at various points along its length. It shouldn’t wobble, flex significantly, or feel loose. Pay special attention to where posts connect to the roof surface and where horizontal rails meet vertical posts. These connection points often show wear first, especially in outdoor environments where weather takes its toll.
Look for visible signs of deterioration: rust on metal railings, rot or soft spots in wooden barriers, cracks in concrete, or loose mounting brackets. These are weak points that compromise your safety. Run your hands along surfaces to feel for rough patches or areas where paint is peeling, which often indicates underlying damage.
Check the spacing between vertical balusters or horizontal rails. Gaps larger than four inches could be hazardous, particularly if you have children or pets who might squeeze through while you’re gardening. Also examine the bottom rail, it should sit close to the rooftop surface with minimal gap underneath.
If you discover any concerns during your inspection, document them with photos and measurements before contacting a qualified professional for repairs or upgrades.
Types of Fall Protection for Garden Spaces
Guardrails and Railing Systems
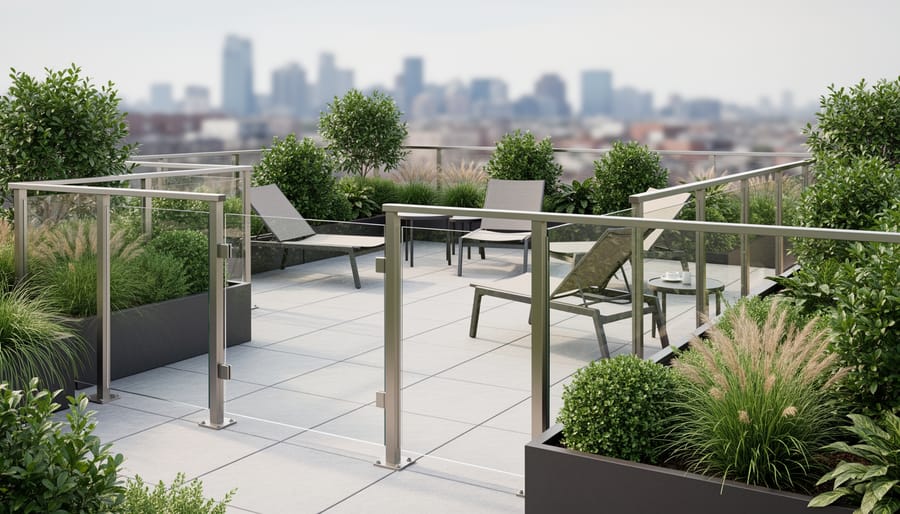
Permanent railing systems offer peace of mind for rooftop gardeners, creating a reliable barrier that protects you while tending your green space. Think of guardrails as the foundation of your safety plan, working quietly in the background while you focus on nurturing your plants.
Standard guardrails must meet specific height requirements, typically 42 inches tall with mid-rails positioned halfway down. While these measurements might sound rigid, they’re designed to catch you naturally if you lose your balance while reaching for that tomato at the garden’s edge. The good news? Modern railing systems come in surprisingly attractive designs that complement rather than clash with your garden vision.
For gardeners, decorative options include powder-coated aluminum railings in earth tones, sleek cable rail systems that maintain sightlines to your plants, or even custom-designed railings incorporating lattice panels where climbing vines can flourish. I’ve seen rooftop gardens where the safety railing doubles as a trellis for morning glories and sweet peas, transforming a practical necessity into a vertical garden feature.
Installation requires professional assessment of your roof’s load-bearing capacity and proper anchoring methods. Most systems attach to the roof deck or parapet walls, and proper installation prevents damage to your roofing membrane. When planning your garden layout, consider the railing as a permanent fixture and design planting beds around it.
Remember, railings work best when they’re accessible. Avoid placing tall planters or structures that might tempt you to climb over the protection you’ve carefully installed.
Safety Netting and Mesh Systems
Safety netting and mesh systems offer an excellent middle-ground solution for rooftop gardeners who want fall protection without completely blocking those gorgeous views you worked so hard to create. These flexible barriers catch falls while letting light, air, and your line of sight pass through freely.
Think of safety mesh as an invisible guardian for your garden space. Modern systems typically use high-strength polyethylene or nylon netting attached to sturdy posts around your rooftop perimeter. The mesh openings are small enough to prevent falls but large enough that you’ll barely notice them when you’re admiring your tomatoes or sunset views.
Here’s what makes them garden-friendly: climbing plants absolutely love these systems. Your sweet peas, clematis, or even lightweight cucumber vines can weave through the mesh, creating a living wall that’s both beautiful and functional. The netting won’t rust or corrode from watering splashes, and it flexes with wind rather than creating rigid barriers that might stress your plants.
The main advantages include easy installation compared to solid railings, lower cost, and that crucial ability to preserve your views. However, mesh does require regular inspection for wear, especially in harsh weather, and won’t provide privacy like solid barriers. Some gardeners also find the visual appearance less polished than traditional railings, though this often disappears once plants fill in around it.
Personal Fall Arrest Systems (For Serious Projects)
For serious rooftop garden projects like building raised beds, installing pergolas, or managing heavy container gardens, personal fall arrest systems offer the highest level of protection. These systems consist of three key components: a full-body harness you wear like a backpack, an anchor point secured to your roof structure, and a connecting lanyard or lifeline between them.
Think of it as insurance for those bigger jobs where you’ll be working extensively near roof edges or carrying heavy materials. If you’re simply watering containers a few feet from the edge, this level of protection is overkill. But when you’re hauling bags of soil, wrestling large planters into position, or working on construction elements for your garden, a harness system prevents a slip from becoming a fall.
The harness distributes any fall impact across your body rather than a single point, while the anchor point is professionally installed into roof joists or structural elements. When you move, the system moves with you, providing freedom while maintaining safety. Most gardeners won’t need this for regular maintenance, but consider it essential for installation days or major garden renovations where you’ll be distracted by heavy lifting and complex tasks.
Planters as Protective Barriers
Here’s a creative solution that brings beauty and safety together: strategically placed planters can double as protective barriers along your rooftop’s edge. Think of those substantial raised beds or large ceramic containers as your garden’s guardrails. For this to work effectively, your planters need real weight and stability. A lightweight plastic pot won’t cut it for safety purposes.
Consider using heavy stone or concrete planters filled with soil, positioned in a continuous line at least 42 inches high from your rooftop surface. Raised beds built from lumber or masonry work wonderfully too. The key is securing them properly so they won’t shift or tip. Bolt wooden raised beds directly to the rooftop structure, or use heavy planters that weigh at least 200 pounds when filled.
Placement matters enormously. Position your barrier planters at least three feet back from the actual roof edge, creating a “buffer zone” that keeps you naturally away from dangerous areas while you’re gardening. This approach works best alongside other fall protection measures rather than as your only safety strategy.
Practical Safety Measures for Daily Garden Activities
Creating Safe Work Zones
Think of your rooftop garden layout like planning a kitchen – you want everything within comfortable reach without unnecessary stretching or leaning. Start by creating a mental (or actual) boundary at least three feet from all roof edges. This becomes your “no-work zone” where you’ll avoid placing plants that need frequent attention.
Position your most demanding plants – those needing daily watering, deadheading, or harvesting – in the center of your space. I learned this the hard way after finding myself leaning precariously over a tomato plant I’d placed too close to the edge. Reserve the perimeter areas for low-maintenance specimens like succulents or established shrubs that need minimal tending.
Establish clear pathways throughout your garden, keeping them at least two feet wide. This ensures you can move comfortably with watering cans, soil bags, or plants without having to squeeze past containers. Place stepping stones or pavers to define these routes, which also prevents you from compacting soil around plant roots.
Consider using plant stands or elevated platforms to bring edge-area plants closer to you rather than you moving toward the edge. Group containers strategically so you can water multiple plants from one safe, stable position. This thoughtful arrangement means you’re gardening smarter, not risking your safety for a perfect bloom.
Weather Considerations and Slippery Surfaces
Weather conditions dramatically change your rooftop’s safety profile, and knowing when to postpone your gardening tasks is just as important as having the right equipment. Morning dew might seem harmless, but it can turn smooth surfaces into skating rinks, especially on painted decks or metal walkways. I learned this the hard way one dewy Saturday morning when my feet nearly slipped out from under me while carrying a watering can.
Rain and ice are clear signals to stay inside. Even light drizzle makes surfaces treacherous, and no amount of harvesting tomatoes is worth the risk. Wait at least two hours after rain stops before venturing back out, giving surfaces time to dry completely.
Wind adds another challenge on exposed rooftops. Gusts above 20 mph can affect your balance, particularly when you’re bending or reaching. Check weather apps before heading up, and save tasks for calmer days.
To improve traction year-round, consider applying anti-slip tape to frequently traveled pathways or installing rubber mats around work areas. Keep a designated outdoor broom nearby to sweep away leaves and debris that become slippery when wet. If your rooftop gets winter ice, use sand rather than salt, which can damage plants and roofing materials while still improving grip underfoot.
Smart Tool and Material Storage
A cluttered rooftop garden is more than just an eyesore—it’s a genuine safety hazard. When you’re focusing on watering that tomato plant near the edge, the last thing you need is to trip over a misplaced trowel or coiled hose.
Start by designating specific zones for your tools and supplies. Keep heavier items like bags of soil, large watering cans, and pots stored low to the ground and away from walkways. This prevents both tripping hazards and reduces strain when lifting. Consider installing wall-mounted tool organizers or using a weatherproof storage bench that doubles as seating.
Store fertilizers, pesticides, and other chemicals in clearly labeled, secured containers—applying the same principles as safe chemical storage in your garden shed. Keep frequently used items within easy reach to avoid overextending while on a ladder or near edges.
Establish a simple routine: return tools to their designated spots after each gardening session. This habit might feel tedious initially, but it dramatically reduces accident risk while making your rooftop gardening experience more enjoyable and efficient.
Balcony Gardens: Smaller Spaces, Unique Challenges
Balcony gardens present their own unique safety puzzle. While you might not have the wide-open spaces of a rooftop garden, the challenges of working in compact areas near edges can actually increase fall risks in ways you might not immediately recognize.
I learned this firsthand from Maria Chen, an urban gardening specialist in San Francisco who’s transformed dozens of balconies into thriving gardens. “The biggest danger I see is people leaning over railings to reach hanging baskets or trim vines,” she told me during our chat. “That extra reach while holding pruning shears or a watering can shifts your center of gravity in unpredictable ways.”
The limited space on balconies means every inch counts, which often leads gardeners to position plants right at the railing’s edge or even hang them on the outside. While this maximizes your growing area, it also means you’re constantly working near the perimeter. Consider installing plant hooks on the inside of your railing instead, or use tiered plant stands that keep everything within comfortable reach.
If you have children or pets, balcony garden safety takes on additional urgency. Young ones and curious cats don’t understand the danger of climbing on chairs to smell flowers or investigate interesting leaves. Ensure your railing height meets local codes (typically 42 inches), and avoid placing furniture or sturdy containers near railings that could serve as stepping stools.
For watering those hard-to-reach spots, invest in a lightweight watering wand with an extended reach rather than stretching dangerously. Keep a sturdy step stool nearby for tasks requiring height, and always maintain three points of contact when using it. Your garden should bring you joy, not anxiety about a momentary loss of balance.
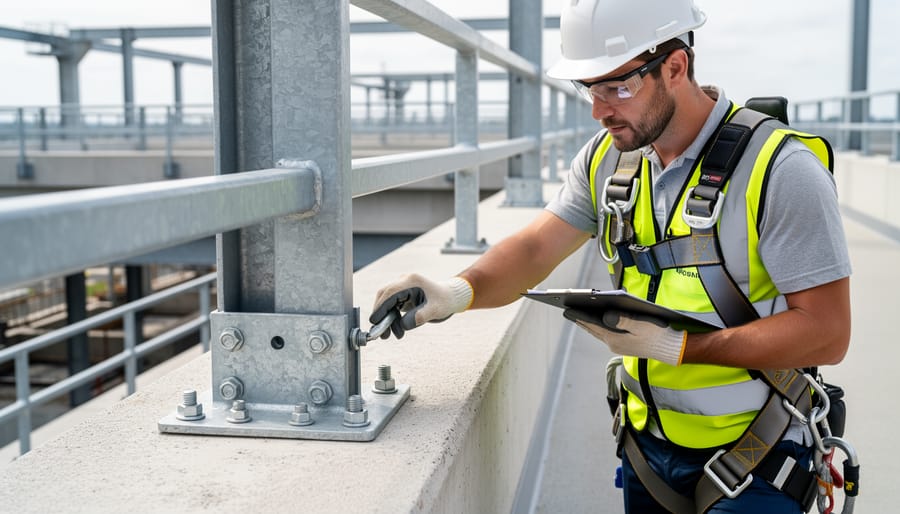
Installing Fall Protection: DIY vs. Professional Help
Let’s be honest – knowing when to tackle a rooftop safety project yourself versus calling in the pros can save you both money and potential headaches. The good news is that some aspects of fall protection are surprisingly manageable for DIY enthusiasts.
Simple installations like securing lightweight guardrails to existing raised beds, installing personal anchor points for harnesses, or adding non-slip mats around your watering stations typically fall within the DIY-friendly zone. If you’re already comfortable with basic power tools and following manufacturer instructions, these projects can run you $200-$500 in materials. I’ve spoken with several rooftop gardeners who successfully installed modular safety rail systems on weekends, treating it much like assembling sturdy garden structures.
However, permanent fall protection systems that require structural analysis, roof penetrations, or building code compliance definitely call for professional expertise. This includes installing parapet extensions, permanent anchor points that attach to load-bearing structures, or any modification to existing railings. The investment typically runs $1,500-$5,000 depending on your space, but it comes with proper engineering assessments and often necessary permits.
Finding the right contractor makes all the difference. Look for professionals certified in fall protection who also understand rooftop environments – they’ll appreciate why you need access points near your trellises rather than viewing your garden as an inconvenience. Ask potential contractors about their experience with green roofs or rooftop installations specifically.
Don’t hesitate to request references from other rooftop gardeners or urban agriculture spaces. A qualified professional should conduct a thorough site assessment, discuss how the protection systems will work with your gardening routine, and provide clear documentation for insurance purposes.
Remember, the goal isn’t just compliance – it’s creating a safe space where you can enjoy your elevated garden for years to come. When in doubt, a consultation with a professional (often free or low-cost) can help you determine which aspects you can handle and which require expert installation.
Maintenance and Regular Safety Checks
Just like your tomatoes need regular attention to thrive, your rooftop fall protection systems deserve seasonal check-ins to keep everyone safe while you garden. The good news? Creating a simple maintenance routine doesn’t have to consume your weekends or require professional expertise for most basic checks.
Start with a seasonal walkthrough each spring and fall. I like to do mine right when I’m transitioning my garden anyway, making it part of my natural routine. Look at your railings and barriers with fresh eyes. Are there loose bolts or screws? Run your hand along the top rail to feel for rough spots, rust, or splintering wood. Give sections a gentle shake to test stability. If anything wobbles or feels questionable, that’s your cue to tighten hardware or call in a professional.
Check for rust or corrosion on metal components, especially near soil containers where moisture accumulates. A little surface rust might just need wire brushing and weatherproof paint, but deep corrosion means replacement time. For wooden railings, watch for rot, particularly at ground level or where water collects. Press a screwdriver gently into the wood; if it sinks in easily, that section needs attention.
Your safety equipment, like harnesses if you use them, should be stored indoors away from UV exposure when not in use. Inspect straps for fraying, check buckles for smooth operation, and replace anything that looks worn. Just as you wouldn’t use damaged garden safety equipment, don’t compromise on fall protection gear.
Keep a simple notebook logging your inspection dates and any issues found. This creates helpful patterns over time and reminds you when the next check is due.
Real Gardener Perspectives: Safety Without Sacrificing Style
We spoke with three experienced rooftop gardeners who’ve navigated the balance between safety and creating beautiful garden spaces. Their insights might surprise you with how practical and achievable safe rooftop gardening really is.
Maria Chen, a Toronto rooftop gardener for eight years, transformed her initially intimidating 12th-floor space into a thriving oasis. “I started with a DIY cable railing system around the perimeter,” she shares. “Honestly, it looks sleeker than the solid wall I was considering, and I get these amazing city views while I water my tomatoes. The key was mounting everything properly from day one rather than treating it like an afterthought.”
Her biggest lesson? “Don’t lean over edges to reach plants. I rearranged everything so my tallest containers sit at least three feet back from any drop-off. It sounds obvious now, but initially I just put things wherever they looked pretty.”
James Rodriguez maintains a sprawling Chicago rooftop garden for his restaurant. His favorite solution combines function with aesthetics. “We installed decorative planters with integrated height that double as guardrails along exposed edges. They’re gorgeous wooden boxes filled with herbs and flowers, but they’re also engineered to code for fall protection. Customers don’t even realize they’re safety features.”
He emphasizes that maintaining healthy plants actually improved his safety awareness. “When you’re regularly checking plants and moving around with watering cans, you become very conscious of your movements. I always keep both hands free near edges and use a wheeled cart for heavy items.”
Sarah Patel, who gardens on her Brooklyn rooftop, initially felt overwhelmed by safety requirements. “I thought it would ruin the relaxed garden vibe I wanted. Instead, my safety upgrades became design features. Transparent glass panels protect without blocking wind-sensitive plants, and my decorative metal fencing actually makes the space feel more intentional and garden-like.”
Her advice for beginners? “Start small and build confidence. Install your safety features first, then design around them. You’ll stop noticing the protection systems and just enjoy your garden, which is exactly how it should be.”
Your rooftop garden brings you joy, fresh air, and a connection to nature that enriches your daily life. Protecting yourself while you tend those thriving plants isn’t about taking away from that experience—it’s about ensuring you’ll be around to enjoy many more seasons of growth and harvest.
Here’s the wonderful truth: you don’t need to transform your entire space overnight. Start with one simple improvement this week. Maybe it’s adding a railing planter that keeps you several feet back from the edge, or finally installing that secure anchor point you’ve been considering. Perhaps it’s as straightforward as wearing shoes with better grip or establishing a new habit of keeping your phone in your pocket so you’re not leaning over ledges for photos.
I recently spoke with Helen, a rooftop gardener for fifteen years, who told me something that stuck with me: “Once I made my space safer, I actually spent more time up there. I wasn’t subconsciously avoiding the edges or worrying in the back of my mind. I was just gardening.”
That’s what we want for you—the freedom to focus completely on the plants you love, the vegetables you’re growing, and the peaceful moments among the leaves and flowers. Every safety measure you implement is an investment in your future gardening seasons. Your tomatoes need you. Your herbs are counting on you. And truthfully, the people who love you want you safely enjoying your passion for years to come.
Start small, start today, and keep growing—safely and joyfully.