
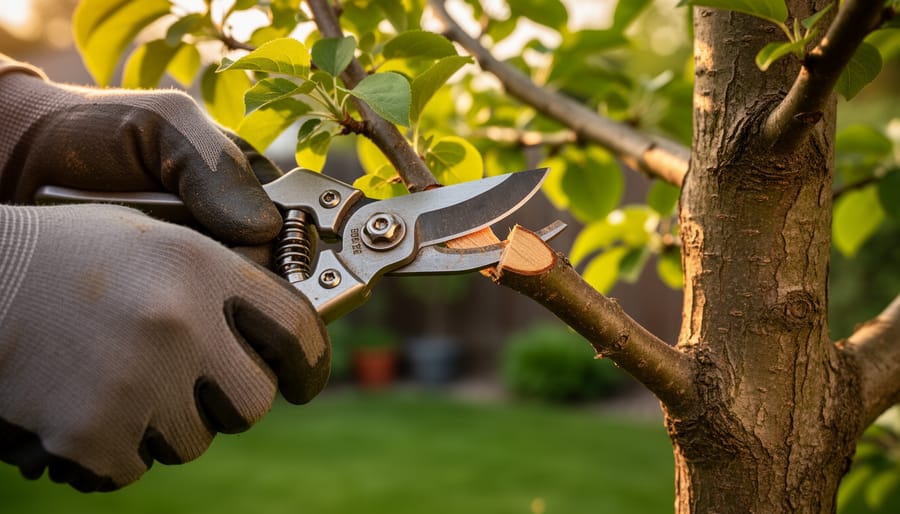
Make your cuts at a 45-degree angle just above an outward-facing bud, leaving about a quarter-inch of space to promote healthy new growth while preventing water accumulation and disease. This fundamental technique applies whether you’re removing a small branch or shaping an entire tree, and getting it right makes the difference between a thriving plant and one that struggles.
Remove dead, damaged, or diseased branches first using the three-cut method: start with an undercut about 12 inches from the trunk, make a second cut from above to remove the branch, then trim the remaining stub just outside the branch collar. This prevents bark from tearing down the trunk and gives your tree the best chance at sealing the wound naturally.
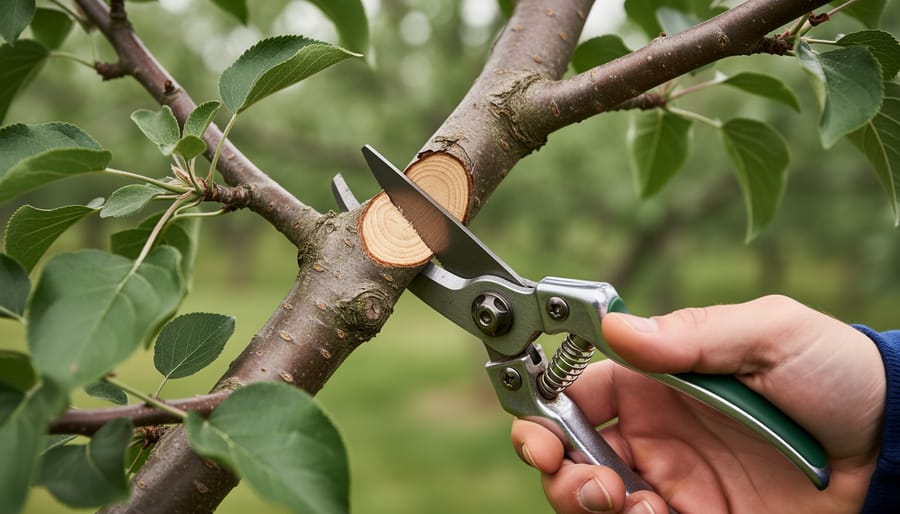
Thin crowded branches by removing entire shoots back to their point of origin rather than shortening them arbitrarily. This opens up the canopy to light and air circulation, reduces disease pressure, and maintains your tree’s natural form. Always step back frequently to assess your work from multiple angles.
Different pruning methods serve distinct purposes, and knowing which technique to apply transforms tree care from guesswork into confident action. Heading cuts stimulate bushy growth by trimming branches partway, while thinning cuts reduce density without triggering excessive regrowth. Crown raising removes lower limbs to create clearance, and crown reduction scales back the overall size while preserving the tree’s shape.
Understanding these core techniques gives you the foundation to approach any pruning situation with clarity, whether you’re maintaining a young ornamental tree or rejuvenating an overgrown specimen that’s been neglected for years.
Why Pruning Method Matters More Than You Think
I’ll never forget the first time I saw a tree that had been “topped”—every major branch cut straight across like someone had given it the world’s worst haircut. My neighbor meant well, but that poor maple never quite recovered. That experience taught me something crucial: how you prune matters just as much as when or why you prune.
Here’s the fascinating part: trees don’t actually heal the way we do. When you or I get a cut, new skin grows over the wound. Trees, however, can’t regenerate damaged tissue. Instead, they compartmentalize it—basically walling off the injured area to prevent disease and decay from spreading. This process, discovered by Dr. Alex Shigo in the 1970s, completely changed how we think about tree care.
When you make a proper pruning cut, you’re working with the tree’s natural defense system. Trees have special zones of cells called “branch collars” where branches meet the trunk. These collars contain chemical barriers that help seal off wounds. Cut too close and you damage this protective zone. Cut too far away and you leave a stub that the tree can’t properly compartmentalize, creating an open invitation for pests and disease.
The consequences of improper pruning aren’t always immediate, which makes them even trickier. A flush cut (too close to the trunk) might look neat today, but it can lead to decay that hollows out your tree years down the road. Leaving stubs creates dead wood that attracts insects and allows rot to work its way into healthy tissue. With ornamental tree pruning, these mistakes become especially noticeable as they affect both the tree’s health and aesthetic appeal.
Understanding these basics transforms pruning from a scary chore into a partnership with your trees—you’re simply helping them do what they’re already designed to do.
The Four Essential Pruning Cuts Every Gardener Should Master
Thinning Cuts: Opening Up Your Tree Canopy
Thinning cuts are one of my favorite pruning techniques because they create such natural, beautiful results. Unlike heading cuts that remove just part of a branch, thinning cuts remove an entire branch right back to its point of origin—either at the trunk, a main branch, or where it meets another lateral branch.
Think of thinning as opening windows in your tree’s canopy. When you remove select branches completely, you allow sunlight to filter through to lower branches and the plants growing beneath. This improved light penetration is especially valuable if you’re trying to grow shade-loving perennials under your trees or simply want a healthier, more balanced canopy.
The air circulation benefits are equally important. Better airflow reduces humidity around leaves and branches, which helps prevent fungal diseases that thrive in damp, stagnant conditions. I learned this lesson the hard way after losing several apple tree branches to fire blight one particularly humid summer.
When making thinning cuts, always cut just outside the branch collar—that slightly swollen area where the branch meets the trunk or parent limb. Never leave stubs, as they invite decay and pests. Remove no more than 25 percent of a tree’s canopy in a single season, focusing on branches that cross, rub together, or grow toward the center. Your tree will thank you with stronger growth and improved vigor.
Heading Cuts: Encouraging Bushier Growth
Heading cuts are like giving your tree a haircut that encourages fullness. When you snip off the tip of a branch just above a bud or lateral shoot, you’re telling the tree to redirect its energy sideways instead of upward. Think of it as choosing bushiness over height—perfect for shade gardens where you want wider canopies without towering trees that block too much light.
I learned this technique from a master gardener who transformed spindly young maples into gorgeous, full specimens. The key is cutting at a slight angle about a quarter-inch above an outward-facing bud. This encourages the new growth to spread away from the tree’s center, creating better air circulation and a more balanced shape.
For shade gardens, heading cuts work beautifully on trees like dogwoods, Japanese maples, and flowering cherries. You’re creating that dappled light effect rather than dense, impenetrable shade. Just remember: light pruning is always better than aggressive cutting.
Here’s where people often stumble: making heading cuts on mature trees or removing too much at once. This stresses the tree and can trigger excessive, weak growth called water sprouts. Also, avoid cutting between buds—you’ll leave ugly stubs that invite disease. Stick to young trees and remove no more than one-quarter of the canopy in a single season, and you’ll see lovely, controlled results.
Reduction Cuts: Controlling Size Without Sacrificing Shape
Reduction cuts are your secret weapon for keeping trees at a manageable size while preserving their beautiful, natural shape. Think of it as giving your tree a thoughtful haircut rather than a buzz cut! This technique involves cutting a branch back to a lateral branch that’s at least one-third the diameter of the branch you’re removing.
Here’s why this matters for your shade garden: When trees grow too large, they can cast excessive shade and compete with your understory plants. Reduction cuts let you control that canopy without creating the ugly stubs that heading cuts leave behind.
To make a proper reduction cut, identify a healthy lateral branch growing in the direction you want to encourage. Make your cut just beyond the branch collar at a slight angle, allowing the lateral branch to become the new leader. The tree will look as though it naturally grew this way.
I learned this technique from master gardener Elizabeth Chen, who manages a stunning woodland garden. She explained that reduction cuts work beautifully on ornamental trees like Japanese maples and dogwoods. The key is patience and selectivity. Remove no more than 25 percent of the canopy in a single season, and always step back frequently to assess your progress. Your tree will maintain its graceful form while staying perfectly sized for your garden’s needs.
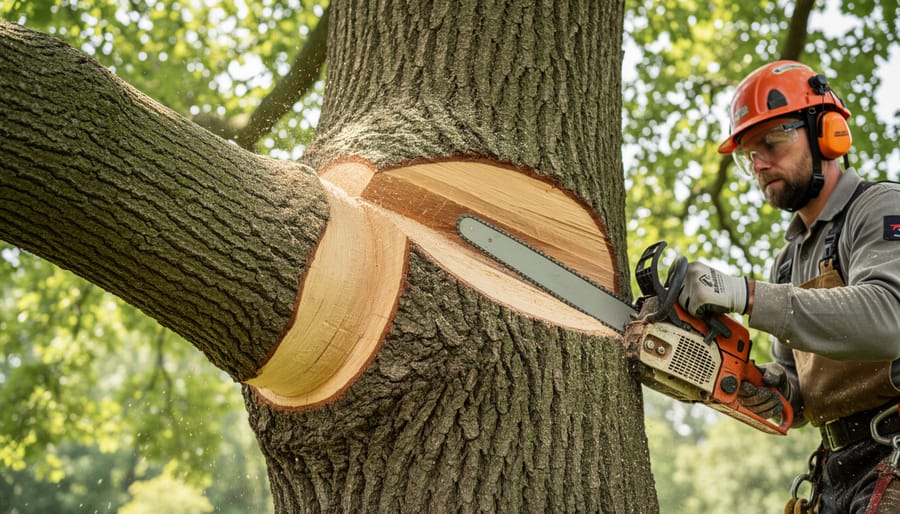
The Three-Cut Method: Your Safety Net for Large Branches
When you’re dealing with branches larger than about 1.5 inches in diameter, the three-cut method becomes your best friend. I learned this technique after watching a neighbor’s beautiful oak tree suffer from massive bark tears, and I’ve been spreading the word ever since!
Here’s how to protect your tree from damage:
Start with the undercut. About 12 to 18 inches from the trunk, make a shallow upward cut on the branch’s underside. Go about one-quarter to one-third of the way through the branch. This prevents the bark from tearing downward when the branch falls.
Next comes the relief cut. Move about an inch farther out from your undercut and saw straight down through the branch from the top. The branch will break away cleanly at this point, and your undercut ensures no bark strips down the trunk.
Finally, remove the stub. Now you can safely cut the remaining stub close to the branch collar without worrying about weight pulling the bark. Take your time positioning this cut correctly, as it’s the one your tree will seal over.
The beauty of this method is that even if your second cut isn’t perfect, that first undercut has already protected your tree. It’s like having insurance for your pruning work!
Specialized Pruning Methods for Different Tree Types
Crown Thinning for Mature Shade Trees
Crown thinning is one of my favorite techniques for maintaining mature shade trees like oaks and maples. Think of it as giving your tree a lighter, airier haircut rather than a severe chop. The goal is to selectively remove branches throughout the entire crown, allowing more light and air to filter through while keeping that beautiful, natural shape intact.
Start by identifying crossing or rubbing branches, then move on to removing some of the smaller interior branches. You’ll want to reduce the crown’s density by no more than 15-25 percent in a single session. I learned this the hard way when I over-thinned a beautiful red maple and it responded with excessive new growth the following spring.
Focus on removing entire branches back to their point of origin rather than just shortening them. This technique is especially valuable for trees near homes or pathways, as improved air circulation helps the tree dry faster after rain, reducing disease risk. It’s also gentler on mature specimens than heavy pruning methods.
When growing ornamental trees, crown thinning becomes increasingly important as they mature. The enhanced light penetration benefits not just the tree but also any shade-loving plants growing beneath it. Always step back frequently during the process to assess your progress and maintain that graceful, balanced appearance your shade tree is known for.
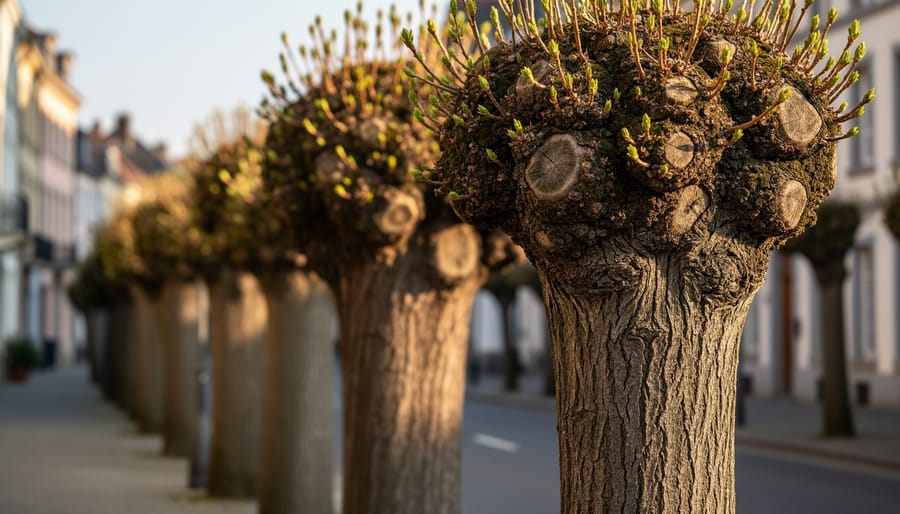
Pollarding and Coppicing: Old-World Methods for Modern Gardens
If you’ve ever admired those distinctive pollarded trees lining European streets or wondered how ancient woodlands managed sustainable timber, you’re about to discover two remarkable techniques that have served gardeners for centuries.
Pollarding involves cutting a tree back to the same point on its trunk every one to three years, creating that characteristic knobby crown you might recognize. This method works beautifully for weeping willow trees, linden, and ash when you need to contain their size in smaller spaces. Start pollarding when trees are young, making cuts about 6-8 feet above ground level.
Coppicing takes a more dramatic approach, cutting trees nearly to ground level. This encourages multiple new shoots to grow from the base, perfect for creating natural screens or harvesting wood for craft projects. Hazel, willow, and sweet chestnut respond wonderfully to this treatment.
Here’s the key: both techniques require commitment. Once you start, you’ll need to maintain the cutting cycle regularly. Think of it as a renewable resource right in your garden. The best time for either method is late winter when trees are dormant.
I spoke with heritage gardener Marion Clarke, who reminded me that these aren’t just practical solutions but living links to sustainable forestry practices. Start with one experimental tree before committing your entire landscape.
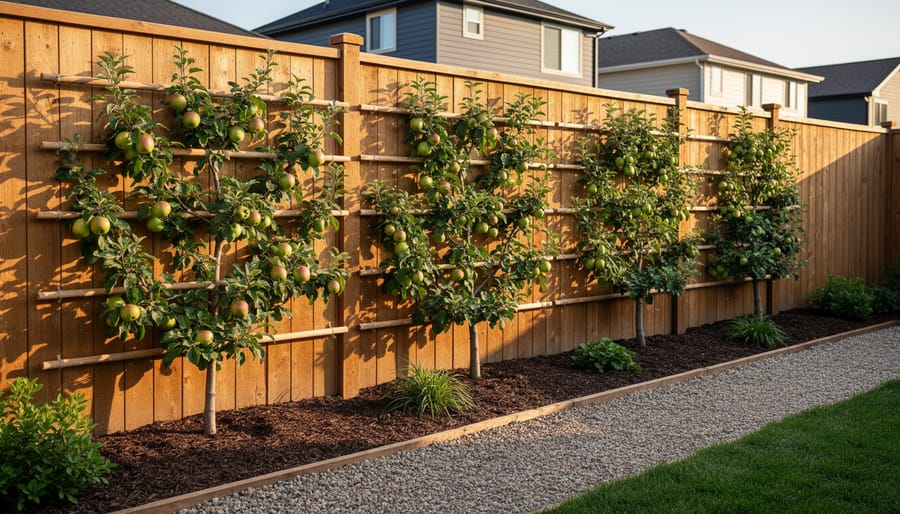
Espalier Pruning: Training Trees Against Walls and Fences
If you’ve ever admired those perfectly flat fruit trees growing against old European garden walls, you’ve witnessed espalier in action. This centuries-old technique trains trees to grow in two-dimensional patterns against walls, fences, or trellises, creating living art that’s both beautiful and practical.
Espalier is perfect for shade gardens with limited space. By growing trees flat against a structure, you maximize vertical growing area while keeping the footprint minimal. Plus, that wall or fence often provides extra warmth and protection, helping trees thrive in shadier conditions.
The process involves pruning and training young branches along horizontal or decorative patterns using wires or supports. You’ll prune away growth that extends outward from the wall, encouraging the tree to follow your chosen design. Popular patterns include horizontal cordons, candelabras, and fan shapes.
Start with naturally flexible young trees like apples, pears, or even ornamental varieties. During the growing season, gently tie new shoots to your support structure and prune competing branches. I once visited a gardener who’d espalier-trained a crabapple against her garage, transforming a blank wall into a stunning focal point that bloomed spectacularly each spring.
While it requires patience and regular attention, espalier rewards you with an architectural masterpiece that produces fruit or flowers in the most unexpected places.
Timing Your Cuts: When to Use Which Method
Timing truly is everything when it comes to pruning, and getting it right makes the difference between a thriving tree and one that struggles. I learned this the hard way years ago when I enthusiastically pruned my birch tree in late spring, only to watch it “bleed” sap profusely. Let me help you avoid similar mistakes!
The dormant season, typically late winter through early spring before buds break, is your golden window for most major pruning work. During this period, trees have stored their energy in their roots, and you can clearly see the branch structure without leaves obscuring your view. This is the perfect time for thinning cuts, heading cuts, and structural pruning on most deciduous trees. The wounds heal quickly once growth resumes, and you’re less likely to spread diseases since many pathogens are dormant too.
However, some trees have different preferences. Spring-flowering trees like magnolias and cherries should be pruned immediately after blooming, so you don’t sacrifice next year’s flower buds. Stone fruits also prefer summer pruning to reduce the risk of disease. Oaks benefit from winter pruning in areas where oak wilt is present, as the beetle vectors are inactive during cold months.
Growing season pruning has its place too, particularly for corrective work. Light pruning in summer helps control vigorous growth and allows you to see how the tree is actually performing. It’s excellent for removing water sprouts and addressing immediate safety concerns like broken branches.
One practical tip I always share: avoid heavy pruning during the fall. Trees are preparing for dormancy, and large wounds don’t seal well during this transition period, leaving them vulnerable to winter damage and disease.
Remember, different pruning methods work better in different seasons. Clean cuts with sharp tools matter year-round, but understanding seasonal timing helps you choose not just which branch to cut, but when to make that cut for the healthiest results.
Common Pruning Mistakes and How to Fix Them
I’ve made plenty of pruning mistakes over the years, and honestly, they’ve been some of my best teachers. The most common error I see fellow gardeners make is the dreaded flush cut, where you remove a branch completely against the trunk without leaving the branch collar. I remember doing this to my flowering dogwood years ago, and it took nearly two seasons for those wounds to heal properly. The fix? Always leave that slightly swollen ring of tissue at the branch base intact. If you’ve already made flush cuts, support your tree’s recovery with proper watering and monitor the wounds for any signs of decay.
Another frequent mistake is topping, or cutting main branches back to stubs. My neighbor once topped his maple thinking it would control the size, but it just sent up a mess of weak, crowded shoots. There’s no quick fix for topping damage, unfortunately. Your best approach is patience: gradually thin out the weakest new growth over several seasons and redirect energy to stronger branches.
Timing errors also trip people up. I once pruned my birch in spring when the sap was running, creating a sticky situation that stressed the tree unnecessarily. Most trees prefer dormant-season pruning, but always research your specific species first.
Over-pruning is perhaps the trickiest mistake because it seems productive in the moment. Removing more than 25 percent of a tree’s canopy in one season can seriously compromise tree health. If you’ve been too enthusiastic, stop immediately, provide extra water during growing season, and let your tree recover for at least a year before any additional pruning. Remember, less is almost always more when it comes to pruning.
Expert Insight: A Professional Arborist’s Approach
I recently sat down with Marcus Chen, a certified arborist with over twenty years of experience, to get his professional take on tree pruning. His advice? Start by understanding what you’re trying to achieve.
“The biggest mistake I see homeowners make is pruning without a clear purpose,” Marcus explains. “Are you removing deadwood for safety? Shaping for aesthetics? Opening up the canopy for light? Your goal determines your method.” He emphasizes that thinning cuts work beautifully for improving air circulation and light penetration, while heading cuts are better suited for maintaining size or encouraging bushier growth.
When it comes to tools, Marcus keeps it simple. “You really only need three essentials: sharp bypass pruners for small branches, loppers for medium-sized wood, and a quality pruning saw for anything larger than your thumb. The key word is sharp. Dull tools crush rather than cut, leaving wounds that invite disease.”
His wisdom from years in the field? “Take your time and step back frequently. I still walk around a tree three or four times before making major cuts. Once a branch is gone, you can’t reattach it.” He also stresses the three-cut method for larger branches to prevent bark tearing, calling it “non-negotiable for branch health.”
Marcus’s final encouragement: “Don’t be intimidated. Pruning is forgiving if you start conservatively. You can always remove more next season, but you can’t put growth back.”
You’ve now got a solid understanding of pruning methods that can transform your trees and garden space. The beauty of these techniques is that you don’t need to master them all at once. Start with simple thinning cuts on smaller branches, practice your angles, and pay attention to how your trees respond through the seasons.
Remember, even experienced gardeners once made their first nervous cut. Pruning is absolutely a learned skill that develops with time and observation. Each season brings new opportunities to refine your technique and build confidence. Your trees are remarkably forgiving, and thoughtful cuts made with good intentions will almost always benefit their health and structure more than avoiding pruning altogether.
The mistakes you might make along the way are simply part of becoming a better gardener. Watch how your trees heal, notice which branches produce the most vigorous growth, and adjust your approach accordingly. You’re not just maintaining trees; you’re developing a relationship with your garden and learning to work with nature’s own patterns.
So grab your pruning shears, step outside, and make that first cut. Your garden is waiting, and there’s no better teacher than hands-on experience. Trust yourself, start small, and enjoy the satisfaction of shaping healthier, more beautiful trees.


