

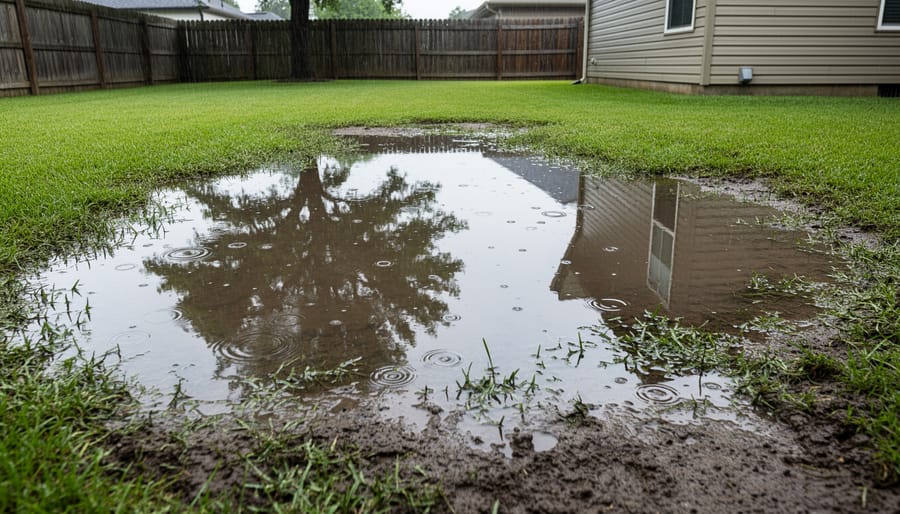
Walk outside after a heavy rain and notice where puddles form, where soil stays soggy, and whether water flows toward or away from your foundation—these observations reveal everything about your yard’s drainage story. That standing water isn’t just an inconvenience; it’s your landscape telling you that water has nowhere to go, and left unaddressed, it will damage your foundation, drown your plants, and turn your garden dreams into a muddy frustration.
The good news? Understanding drainage and grading doesn’t require an engineering degree. Your yard follows simple physics: water flows downhill and seeks the path of least resistance. When you grasp these basics, you can transform problem areas into thriving garden spaces.
Most drainage headaches stem from poor grading—the slope and contour of your land. Ideally, your property should slope away from structures at a rate of about six inches over ten feet, guiding water safely away from foundations and into appropriate drainage areas. Sometimes the fix is straightforward enough for a determined DIYer with a weekend and a wheelbarrow of soil. Other times, especially with severe foundation threats or large-scale water issues, calling in professionals with laser levels and earth-moving equipment makes sense.
Whether you’re dealing with a perpetually soggy flowerbed or water pooling against your basement wall, solutions exist for every budget and skill level. Let’s explore how water moves through your landscape and discover practical ways to take control of it.
Understanding Why Water Pools in Your Yard
The Role of Soil in Drainage Problems
Your soil is like a backstage manager for your garden’s drainage system—it quietly determines whether water flows smoothly or creates those frustrating puddles we all dread. Understanding what’s happening beneath your feet makes all the difference in solving drainage problems.
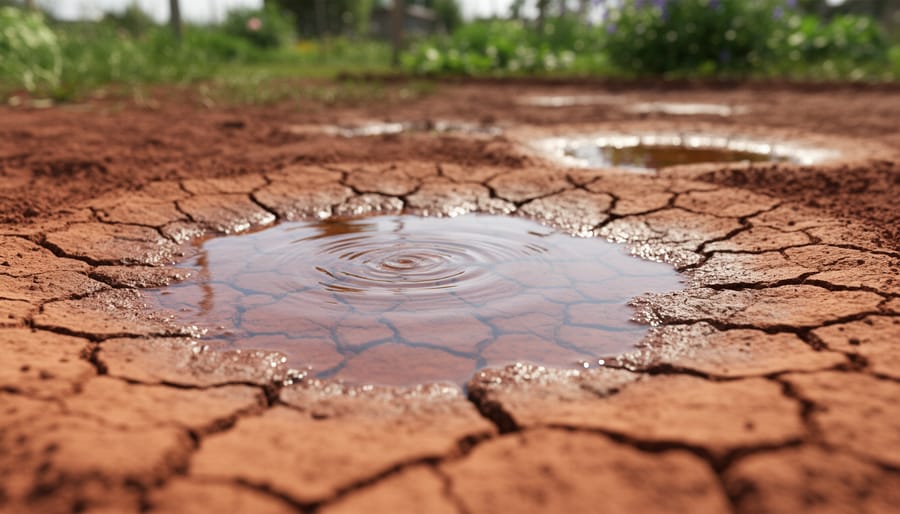
Let’s talk about the three main soil types. Clay soil has tiny, tightly-packed particles that hold water like a sponge but drain slowly, often leading to waterlogged areas. Sandy soil is the opposite—its large particles let water rush through quickly, sometimes too quickly for plant roots to absorb what they need. Loam is the garden gold standard, with a balanced mixture that retains moisture while draining well.
Here’s a simple way to identify your soil: grab a handful of moist (not wet) soil and squeeze it. Clay forms a tight ball that holds its shape and feels slick. Sandy soil won’t hold together and crumbles immediately. Loam forms a ball that gently breaks apart when poked.
Want to dig deeper? A simple soil test reveals exactly what you’re working with and helps you understand those soil composition issues causing drainage headaches. Armed with this knowledge, you can choose the right solutions—whether that’s amending heavy clay or addressing fast-draining sand—to create a yard that handles water beautifully.
How Slope and Grade Affect Water Flow
Think of grading as creating gentle highways for water in your yard. Just as roads are built with a slope so rain runs into storm drains, your landscape needs a subtle tilt to guide water away from trouble spots like your home’s foundation or low-lying garden beds.
Here’s the fascinating part: you don’t need a dramatic hillside to move water effectively. Even a slope as gentle as 2% (that’s just a 2-inch drop over 10 feet) can redirect water beautifully. I learned this from master gardener Linda Chen, who transformed her perpetually soggy backyard simply by adjusting the grade near her patio by three inches over eight feet.
When water flows downhill—and it always will—proper grading ensures it travels where you want it to go. Slope your lawn away from buildings, and you’ll prevent basement flooding and foundation damage. Create a slight depression leading to a rain garden, and you’ve turned a drainage problem into a beautiful feature.
The key is understanding that water follows the path of least resistance. Walk your yard after a heavy rain and observe where puddles form. Those low spots are telling you exactly where your grading needs attention.
Reading Your Yard’s Natural Drainage Patterns
Red Flags That Signal Drainage Issues
Your yard often gives clear signals when drainage isn’t working properly, and recognizing these signs early can save you from bigger headaches down the road. Let’s walk through what to watch for.
Standing water that lingers more than 24 hours after rain is your most obvious red flag. If you’re dodging puddles days after a storm, your soil simply can’t absorb water quickly enough. You might also notice constantly muddy or squishy patches, even during dry spells—these soggy spots can contribute to various lawn health problems and make those areas unusable.
Check your home’s foundation for water stains, discoloration, or that telltale tidemark showing where water has been pooling. Cracks in your foundation or basement walls often follow persistent moisture issues.
Other warning signs include erosion channels cutting through your garden beds, exposed tree roots from soil washing away, and downspouts emptying directly against your house. Inside, watch for musty basement odors or dampness—what happens outside eventually affects your indoor spaces too.
If you’re seeing multiple red flags, don’t worry. Understanding the problem is your first step toward creating a healthier, more functional yard that you’ll actually enjoy.
Mapping Water Movement in Your Landscape
Understanding how water moves through your yard is detective work that’s easier than you might think! Next time it rains, grab an umbrella and observe where water enters your property. Does it sheet off your neighbor’s driveway? Flow from downspouts? Start by noting these entry points on a simple sketch of your yard.
During the storm, watch for flow patterns. Water always follows the path of least resistance, creating visible channels and streams across your lawn. Notice where these streams converge and where they slow down. Those slower areas often become problem spots.
After the rain stops, take another walk within a few hours. Low-lying areas will reveal themselves through puddles and standing water. Mark these on your sketch with a simple “P” for puddle. Pay special attention to water near your foundation or gathering against hardscaping.
For a more detailed picture, photograph the same spots during different rainstorms. Heavy downpours versus gentle rain can show dramatically different patterns. I learned this the hard way when my “small” drainage issue became a rushing river during a thunderstorm!
Keep your observations simple. This map becomes your roadmap for creating effective solutions tailored to your yard’s unique challenges.
Grading Solutions That Actually Work
Quick Fixes for Minor Grading Problems
Good news! Many minor grading issues are surprisingly easy to fix with just a weekend afternoon and a few basic tools. I remember tackling my first drainage problem with nothing more than a shovel, a wheelbarrow, and determination—and you can too.
Start by identifying those troublesome low spots where water pools. For small depressions less than a foot deep, adding topsoil is your simplest solution. Choose high-quality topsoil that matches your existing soil type, then gradually fill the depression in layers, compacting each layer lightly with your foot or the back of your shovel. This prevents settling later on. Top it off with a thin layer of compost to help new grass establish quickly.
Creating proper slopes away from your house or garage is essential for protecting your foundation. The magic number to remember is a one-inch drop for every foot of distance—this gentle grade moves water away effectively without creating erosion problems. A simple carpenter’s level attached to a straight board helps you check your work as you go.
For smoothing out uneven areas, a garden rake works wonders on loosened soil. Work in sections, raking soil from high spots to fill nearby low areas. Take breaks to step back and assess your progress—sometimes the best tool is simply your eye for spotting problem areas.
If you’re working with compacted soil, roughen it up with your shovel before adding new topsoil. This helps the layers bond together rather than creating separate sheets that can slide apart. Remember, patience and gradual adjustments beat aggressive changes every time.
Creating Swales and Berms for Better Water Direction
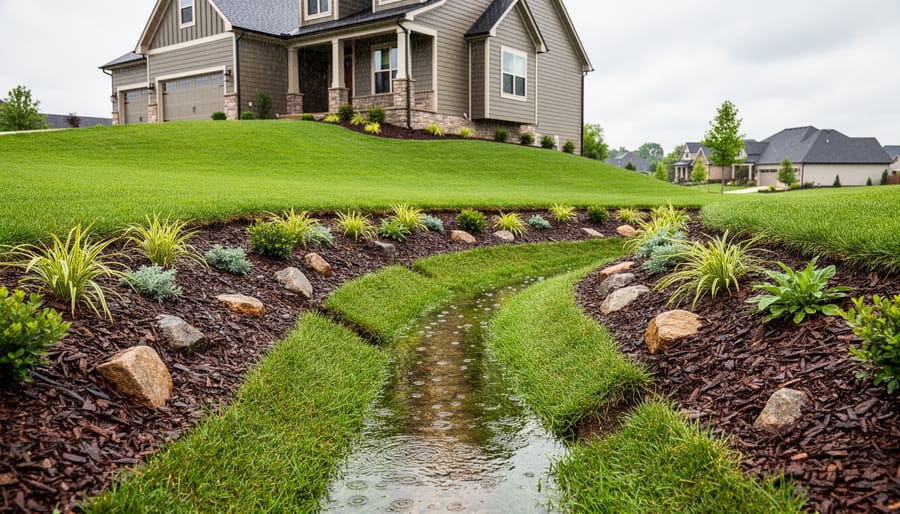
Think of swales and berms as nature’s own water management team! A swale is essentially a shallow, gently sloping ditch that channels water where you want it to go, while a berm is a raised mound of soil that acts as a barrier, redirecting water away from problem areas.
I learned about swales from my neighbor, a landscape designer who transformed her soggy backyard into a thriving garden. She explained that swales work beautifully when you need to move water slowly across your property or direct it toward thirsty plants. They’re perfect for capturing runoff and letting it soak into the soil rather than rushing away.
Here’s how to create a simple swale: Start by marking your path following the natural contours of your land. Dig a shallow channel about 6-12 inches deep and 2-3 feet wide, keeping the bottom relatively flat. Use the excavated soil to build up the downhill side slightly, which helps contain the water flow.
Berms work differently. Position them perpendicular to water flow to redirect it around vulnerable areas like patios or foundations. Build them 12-18 inches high and at least 3 feet wide at the base for stability. Pack the soil firmly and plant it with deep-rooted grasses or groundcovers to prevent erosion.
Use swales when you want to guide water to specific locations and berms when you need to block or redirect flow. Both methods work wonderfully together, creating a complete water management system that protects your property while nourishing your landscape.
When to Call in a Professional Grading Contractor
While tackling simple grading projects can be rewarding, some situations truly require professional expertise. If you’re dealing with major slope changes greater than six inches across your yard, it’s time to call in the experts—they have specialized equipment and knowledge to ensure proper drainage without creating new problems. Working within ten feet of your home’s foundation is another red flag for DIY attempts, as mistakes here can lead to costly structural damage. I learned this lesson when a friend’s well-intentioned regrading project directed water toward his basement instead of away from it.
Professional help is essential when your drainage issues involve municipal storm systems, shared property lines with neighbors, or local permits. Grading contractors understand regulations and can navigate the paperwork while protecting everyone’s interests. They’re also invaluable for installing complex solutions like French drains, retaining walls, or addressing persistent flooding that simple fixes haven’t resolved. Think of it as an investment in your home’s health—some projects are simply worth the peace of mind that comes with professional results.
Surface Water Management Strategies for Every Yard
French Drains: Your Underground Ally
If you’ve ever wondered how water can mysteriously disappear underground, you’re about to become a fan of French drains! Think of them as secret tunnels that guide water away from problem areas, and they’re surprisingly straightforward to understand.
Here’s how they work: a French drain is essentially a gravel-filled trench containing a perforated pipe. Water seeps through the gravel, enters the pipe through those small holes, and flows to a safer spot away from your garden beds or foundation. The gravel acts as a filter, keeping soil out while letting water in.
French drains shine in specific situations. They’re your best friend when dealing with consistently soggy areas, water pooling against foundations, or when you need to protect a downslope garden from runoff. I’ve seen them transform waterlogged flower beds into thriving garden spaces within a single season.
The basic installation involves digging a sloped trench (about 1 inch per 8 feet), lining it with landscape fabric, adding gravel, placing the perforated pipe, and covering everything with more gravel and fabric. While ambitious DIYers can tackle smaller projects, longer runs or those near foundations often benefit from professional installation to ensure proper slope and drainage destination.
The beauty of French drains? Once installed, they work quietly underground for years, letting you focus on growing gorgeous gardens instead of managing puddles.
Rain Gardens: Beauty That Solves Problems
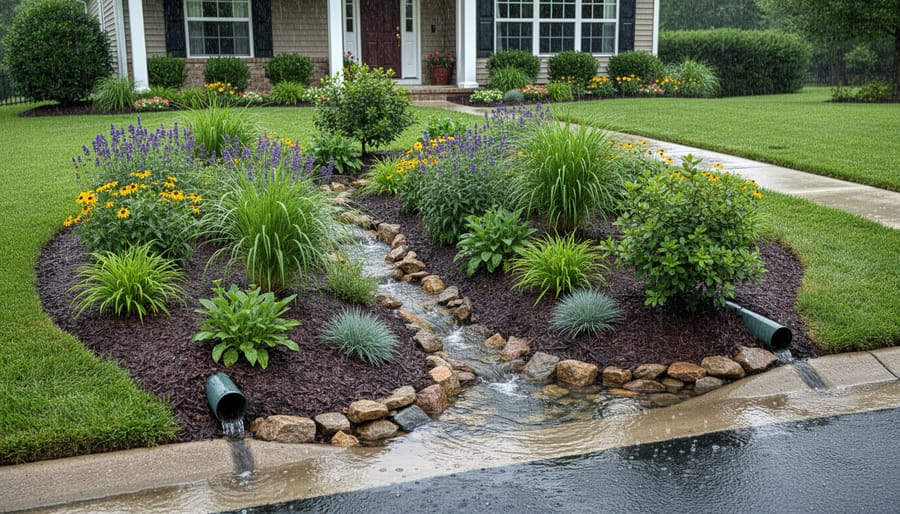
Here’s a problem-solving solution that’s as practical as it is pretty: rain gardens transform those frustrating low spots into landscape stars. Instead of fighting against areas where water naturally collects, you’re working with your yard’s existing contours to create a beautiful feature that handles excess runoff.
Think of a rain garden as a shallow depression planted with water-loving natives that can handle both wet and dry conditions. During heavy rains, it temporarily holds water, allowing it to slowly soak into the ground rather than running off toward your foundation or creating muddy messes. Between storms, it looks like any other attractive garden bed.
For sunny spots, try black-eyed Susans, switchgrass, or New England asters. These beauties don’t mind getting their feet wet occasionally but won’t sulk during dry spells with proper watering practices. Shadier locations welcome native ferns, cardinal flowers, and blue flag iris.
Start small with a 100-square-foot depression about 6 inches deep, positioned at least 10 feet from your house. Layer the bottom with 12 inches of sandy soil mixed with compost for optimal drainage. The result? A problem area becomes a pollinator paradise that actually helps protect your home from water damage.
Catch Basins and Channel Drains
When you’re dealing with concentrated water flow—like at the end of downspouts or along paved surfaces—catch basins and channel drains become your best friends. I learned this the hard way when my driveway kept flooding every spring!
Catch basins are those grated boxes you’ve probably noticed in parking lots. In your yard, they work beautifully at low points where water naturally collects, capturing runoff before it becomes a problem. They connect to underground drainage pipes that redirect water away from trouble spots. I typically place them where patios meet lawns or at the base of sloped driveways.
Channel drains, those long, narrow grates, excel at intercepting water along a line—think garage entrances or across the bottom of a sloped driveway. They’re particularly helpful for protecting garden beds from water rushing off hardscapes.
The real magic happens when you integrate these with your overall drainage plan. Your catch basin might feed into a French drain system, or channel drains could direct water toward a rain garden. It’s like creating a connected highway system for water, guiding it exactly where you want it to go rather than letting it wander destructively through your landscape.
Permeable Hardscaping Options
Instead of impervious surfaces that send water rushing away, consider hardscaping options that welcome moisture into the ground. Permeable pavers feature gaps that allow water to seep through while still providing solid walkways and patios. Gravel pathways offer excellent drainage for garden paths, and they’re simple to install yourself. For a polished look, try crushed stone or decomposed granite, which pack firmly underfoot yet remain porous. I’ve found that combining permeable surfaces with proper grading creates the ultimate water-friendly landscape—rain becomes an asset rather than a headache.
Protecting Your Plants While Improving Drainage
Best Times to Tackle Drainage Projects
Timing can make all the difference when tackling drainage projects! The best window is typically late fall through early spring, when most plants are dormant and won’t mind having their roots disturbed. I’ve found that working during these cooler months means less stress on your landscape and easier digging in moist (but not frozen) soil.
Early spring offers another advantage—you can observe exactly where water pools during rain events, giving you valuable clues about problem areas. Just wait until the ground thaws and isn’t too muddy to work with.
Try to avoid major grading work during the peak growing season (late spring through summer) when plants are actively developing. If you absolutely must work during warmer months, water thoroughly before and after, and consider temporarily relocating sensitive plants.
One experienced landscaper I interviewed shared this wisdom: “Mother Nature shows you where the problems are—pay attention during heavy rains, then fix them when plants are sleeping.” That seasonal observation period is golden for planning your drainage strategy effectively.
Plants That Handle Wet and Dry Conditions
Transition zones between wet and dry areas present a unique challenge, but several resilient plants actually thrive in these fluctuating conditions. The key is choosing species that tolerate “wet feet” during soggy periods yet won’t sulk when things dry out.
Switchgrass is a fantastic native option that handles moisture swings beautifully while adding graceful movement to your garden. Joe Pye weed brings gorgeous late-summer blooms and doesn’t mind occasional flooding. For shrubs, buttonbush and winterberry holly are champions of adaptability, offering seasonal interest whether they’re standing in water or dealing with summer drought.
Ground covers like creeping Jenny and native sedges spread happily across uneven terrain, helping stabilize soil while looking attractive. Cardinal flower provides stunning red blooms in areas that shift from damp to merely moist.
When I redesigned my own problematic drainage area, mixing these adaptable plants with alternative plantings transformed what was once a frustrating mud patch into a thriving garden feature. The secret is giving new plants extra attention during their first season while they establish deep roots that’ll handle whatever moisture levels come their way.
Maintaining Your Drainage System Long-Term
Once you’ve got your drainage system working beautifully, a little regular attention goes a long way in keeping it that way. Think of it like tending your garden beds—a bit of preventive care now saves you from bigger headaches later!
I like to do seasonal check-ins, especially in spring and fall. Walk your property after a good rain and watch how water flows. Are there new problem spots? Has anything shifted? These simple observations catch issues before they become serious. Master gardener Patricia Chen told me she marks her calendar twice a year for drainage inspections, treating it as essential as fertilizing her roses.
Debris removal is your drainage system’s best friend. Clean gutters and downspouts at least twice yearly, and check French drains or catch basins for leaves, sediment, and silt buildup. I once ignored this for a season and ended up with a completely clogged system—lesson learned! Pull weeds from around drainage channels, too, as roots can eventually obstruct flow.
Keep an eye out for warning signs that repairs are needed: persistent soggy spots reappearing, erosion around swales or channels, sunken areas along underground drainage lines, or water pooling near your foundation. These red flags mean it’s time to take action.
Don’t forget about maintaining proper grading. Freezing and thawing cycles, settling soil, and enthusiastic landscaping projects can alter your carefully established slopes. Top-dress low spots as needed to preserve that critical pitch away from structures.
Here’s the wonderful truth I want you to walk away with: drainage problems, no matter how frustrating they seem right now, are absolutely solvable. Whether you’re dealing with a persistent puddle near your vegetable garden or water creeping toward your foundation, you now have a toolkit of solutions at your fingertips.
We’ve covered the essentials together—from reading your landscape and understanding how water naturally moves, to hands-on fixes like regrading slopes, installing French drains, and creating rain gardens that turn problems into beautiful features. You’ve learned when a simple afternoon project can solve the issue and when it’s time to call in professional help.
The best part? You don’t have to tackle everything at once. Start small. Maybe begin by observing where water collects after the next rainfall, or test your soil drainage in that trouble spot. Each step forward, no matter how modest, brings you closer to a healthier, happier yard.
Your garden deserves proper drainage, and you’re now equipped to make it happen. Trust yourself, take that first step, and remember that every experienced gardener once stood exactly where you are now. You’ve got this!


