
Your lawn is telling you something—those brown patches, stubborn weeds, and thin grass aren’t random bad luck. They’re symptoms of underlying soil imbalances that no amount of watering or mowing can fix. Think of soil diagnostics as a health checkup for your yard: just as you wouldn’t treat a fever without knowing its cause, you shouldn’t throw fertilizer at your lawn without understanding what it actually needs.
Soil testing removes the guesswork from lawn care. Instead of spending money on products that might not address your real problems, a simple diagnostic reveals your soil’s pH levels, nutrient deficiencies, and organic matter content. Armed with this information, you can target exactly what your turf needs—whether that’s adjusting acidity, adding nitrogen, or improving drainage.
The process is surprisingly straightforward. Collect soil samples from multiple spots in your lawn, send them to a testing lab or use a home kit, and receive a detailed report within days. The results translate complex chemistry into plain language, telling you precisely which amendments to apply and in what quantities.
This isn’t about becoming a soil scientist. It’s about working smarter, not harder, so you can finally achieve that healthy, resilient lawn you’ve been chasing. When you understand what’s happening beneath the surface, everything above ground transforms. Let’s walk through how turf and soil diagnostics work and how you can use them to solve your lawn’s persistent problems once and for all.
What Turf and Soil Diagnostics Actually Tell You

The Big Three: pH, Nutrients, and Soil Structure
Think of your lawn like a three-legged stool – if any leg is wobbly, the whole thing becomes unstable. That’s exactly how soil health works, resting on three crucial supports: pH, nutrients, and soil structure.
Let’s start with pH, which measures how acidic or alkaline your soil is on a scale from 0 to 14. Most grass thrives between 6.0 and 7.0, where nutrients become most available to roots. Picture pH like a locked gate – even if your soil is packed with nutrients, the wrong pH level keeps them locked away from your grass. When you’re maintaining optimal pH levels, those gates swing open, and your lawn can feast.
Next up are nutrients, the actual food your grass needs to grow. The big three here are nitrogen (for lush green growth), phosphorus (for strong roots), and potassium (for overall health and stress resistance). Think of them like a balanced diet – you wouldn’t eat only protein and skip everything else, right?
Finally, soil structure describes how soil particles clump together, creating spaces for air and water. Clay soil is like a tightly packed suitcase – barely any breathing room. Sandy soil resembles a colander – everything drains right through. Loamy soil, the goldilocks option, strikes the perfect balance. Healthy structure means roots can spread easily, water drains properly without disappearing too quickly, and beneficial microbes have room to thrive.
Reading Between the Lines of Your Test Results
When your test results arrive, those columns of numbers might look intimidating at first, but think of them as your lawn’s report card. Here’s what really matters: pH is like the master key that unlocks nutrients. If yours reads below 6.0 or above 7.5, your grass is struggling to access food even if it’s technically there in the soil.
The NPK numbers tell you what your lawn is hungry for right now. Low nitrogen (typically below 20 ppm) explains pale, slow-growing grass. Phosphorus readings matter most for new lawns establishing roots, while potassium below 100 ppm often means your turf can’t handle stress well.
I remember staring at my first soil test, confused why my nitrogen was “medium” but my lawn looked terrible. Turns out, my pH was 5.2, essentially locking up those nutrients like food behind glass. The fix wasn’t more fertilizer but addressing the acidity first.
Look at the recommendations section too. Most labs translate those numbers into practical advice specific to your grass type and region. Don’t try to fix everything at once. Start with pH adjustments, wait a season, then tackle nutrient deficiencies. Your lawn didn’t decline overnight, and it won’t recover instantly either.
How to Get Your Lawn’s Soil Tested
The Right Way to Collect Soil Samples
Getting an accurate soil sample is easier than you might think, but a few simple techniques make all the difference between helpful results and misleading data.
Start by collecting samples from multiple spots rather than just one location. I recommend taking 8-10 small samples from different areas of your lawn or garden bed, then mixing them together. This gives you a representative picture of your soil’s overall condition. Think of it like tasting ingredients from different parts of a soup pot to judge the whole batch.
For depth, dig down 4-6 inches for lawns and 6-8 inches for garden beds. Use a clean trowel or soil probe, pushing straight down and pulling up a slice of soil. Here’s a trick I learned from a seasoned gardener: avoid touching the soil with your hands, as oils and residue can affect test results.
Before you start, make sure your tools are clean and free from fertilizer or chemical residue. Avoid sampling near structures, driveways, or heavily trafficked areas, as these spots often have contaminated or compacted soil that doesn’t reflect your actual growing conditions.
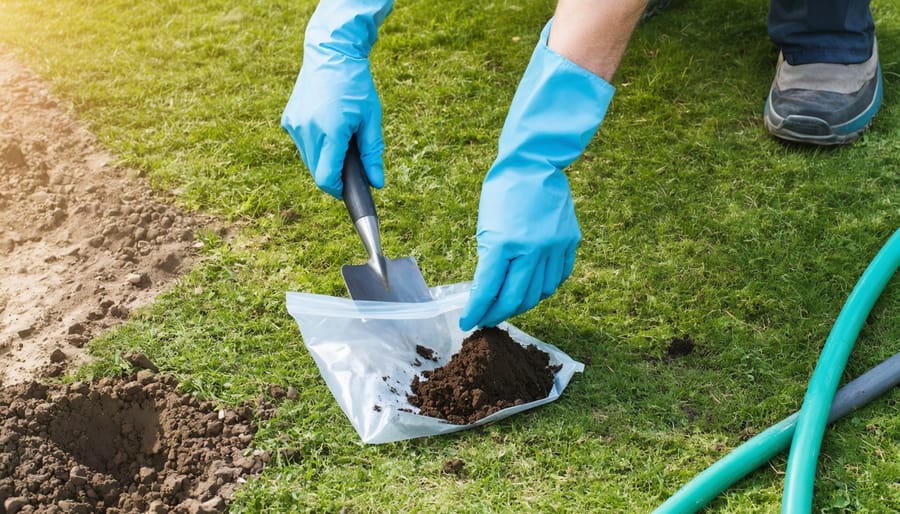
Once collected, mix your samples thoroughly in a clean bucket, then place about two cups of this blend into a clean plastic bag or container. Remove any grass, roots, or debris first. Label it with the date and location, and you’re ready to send it off for testing or use a home kit.
DIY Test Kits vs. Professional Lab Analysis
When you’re ready to test your soil, you’ll face a choice between DIY kits and professional lab analysis. Let’s break down what each offers so you can make the best decision for your lawn.
DIY test kits, available at garden centers for $10-$30, give you quick results at home. They’re perfect for getting a general snapshot of pH and major nutrients like nitrogen, phosphorus, and potassium. You’ll have answers in minutes, which is wonderfully convenient. However, they’re less precise than lab tests and typically don’t measure micronutrients or provide detailed recommendations.
Professional lab analysis, costing $30-$75, offers comprehensive results with impressive accuracy. Most university extension services and private labs test for pH, macro and micronutrients, organic matter, and sometimes even heavy metals. You’ll receive a detailed report with specific amendment recommendations tailored to your lawn type. The downside? Results take 1-3 weeks.
My honest take? Start with a professional test to establish your baseline, especially if you’re tackling serious lawn problems. Once you understand your soil’s unique personality, DIY kits work great for annual check-ins. Think of the lab test as your investment in truly understanding what’s happening beneath your grass.
Timing Your Tests for Maximum Insight
Timing makes all the difference when it comes to accurate soil testing. The best window is early spring or fall when your lawn is actively growing but you haven’t recently fertilized. I recommend testing at least six weeks after any fertilizer application to get a true picture of what’s naturally happening in your soil.
For new lawns or gardens, test before you plant anything. This gives you a baseline and lets you make amendments before those precious seeds or plants go in the ground. For established lawns, testing every three to four years works well for most homeowners. However, if you’re dealing with ongoing issues like persistent bare patches or discoloration, annual testing helps you track progress and adjust your approach.
Here’s a helpful tip from my own experience: mark your calendar with your testing schedule. It’s easy to forget year after year, and consistent timing helps you compare results more accurately over time.
Common Problems Your Soil Test Will Uncover

When Your Soil Is Too Acidic or Alkaline
Picture this: you’ve been fertilizing regularly, watering faithfully, and yet your lawn still looks pale and patchy. The culprit might be pH imbalance. Think of pH as your soil’s comfort zone—most lawn grasses thrive in that sweet spot between 6.0 and 7.0, where nutrients are readily available like items on a well-stocked grocery shelf.
When soil becomes too acidic (below 6.0), you’ll notice grass taking on a yellowish tinge, especially in older blades. Growth slows, and moss often invites itself to the party, thriving where grass struggles. On the flip side, alkaline soil (above 7.5) creates similar yellowing, but this time iron and other micronutrients get “locked up”—they’re physically present but chemically unavailable to grass roots.
Here’s what’s happening underground: extreme pH levels actually change how nutrients behave. Even if you’re adding fertilizer, your grass can’t access it properly. It’s like having a full pantry but the door is stuck. The good news? Once you’ve identified a pH problem through testing, it’s completely fixable with lime to raise pH or sulfur to lower it. Understanding these visual clues helps you move from guesswork to targeted solutions.
Nutrient Deficiencies That Sabotage Growth
Your lawn speaks volumes through its appearance, and nutrient deficiencies often show up like red flags waving for attention. Let me walk you through the big three nutrients and what they’re telling you.
Nitrogen deficiency is probably the easiest to spot. Your grass will develop a pale yellow-green color, starting with the older blades at the bottom. Growth slows dramatically, and the lawn looks thin and lackluster overall. I’ve noticed that nitrogen-starved turf also becomes more vulnerable to weeds, which seem to sense weakness like opportunistic party crashers.
Phosphorus deficiency creates a darker, almost purplish tint on grass blades, particularly in cooler weather. You might see stunted root development, which means your lawn struggles to establish itself deeply. This is especially common in new lawns that just won’t seem to take off.
Potassium deficiency shows up as yellowing or browning along leaf margins, giving blades a scorched appearance. The grass becomes more susceptible to disease and drought stress, wilting faster than it should during dry spells.
The good news? Once you identify these visual cues, targeted soil testing confirms your suspicions and guides precise amendments to restore balance.
The Compaction Problem Nobody Talks About
Here’s a lawn struggle you might not even realize you have: compacted soil. I’ve seen countless frustrated gardeners throw fertilizer at brown patches, only to watch their efforts fail because their soil is too compressed for roots to grow properly or water to penetrate.
Compaction happens gradually, often from foot traffic, heavy equipment, or even just years of neglect. The telltale signs? Water pooling on the surface instead of soaking in, sparse grass growth in high-traffic areas, and soil that feels rock-hard when you poke it with a screwdriver (if you can’t push it in at least six inches easily, you’ve likely got compaction).
The fix isn’t mysterious—core aeration breaks up that compressed layer, creating channels for air, water, and nutrients to reach roots again. Sometimes addressing what you can’t see makes all the difference in what you can.
Amendment Strategies That Actually Work
Adjusting Soil pH: Lime and Sulfur Basics
Once your soil test reveals pH issues, you’ll need either lime or sulfur to get things back on track. Think of pH adjustment as a gentle nudge rather than an overnight fix—patience is key!
To raise pH in acidic soils, apply garden lime. For every 100 square feet, use approximately 5 pounds of lime to raise pH by one point in sandy soil, or 7-10 pounds for clay soil. Fall application works beautifully since lime needs several months to fully react with soil. I always spread mine in late autumn after aerating, giving it all winter to work its magic.
Lowering pH in alkaline soils requires elemental sulfur or aluminum sulfate. Sulfur works more slowly but lasts longer—apply 1-2 pounds per 100 square feet to drop pH by one point. Aluminum sulfate acts faster, needing about 5 pounds for the same effect, making it great when you’re in a hurry.
Whatever you choose, split large applications into smaller doses applied six months apart. This prevents shocking your lawn and gives you better control. Water thoroughly after applying, and retest soil annually. Remember, pH changes gradually, so don’t expect instant results. Your grass will thank you with deeper roots and vibrant growth once conditions improve!

Feeding Your Soil: Organic vs. Synthetic Amendments
Once you understand what your soil needs, it’s time to feed it! Think of soil amendments as meals for your lawn—you can go organic or synthetic, and both have their place in a healthy gardening strategy.
Organic amendments like compost, aged manure, and leaf mold work slowly but steadily, improving soil structure while feeding beneficial microbes. I love compost because it’s like a multivitamin for soil—it adds nutrients, improves drainage in clay soils, and helps sandy soils hold moisture. Aged manure packs more nitrogen punch, making it perfect when your test shows you’re running low. The trade-off? These amendments take time to break down and release nutrients, so patience is key.
Synthetic fertilizers deliver nutrients quickly and precisely. When your soil test reveals a specific deficiency—say, low potassium—synthetics let you target that exact need. They’re also predictable, which makes fertilizer selection easier when you need fast results before an event or to rescue a struggling lawn mid-season.
Here’s my honest take: combining both approaches often works best. I use compost as my foundation, building long-term soil health, then supplement with synthetics when specific problems pop up. If you’re managing compacted soil or poor microbial activity, lean heavily on organics. Need quick color before your daughter’s graduation party? Synthetics can save the day. Your soil test results will guide which direction makes most sense for your unique situation.
Fixing Compaction and Improving Soil Structure
If your soil test reveals compaction issues, don’t worry—you can absolutely turn things around! Compacted soil prevents roots from growing deep and blocks water and air from reaching where they’re needed most. The good news is that several proven methods can restore your soil’s health.
Core aeration is your first line of defense against compaction. This process removes small plugs of soil, creating channels for air, water, and nutrients to penetrate deeper. You’ll find various aeration techniques available depending on your lawn size and budget, from manual aerators to powered machines you can rent.
Following aeration, topdressing works wonders. Spread a thin layer of compost or quality topsoil across your lawn—about a quarter to half inch. This adds organic matter that gradually works its way into the soil, improving texture and feeding beneficial microbes. I like to think of it as giving your lawn a nutrient-rich blanket.
For longer-term improvement, regularly incorporate organic matter like compost, aged manure, or leaf mold into garden beds. These amendments act like tiny sponges, helping sandy soils retain moisture while breaking up heavy clay. Your soil structure will improve season by season, and you’ll notice stronger, healthier turf with roots that can finally stretch and thrive.
Creating Your Custom Lawn Care Plan

Prioritizing Fixes: What to Tackle First
When your soil test reveals multiple issues, it’s natural to feel a bit overwhelmed. But here’s the good news: you don’t need to fix everything at once. Think of it like renovating a house—you tackle the foundation before painting the walls.
Start with pH adjustments first. Why? Because pH affects how well your lawn absorbs every other nutrient you’ll add. If your soil is too acidic or alkaline, those expensive fertilizers won’t do much good. Apply lime to raise pH or sulfur to lower it, then wait about six weeks before moving forward.
Next, address major nutrient deficiencies, particularly nitrogen and phosphorus. These are the building blocks your grass needs to grow strong and healthy. Organic options like compost work beautifully here, releasing nutrients slowly over time.
Save minor tweaks, like adding trace minerals, for later. Your lawn won’t transform overnight from a zinc deficiency, but it will definitely suffer from severe nitrogen depletion.
Remember, I once tried fixing everything simultaneously in my backyard and ended up with chemical interactions I hadn’t anticipated. Patience truly pays off. Work through your amendments methodically, giving each one time to integrate into your soil ecosystem, and you’ll see lasting results.
Building a Seasonal Maintenance Calendar
Once you’ve completed your soil test and made initial amendments, the work isn’t over. Think of soil health like your own wellness—it needs regular check-ins and adjustments throughout the year.
Start by creating a seasonal maintenance schedule that works with nature’s rhythm. In spring, focus on testing and major amendments while your lawn is waking up. This is when adding compost, adjusting pH, or incorporating slow-release fertilizers has maximum impact. Your grass roots are actively growing and ready to absorb nutrients.
Summer becomes your monitoring season. Watch how your lawn responds to those spring amendments. Notice any yellowing or bare patches that might signal lingering issues. Light top-dressing with compost mid-summer keeps beneficial microbes active.
Fall is your second opportunity for testing and amendments. I like to retest every 18-24 months, but if you had severe deficiencies, consider retesting after one year. Fall aeration combined with overseeding gives you a fresh start.
Winter allows your soil to rest while you plan next year’s approach. Keep a simple garden journal noting what worked and what didn’t. This becomes your personal roadmap, making each year easier than the last.
Here’s the wonderful news: you don’t have to guess anymore. Soil testing takes the mystery out of lawn care and puts you firmly in control. Instead of throwing random products at your struggling turf and hoping something works, you’ll know exactly what your soil needs and can give it just that.
I recently spoke with Margaret, a gardener with 20 years of experience, who shared how diagnostics completely changed her approach. “I used to fertilize every spring like clockwork, wondering why my lawn stayed patchy,” she told me. “One soil test revealed I had plenty of nitrogen but was severely lacking phosphorus. I adjusted my routine, and within two growing seasons, I had the healthiest lawn on my block. I wish I’d tested years earlier!”
Think of soil testing as getting a prescription rather than buying over-the-counter remedies. Your lawn is unique, with its own specific needs shaped by climate, soil type, and usage patterns. When you understand what’s happening beneath the surface, you can make informed decisions that save time, money, and frustration. Give your lawn the care it deserves by starting with knowledge, not guesswork.


