Low vision doesn’t mean giving up the garden you love. With the right adaptive equipment, you can navigate your outdoor space safely, identify plants confidently, and continue cultivating beauty independently.
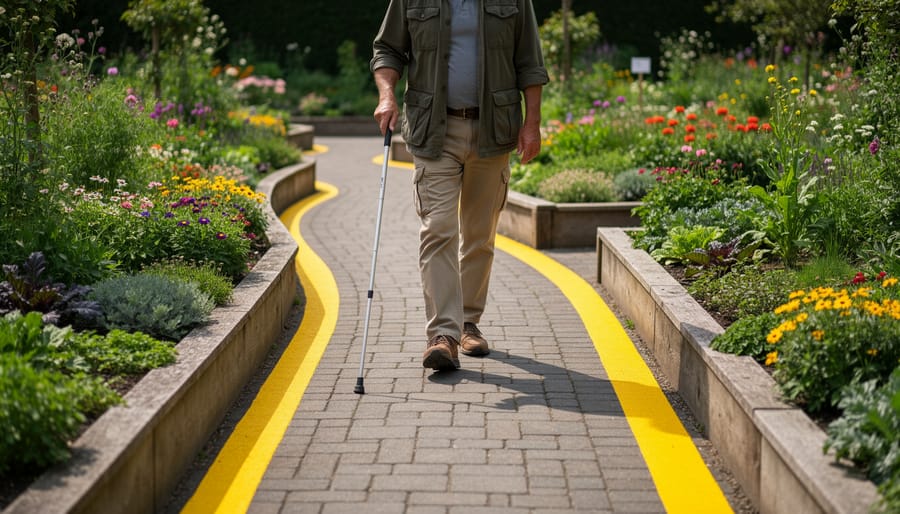
Start by installing high-contrast tactile pathway markers—raised edging painted in bright yellow or white creates clear boundaries you can see and feel. These simple additions let you move through garden beds without wondering where paths end and planting areas begin.
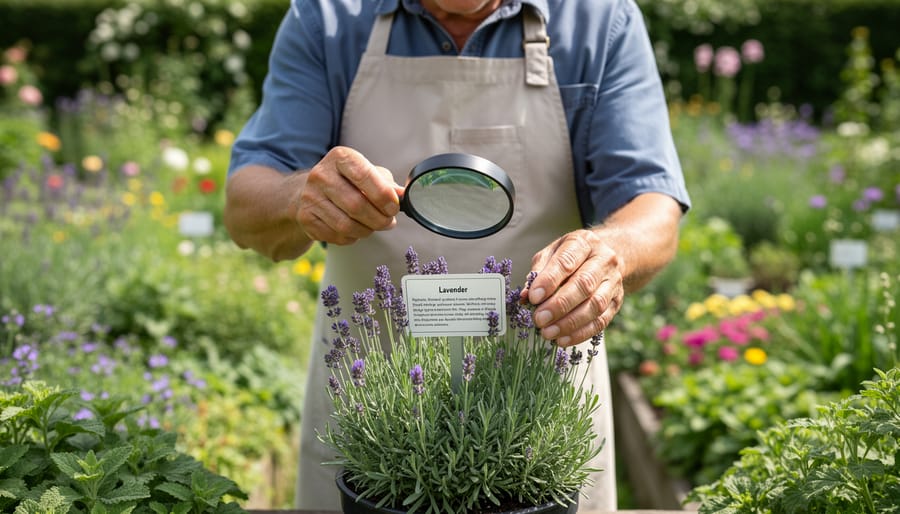
Mount magnifying glasses on adjustable arms near workbenches and potting stations. These hands-free tools enlarge seed packets, plant labels, and small seedlings, making detailed tasks manageable without constantly reaching for reading aids.
Use color-coded plant markers with large, bold lettering. Create labels with black text on white backgrounds, or invest in talking plant markers that record and playback voice notes about watering schedules, plant names, and care instructions at the touch of a button.
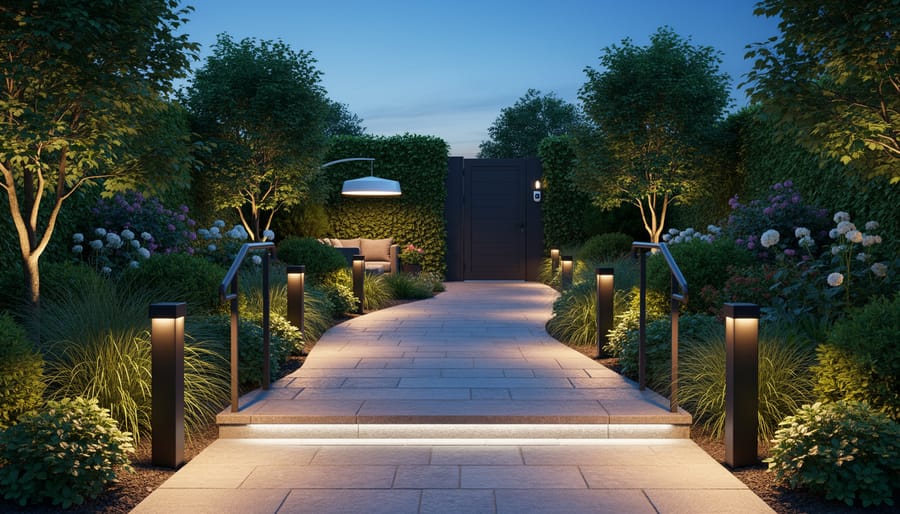
Install motion-activated lighting along pathways and work areas. These lights illuminate your space automatically as you approach, eliminating shadows that make navigation challenging during early morning or evening gardening sessions.
The equipment available today ranges from simple DIY solutions to sophisticated assistive technology, all designed to help you garden on your terms. Whether you’re adapting an existing garden or planning a new accessible space, the right tools transform limitations into possibilities. Your gardening journey doesn’t end with vision changes—it simply evolves with equipment that supports your independence and passion for growing things.
Understanding Low Vision in the Garden
What Makes Garden Navigation Tricky
Gardens are wonderfully sensory spaces, but they can present unique challenges when you’re working with low vision. Unlike indoor spaces with consistent flooring, gardens naturally have uneven terrain—raised beds meet pathways, mulch transitions to stone, and roots can create unexpected bumps. These changes in surface aren’t always easy to spot when visual cues are limited.
Lighting conditions outdoors shift throughout the day, creating tricky shadows and glare that can mask obstacles or make it harder to distinguish where one area ends and another begins. Early morning dew can make surfaces shine differently, and late afternoon sun might cast long shadows that confuse depth perception.
Then there’s the challenge of visual similarity. Many plants share comparable shapes, colors, and textures, making it tough to identify exactly where you are in the garden or which plant you’re reaching for. Green blends into green, and without clear contrasts, pathways can disappear into the surrounding landscape.
Spatial awareness becomes more complex outdoors too. Without walls and doorways as reference points, estimating distances between plants, benches, or tool storage requires different strategies. These challenges are real, but they’re also completely manageable with the right adaptive equipment and thoughtful garden design.
Why Adaptive Equipment Changes Everything
Imagine stepping into your garden with complete confidence, knowing exactly where each plant bed begins, where the path curves, and which tools you need without straining to see. That’s the power of low vision adaptive equipment. For gardeners experiencing vision loss, the right tools don’t just make tasks easier—they transform the entire gardening experience from frustrating to fulfilling.
When you can’t rely on vision alone, accessible gardening tools and equipment become your trusted partners. High-contrast markers help you navigate pathways safely. Tactile plant labels let you identify herbs by touch. Magnifying devices bring tiny seedlings into focus. These aren’t just helpful additions—they’re game-changers that restore your ability to garden independently.
The beauty of adaptive equipment lies in its ability to meet you where you are. Whether you’re managing age-related vision changes or adapting to more significant sight loss, there’s a solution designed for your needs. Many gardeners tell us that discovering the right adaptive tools gave them back something precious: the joy of digging in the soil, nurturing plants, and watching their garden flourish—all on their own terms.
Essential Low-Vision Wayfinding Equipment
High-Contrast Pathway Markers and Edging
Creating clear pathway boundaries transforms garden navigation for anyone with low vision. Think of these markers as your garden’s road signs—they keep you confidently moving from one area to another without second-guessing your steps.
Brightly colored edging materials work wonders for defining paths. Consider yellow or orange plastic lawn edging, which you can find at most garden centers for under twenty dollars per twenty-foot section. The vivid colors create strong visual contrast against green lawns or brown mulch. I spoke with Janet Chen, a landscape designer who specializes in accessible gardens, and she recommends painting existing stone edging with high-visibility paint as a budget-friendly alternative. “A can of fluorescent orange paint and an afternoon can completely change how someone experiences their garden,” she shared.
Reflective tape or markers add another layer of visibility, especially useful during early morning or evening gardening sessions. Solar-powered pathway lights with reflective stakes serve double duty, marking edges while providing illumination. These typically cost fifteen to thirty dollars for a set of six.
Tactile borders offer physical feedback as you walk. Raised stone edging, thick rope borders staked into the ground, or even repurposed pool noodles cut lengthwise and secured along path edges provide that gentle bump your foot can detect. This simple cue tells you you’re approaching the path’s boundary before stepping off.
For a complete DIY approach, try alternating white-painted rocks with colored ones to create a checkerboard effect along your pathway edges. The pattern provides both visual and textural guidance.
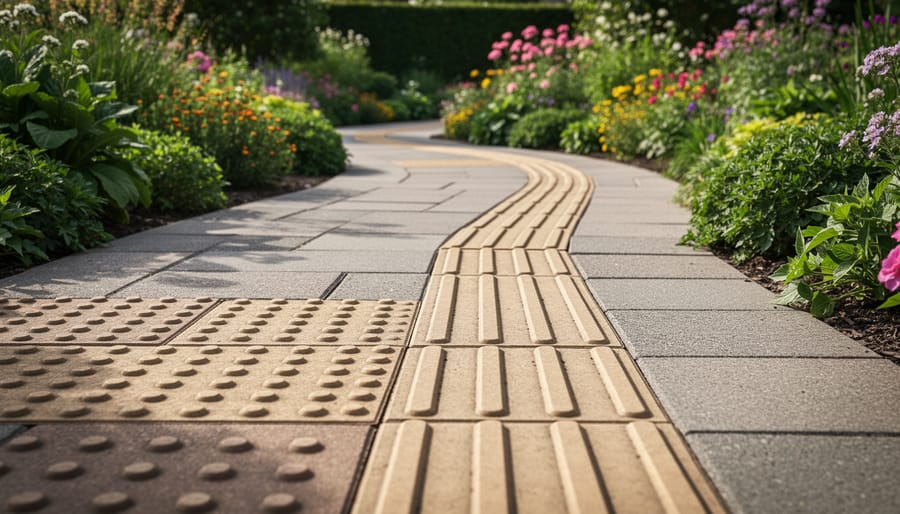
Tactile Paving and Surface Indicators
Creating clear pathways through your garden becomes wonderfully simple with tactile paving and surface indicators. These clever solutions use different textures underfoot to communicate important information about your surroundings, allowing you to navigate confidently without relying on sight alone.
Think of tactile paving as your garden’s language spoken through touch. Raised dome patterns, often called truncated domes, signal important transitions like the edge of a patio meeting a gravel path or the beginning of steps. Corduroy-style bars with parallel ridges indicate directional guidance, helping you follow a path or approach a specific area safely.
You can incorporate these helpful surfaces in numerous ways around your growing spaces. Consider installing textured pavers at garden bed entrances, tool shed doorways, or wherever ground level changes occur. The contrast between smooth concrete walkways and rougher textured sections creates instant awareness of transitions.
For a budget-friendly approach, try mixing materials you already have. Arrange river rocks in a distinct pattern before steps, use weathered brick to outline raised beds differently from main paths, or embed shells in concrete for unique tactile markers. Many gardeners find success with rubber tactile mats designed for outdoor use, which withstand weather beautifully and require minimal installation.
The beauty of tactile surfaces lies in their universal benefit. Everyone in your household, regardless of vision ability, gains clearer spatial awareness. When planning your tactile system, keep patterns consistent throughout your garden. If corduroy ridges mean “stairs ahead” in one location, use that same signal everywhere for reliable navigation.
Handrails and Supportive Structures
Creating a garden space that’s both safe and easy to navigate makes all the difference when you have low vision. Handrails and supportive structures serve a dual purpose: they help you find your way around and provide steady support as you move through your garden.
Permanent handrails installed along main pathways are wonderful investments. These can be simple metal or wooden rails mounted on posts, typically positioned at a comfortable height between 34 and 38 inches. They create a reliable tactile guide that lets you confidently navigate from one garden area to another. Think of them as your garden’s highway system, connecting raised beds, tool sheds, and seating areas.
For more flexibility, portable handrails are excellent options. These freestanding units can be repositioned as your garden layout changes with the seasons. Many gardeners find them particularly useful near steps, slopes, or transition areas between different garden levels.
Guide rails along pathways don’t need to be elaborate. A simple rope strung between posts at waist height provides guidance without obstructing the view for others. Some creative gardeners use chain-link borders or decorative garden edging that rises slightly above ground level, offering both a visual boundary and a tactile reference point you can follow with a cane or your foot.
Renowned accessibility gardener Marcus Chen shared with us that he installed bamboo rails throughout his garden, creating a natural-looking support system that blends beautifully with the landscape while providing essential navigation assistance. The key is choosing structures that feel intuitive and comfortable for your specific needs.
Lighting Solutions for Low Vision
Good lighting transforms a garden from inaccessible to inviting, especially when you’re working with low vision. The right illumination helps you move confidently along paths, spot tools you’ve set down, and enjoy your outdoor space during early morning or evening hours.
Solar pathway lights are garden champions for anyone needing reliable navigation. These stake-in-the-ground wonders automatically illuminate at dusk, marking borders and walkways without any wiring hassle. Position them every three to four feet along main paths, and consider adding extra lights at turns or steps where clear boundaries matter most. Many models now offer adjustable brightness levels, letting you customize the light intensity that works best for your eyes.
Motion-activated lighting gives you light exactly when and where you need it. These sensors detect movement and flood work areas with illumination as you approach. I spoke with Margaret Chen, an accessibility consultant who gardens despite macular degeneration, and she swears by motion lights near her potting bench and tool shed. “I’m not fumbling in shadows trying to find my pruners anymore,” she shared. The automatic shut-off also conserves energy while ensuring you’re never left working in darkness.
For task lighting, look for adjustable LED options with dimmer switches. Unlike harsh overhead lights that can cause glare or eye strain, dimmable LEDs let you dial in comfortable brightness. Choose fixtures with warm color temperatures around 2700-3000K, which provide better contrast than cool blue-white lights without overwhelming sensitive eyes. Explore various garden lighting options to find combinations that suit your specific vision needs and garden layout.
Tools That Help You Find Your Way
Magnification Devices for Garden Use
Getting up close with your plants doesn’t have to be a challenge when you have the right magnification tools at hand. Whether you’re trying to read tiny text on seed packets or examining leaves for pest damage, there are excellent options designed for outdoor gardening use.
Handheld magnifiers are the workhorses of the garden. Look for models with built-in LED lights, which really make a difference when you’re working in shadier spots. I’ve found that magnifiers with 3x to 5x magnification strike the perfect balance between enlargement and field of view. Choose ones with rubberized grips that won’t slip when your hands are damp or dirty, and consider attaching a lanyard so you can wear it around your neck for quick access.
Wearable magnification glasses are game-changers for hands-free gardening. These clip-on or head-mounted options let you keep both hands free for planting, pruning, or potting. Some experienced gardeners I’ve spoken with swear by their hands-free magnifiers, especially when transplanting seedlings or doing detailed work that requires precision.
For reading plant labels and seed packets, electronic magnifiers with high-contrast settings work wonderfully. Modern portable video magnifiers are increasingly weather-resistant and battery-powered, making them practical garden companions. They’re particularly helpful when lighting conditions aren’t ideal, as you can adjust brightness and contrast to suit your needs.
The key is finding what feels comfortable for your specific tasks. Many gardening centers will let you test different options, so don’t hesitate to try before you buy.
Audio and Sensory Navigation Aids
Navigating your garden with confidence becomes so much easier when you combine your other senses with helpful technology. Audio and sensory tools create invisible guideposts that help you move through your growing space independently.
Talking measuring tools have become wonderful companions for gardeners with low vision. These battery-powered devices announce measurements aloud as you check plant spacing, depth, or height. I’ve spoken with gardeners who say their talking tape measures have eliminated the guesswork from seed planting and made following garden plans completely manageable.
Audio plant labels are another game-changer. You can record information about each plant—watering schedules, bloom times, or special care instructions—and play it back whenever needed. Simply touch the device to the label and hear your own voice reminding you what’s growing there. Some gardeners create entire audio garden journals this way.
Wind chimes serve as charming spatial markers. Position different-sounding chimes at garden entrances, along pathways, or near specific beds. The gentle tinkling helps you orient yourself, especially on breezy days. Think of them as auditory landmarks that add beauty while providing navigation cues.
Smartphone apps designed for low-vision wayfinding have expanded beyond urban environments. Apps with audio GPS can help you map your garden layout, mark plant locations, and even set up audio beacons at specific spots. While technology might seem intimidating at first, many gardeners find these apps surprisingly intuitive and genuinely helpful for maintaining independence in their outdoor spaces.
Creating a Garden Layout That Guides You
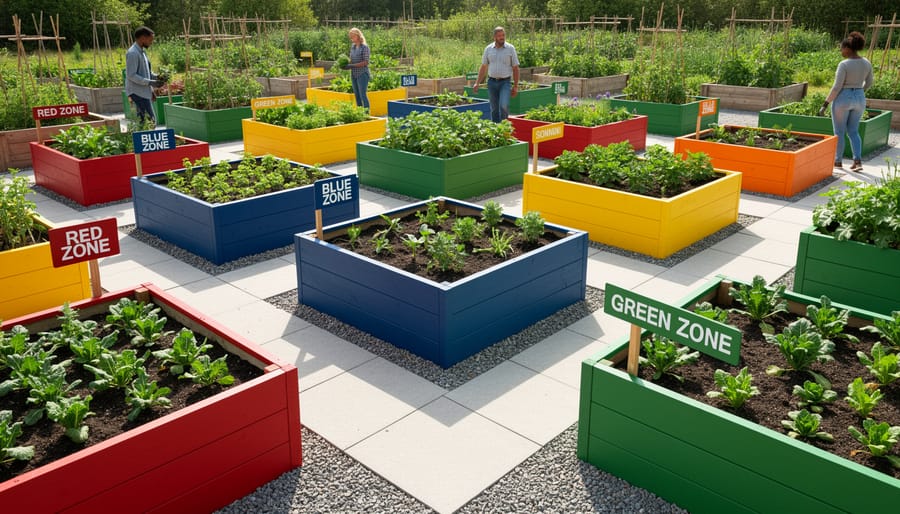
Color-Coded Garden Zones
Color-coding your garden creates a visual navigation system that makes moving around safer and more enjoyable. Think of it as creating a map you can see without needing to read signs or markers.
Start with high-contrast planters to define different zones. Bright yellow containers can mark your herb garden, while deep blue pots might designate your vegetable area. Paint existing raised beds in bold, contrasting colors like white against dark wood or orange against gray. These visual anchors help you locate specific areas at a glance, even from across the yard.
Consider painting vertical structures too. A red trellis becomes an instant landmark, while white-painted fence posts create clear boundaries. One gardener I spoke with painted her garden shed bright coral, transforming it into a beacon visible from anywhere in her space.
Strategic plant choices add another layer of visual guidance. Group plants with silver foliage along pathways to create glowing edges, especially beautiful in early morning or evening light. Plant masses of bright orange marigolds or deep purple salvia to mark entrances or transitions between zones.
The key is creating enough contrast between colors so they remain distinct. Avoid pairing similar shades like red and orange together. Instead, use complementary colors that pop against each other and your garden’s natural green backdrop.
Textured and Scented Landmarks
Creating textured and scented landmarks transforms your garden into an easy-to-navigate space where each area announces itself through touch and smell. Think of these markers as friendly signposts that guide you naturally as you move through your outdoor haven.
Aromatic plants work beautifully as living landmarks. Plant lavender near the entrance to your vegetable beds, rosemary along pathway edges, or mint beside your seating area. Each distinctive scent tells you exactly where you are without needing to see. I’ve spoken with gardeners who use this technique, and they describe it as their garden “talking” to them through fragrance.
Textured materials offer equally reliable cues. Try placing smooth river rocks at pathway intersections, rough bark mulch around tree bases, or corrugated edging along raised beds. Your hands and feet instantly recognize these different surfaces. This approach fits perfectly into sensory garden design principles that benefit everyone, not just those with low vision.
Wind chimes, small water features, or rustling ornamental grasses add auditory landmarks too. Position a bamboo stake wind chime near your tool shed or a small fountain by the herb garden. These gentle sounds create a mental map of your space that grows more detailed with each visit, building confidence and independence in your gardening journey.
Raised Bed Systems as Wayfinding Tools
Raised beds offer a wonderful solution that goes beyond making gardening more comfortable—they actually help you navigate your garden space with greater confidence. When you construct beds with clear, distinct edges, you’re creating natural pathways and landmarks that are easy to feel and follow.
Think of your raised bed gardening area as a grid system. The raised edges become tactile guides you can trace with your hands or even a walking cane. As you move through your garden, these solid borders tell you exactly where you are and where the next bed begins. Many gardeners find that beds raised 12 to 24 inches high are ideal—high enough to locate easily but still comfortable for reaching plants.
The pathways between beds become just as important as the beds themselves. Keep them wide enough for safe movement, ideally three to four feet across. Some gardeners add different textures to pathway surfaces—smooth pavers near the entrance, mulch in the middle sections—creating a sensory map of their garden layout.
You can further enhance wayfinding by varying bed sizes or arranging them in memorable patterns. One experienced gardener I spoke with uses square beds for vegetables and rectangular ones for herbs, making it simple to locate what she needs without relying solely on sight.
Real Gardener Story: Maria’s Adaptive Garden Journey
Maria Chen discovered her passion for gardening in her fifties, just a few years before age-related macular degeneration began affecting her central vision. Rather than abandoning her beloved hobby, she transformed her backyard into an accessible haven that proves low vision doesn’t mean giving up the activities you love.
“At first, I was devastated,” Maria shares from her Seattle garden, where raised beds overflow with vegetables and herbs. “I thought my gardening days were over. But my occupational therapist encouraged me to adapt rather than quit, and that changed everything.”
The game-changer for Maria was installing high-contrast pathway edging. She chose bright yellow rubber borders that clearly define where paths end and planting areas begin. “I can’t tell you how much confidence this gave me. Before, I was constantly worried about stepping on my plants or tripping. Now I move around independently without hesitation.”
Her second essential addition was a collection of brightly colored hand tools with thick, ergonomic grips. “The neon orange handles are so much easier to spot against the soil than traditional wooden or gray tools,” she explains. “I used to spend more time searching for my trowel than actually planting!”
Maria also installed solar-powered pathway lights along all her garden routes. While they’re functional at night, she appreciates them most during the day. “The light fixtures themselves serve as visual markers. I know exactly how many steps between each light to reach my tomato bed or herb spiral.”
Her most creative solution involved winding colorful surveyor’s tape around plant stakes and tomato cages. “Those thin green stakes were impossible for me to see. I’d walk right into them and nearly poke my eye out!” she laughs. “The bright pink and orange tape solved that problem for about three dollars.”
When asked what advice she’d give others with low vision who want to garden, Maria doesn’t hesitate: “Start small and don’t be afraid to experiment. What works for someone else might not work for you. I tried talking plant labels before settling on large-print tags with high contrast. The important thing is to keep gardening and keep adapting. My garden brings me so much joy, and I refuse to let low vision take that away.”
Budget-Friendly Adaptive Solutions You Can Make
DIY High-Contrast Pathway Markers
Creating your own high-contrast pathway markers is easier than you might think, and it’s a wonderful weekend project that makes garden navigation safer and more enjoyable. I’ve helped several friends with low vision tackle this, and the results are always impressive.
Painted rocks are my favorite go-to solution. Choose smooth, flat rocks about fist-sized or larger, and paint them with bright, outdoor acrylic paint in colors like white, yellow, or orange. These colors provide excellent contrast against soil and grass. Space them every two to three feet along your path edges. One gardener I interviewed, Martha, painted hers with glow-in-the-dark paint, which helps during dusk watering sessions.
Bright tape offers another quick solution. Heavy-duty electrical or duct tape in fluorescent colors works wonderfully on wooden stakes or existing garden borders. Just wrap it around stakes placed at regular intervals. The tape is weather-resistant and incredibly visible, even in changing light conditions.
Reflective materials take things up a notch. Stick reflective tape strips on wooden posts, or use reflective garden stakes from hardware stores. These catch sunlight during the day and any outdoor lighting at night, creating brilliant visual guides.
The key is consistency. Whatever method you choose, keep the spacing uniform and use the same bright color throughout. This creates a reliable pattern your eyes can follow easily. Start with one path to test what works best in your garden’s lighting conditions, then expand from there. The investment is minimal, but the independence gained is priceless.
Homemade Tactile Garden Maps
Creating your own tactile garden map is a wonderfully practical project that transforms how you navigate your outdoor space. Think of it as your personal GPS, designed specifically for your hands rather than your eyes.
Start with a sturdy base like corkboard, foam board, or even a wooden tray with raised edges. The key is choosing materials that represent different garden features through distinct textures. I’ve found that sandpaper works brilliantly for pathways, felt or velvet for planting beds, and small pebbles glued in place for gravel areas. Corrugated cardboard can indicate raised beds, while smooth stones mark important landmarks like water features or seating areas.
Consider the scale that works best for you. A smaller map might cover your whole yard, while larger versions can detail specific garden sections with more precision. Use hot glue or fabric glue to secure materials firmly, ensuring everything stays put even with regular handling.
I spoke with Maria Rodriguez, a landscape designer who specializes in accessible gardens, and she shared this tip: “Add braille labels or textured stickers at key locations. It transforms a simple map into a truly personalized navigation tool.”
Keep your map near your garden entrance or wherever you prepare for gardening sessions. Run your fingers across it before heading out to refresh your mental picture of the layout. Over time, this tactile reference becomes second nature, building confidence as you move through your garden independently. You can update it seasonally as your garden evolves, making it a living document of your growing space.
Making the Most of Your Adaptive Equipment
Getting the most from your adaptive equipment means treating it as part of your regular gardening routine, just like watering and weeding. Start by testing new tools during good weather when you have plenty of energy and patience. This gives you time to adjust and make improvements before challenging conditions arrive.
Seasonal changes require different approaches. In spring and summer, high-contrast markers work beautifully against green foliage, but autumn leaves might camouflage them. Consider switching to reflective tape or brighter colors during fall. Winter weather can fade painted markers and damage electronic devices, so bring battery-powered items indoors and refresh painted surfaces annually. I’ve found that dedicating one afternoon each season to checking and updating markers saves frustration later.
As your vision changes, don’t hesitate to modify your system. What worked last year might need adjustment now. Perhaps those yellow markers need upgrading to orange, or your talking plant labels require fresh batteries more frequently. Keep a simple notebook in your potting shed to track what works and what doesn’t. These observations become invaluable over time.
Maintenance doesn’t need to be complicated. Wipe down tactile markers monthly to keep them noticeable under your fingers. Replace worn rope or chain pathways before they become tripping hazards. Test electronic devices regularly rather than discovering dead batteries mid-garden session.
Combine multiple adaptive gardening techniques for best results. Pair tactile ground markers with scented plant borders, or use both audible timers and high-contrast plant labels. Redundancy isn’t wasteful; it’s smart planning that keeps you gardening confidently.
Remember, renowned gardener Tom Sullivan always says that adaptive equipment should simplify your gardening, not complicate it. If something feels cumbersome, modify it. Your garden is your space, and your equipment should serve you, not the other way around. Trust your instincts and adjust freely.
Living with low vision doesn’t mean saying goodbye to the garden you love. With the right adaptive equipment and a willingness to experiment, you can continue nurturing plants, enjoying the outdoors, and experiencing all the therapeutic benefits that gardening brings. The key is starting small and building your toolkit gradually.
You don’t need to invest in every adaptive solution at once. Begin with one or two tools that address your biggest challenges, whether that’s navigating pathways safely or identifying plant markers. As you gain confidence, you can add more equipment that enhances your independence and enjoyment. Remember, gardening is a journey, and adapting your methods is simply part of that adventure.
What makes this journey even more rewarding is the incredible support within the gardening community. Gardeners are some of the most generous, resourceful people you’ll meet, always ready to share tips, modifications, and encouragement. Many have faced their own challenges and found creative solutions worth celebrating. Your experience with low vision brings a unique perspective that enriches this diverse community.
The garden is a place of growth, not just for plants, but for ourselves. It welcomes everyone, regardless of visual ability, offering texture, fragrance, sound, and taste alongside its visual beauty. By embracing adaptive equipment and techniques, you’re not working around a limitation but discovering new ways to connect with nature. Your garden is waiting, and it’s more accessible than you might think.